iA Writer for Mac helps you to distinguish between Human generated text and Other sources (such as AI).
When the feature is enabled you can quickly see the difference in a document:
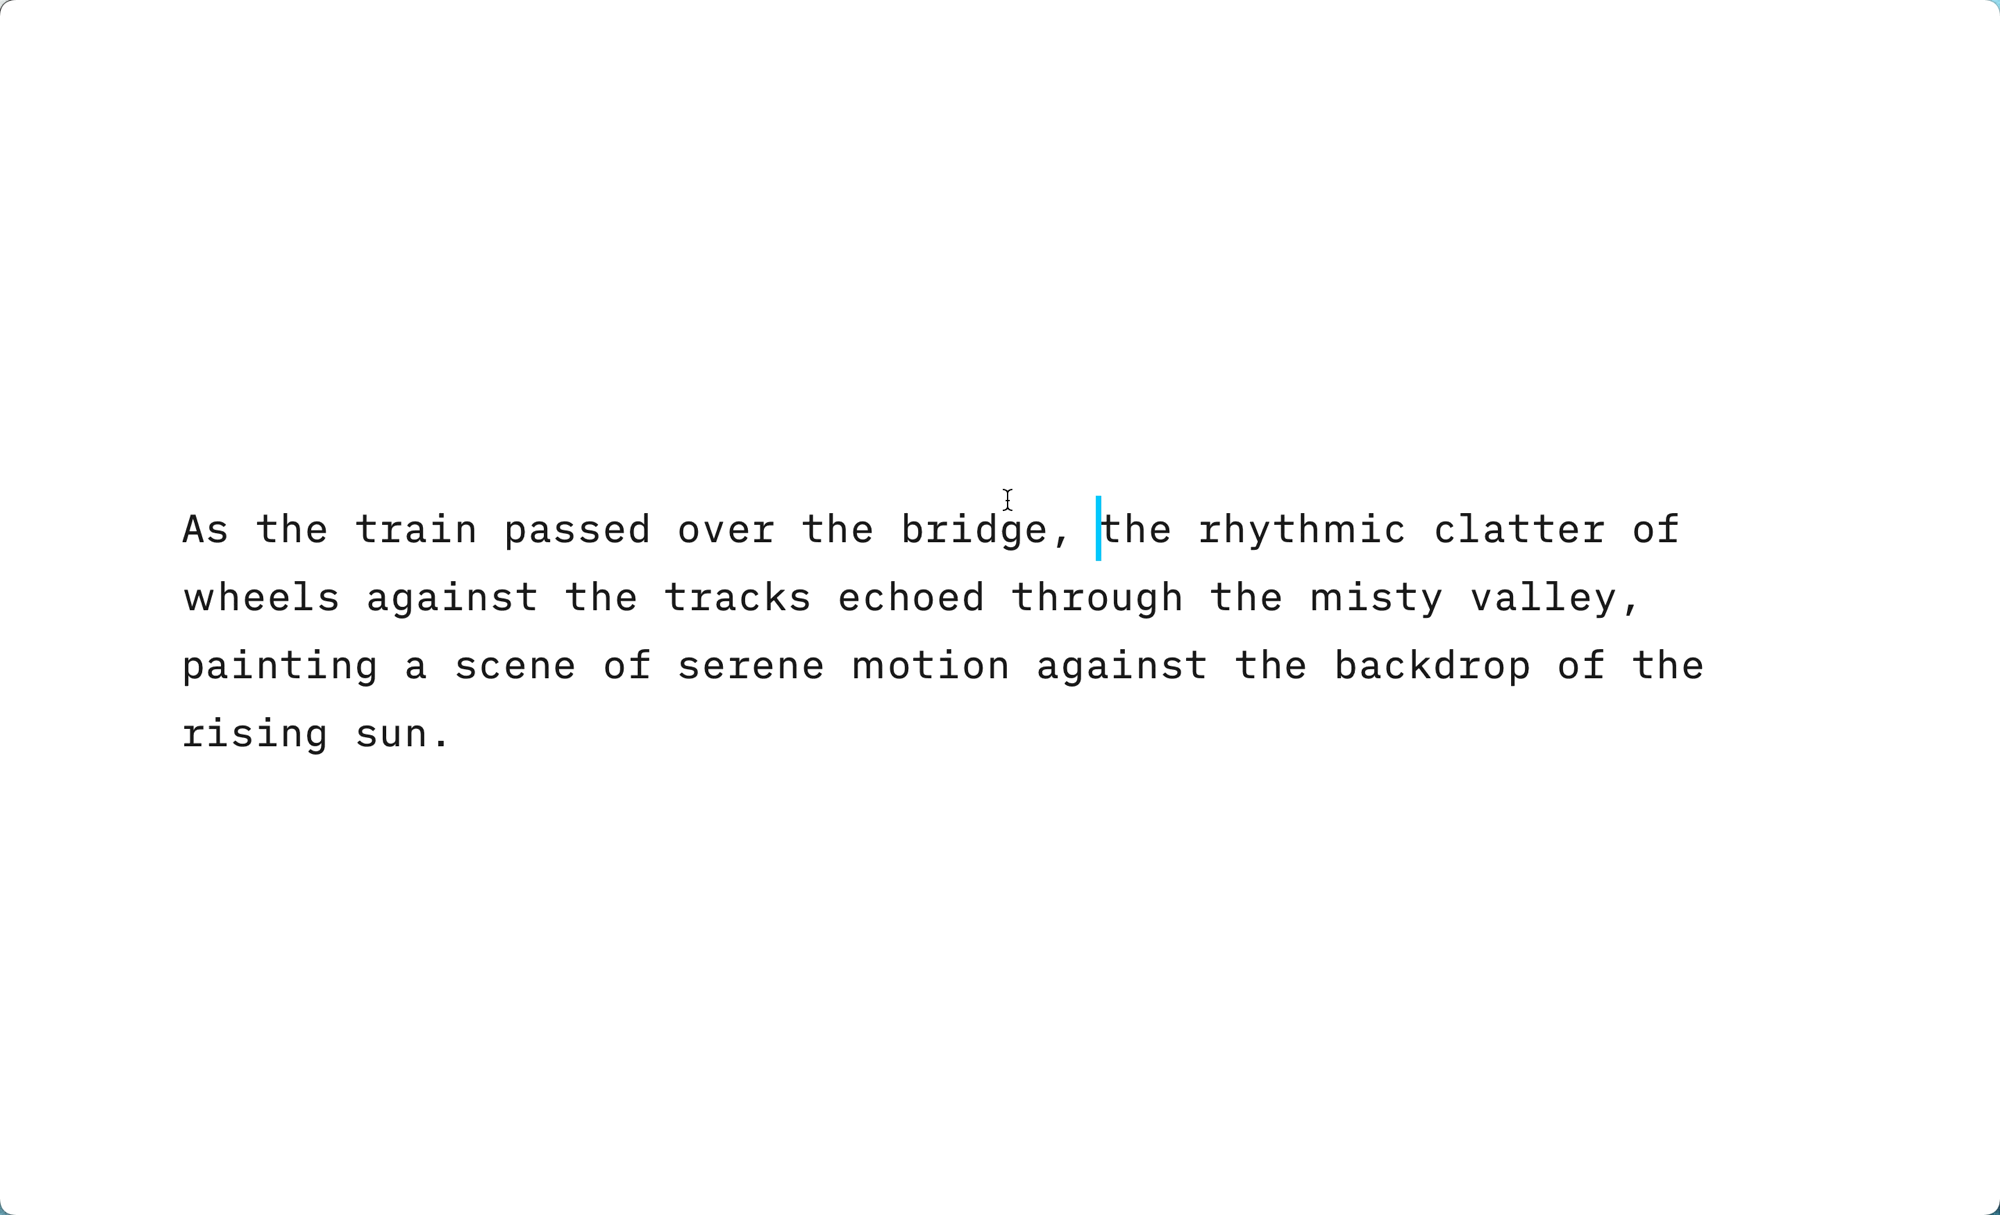
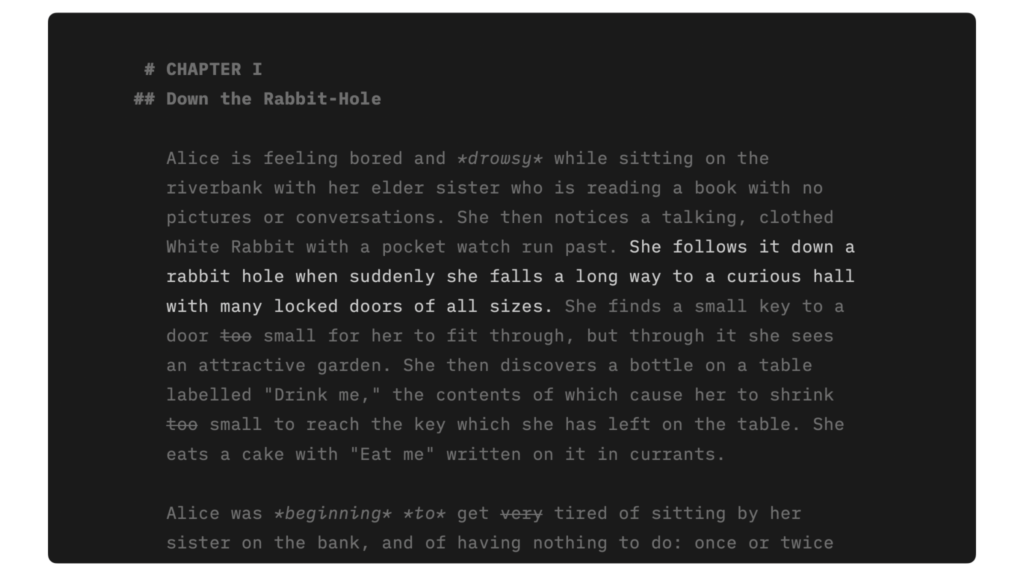
When you make edits to text as the primary author, your text remains in full focus and you can clearly see where your text ends and externally sourced content starts.
Note: Authorship does not modify your content in anyway and your text is not sent to a server to detect authors. Everything happens locally on your device: Your data is yours, in compliance with our Privacy Policy.
You can always mark a selection or paste as any type of author into a document. To see the distinction in the Editor you need to enable the appropriate Editor settings.
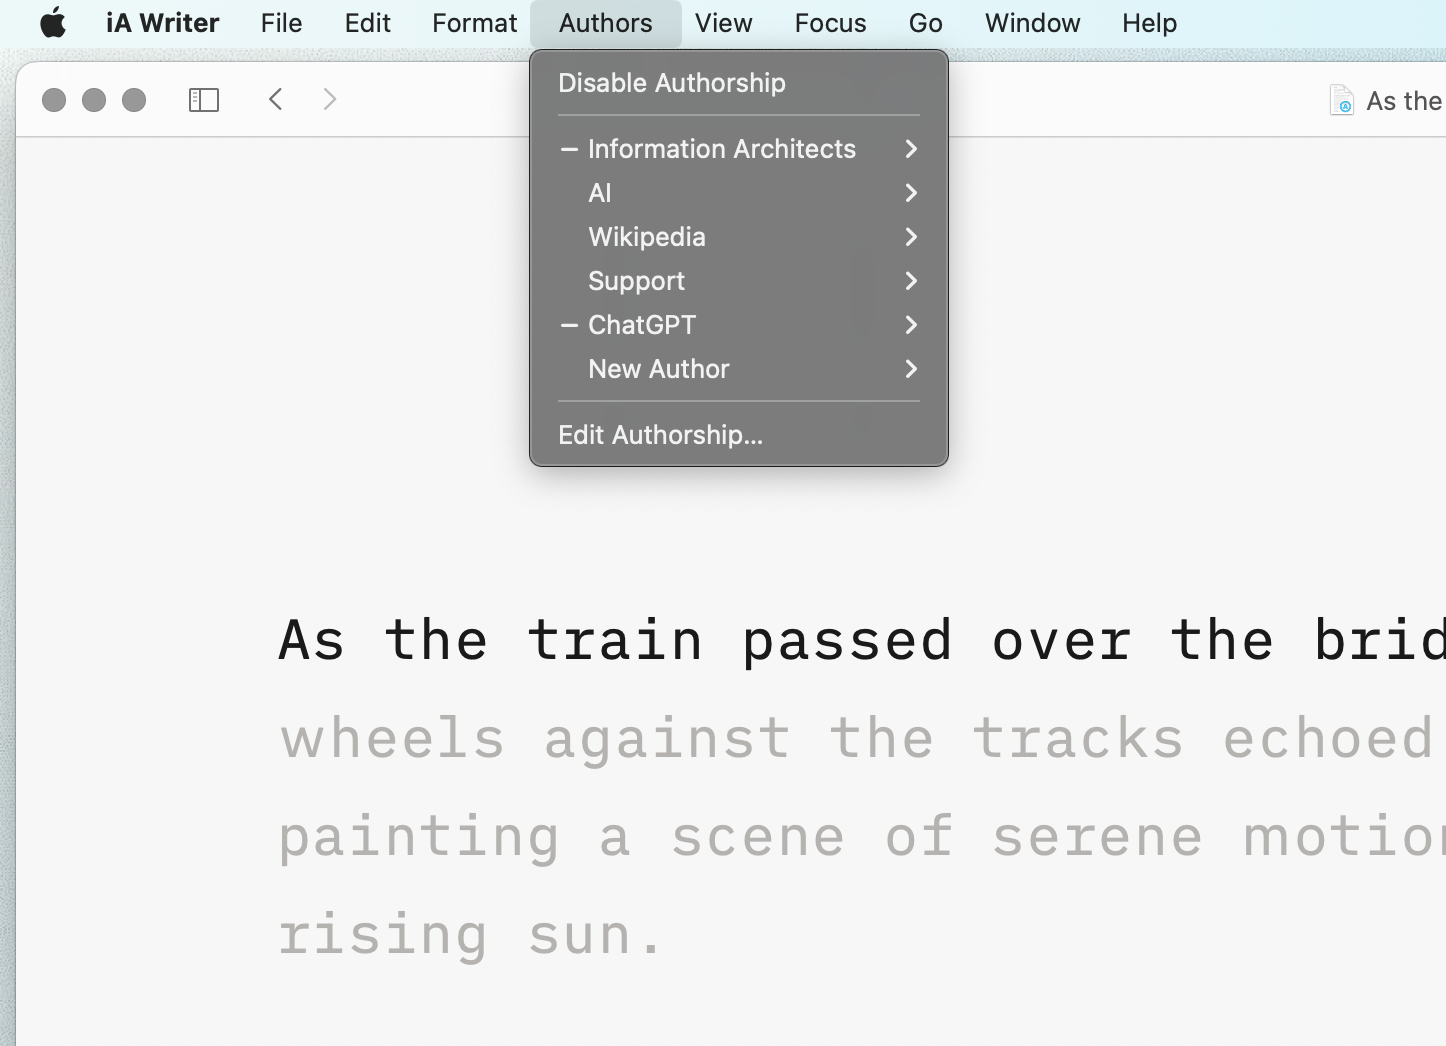
You can enable Authorship in one of three ways:
| Settings pane | Editor → Authors: |
| Focus Menu | Show Authors |
| Editor’s Title Bar | Select the Focus dropdown |
| Keyboard shortcut | ⇧ ⌘ A |

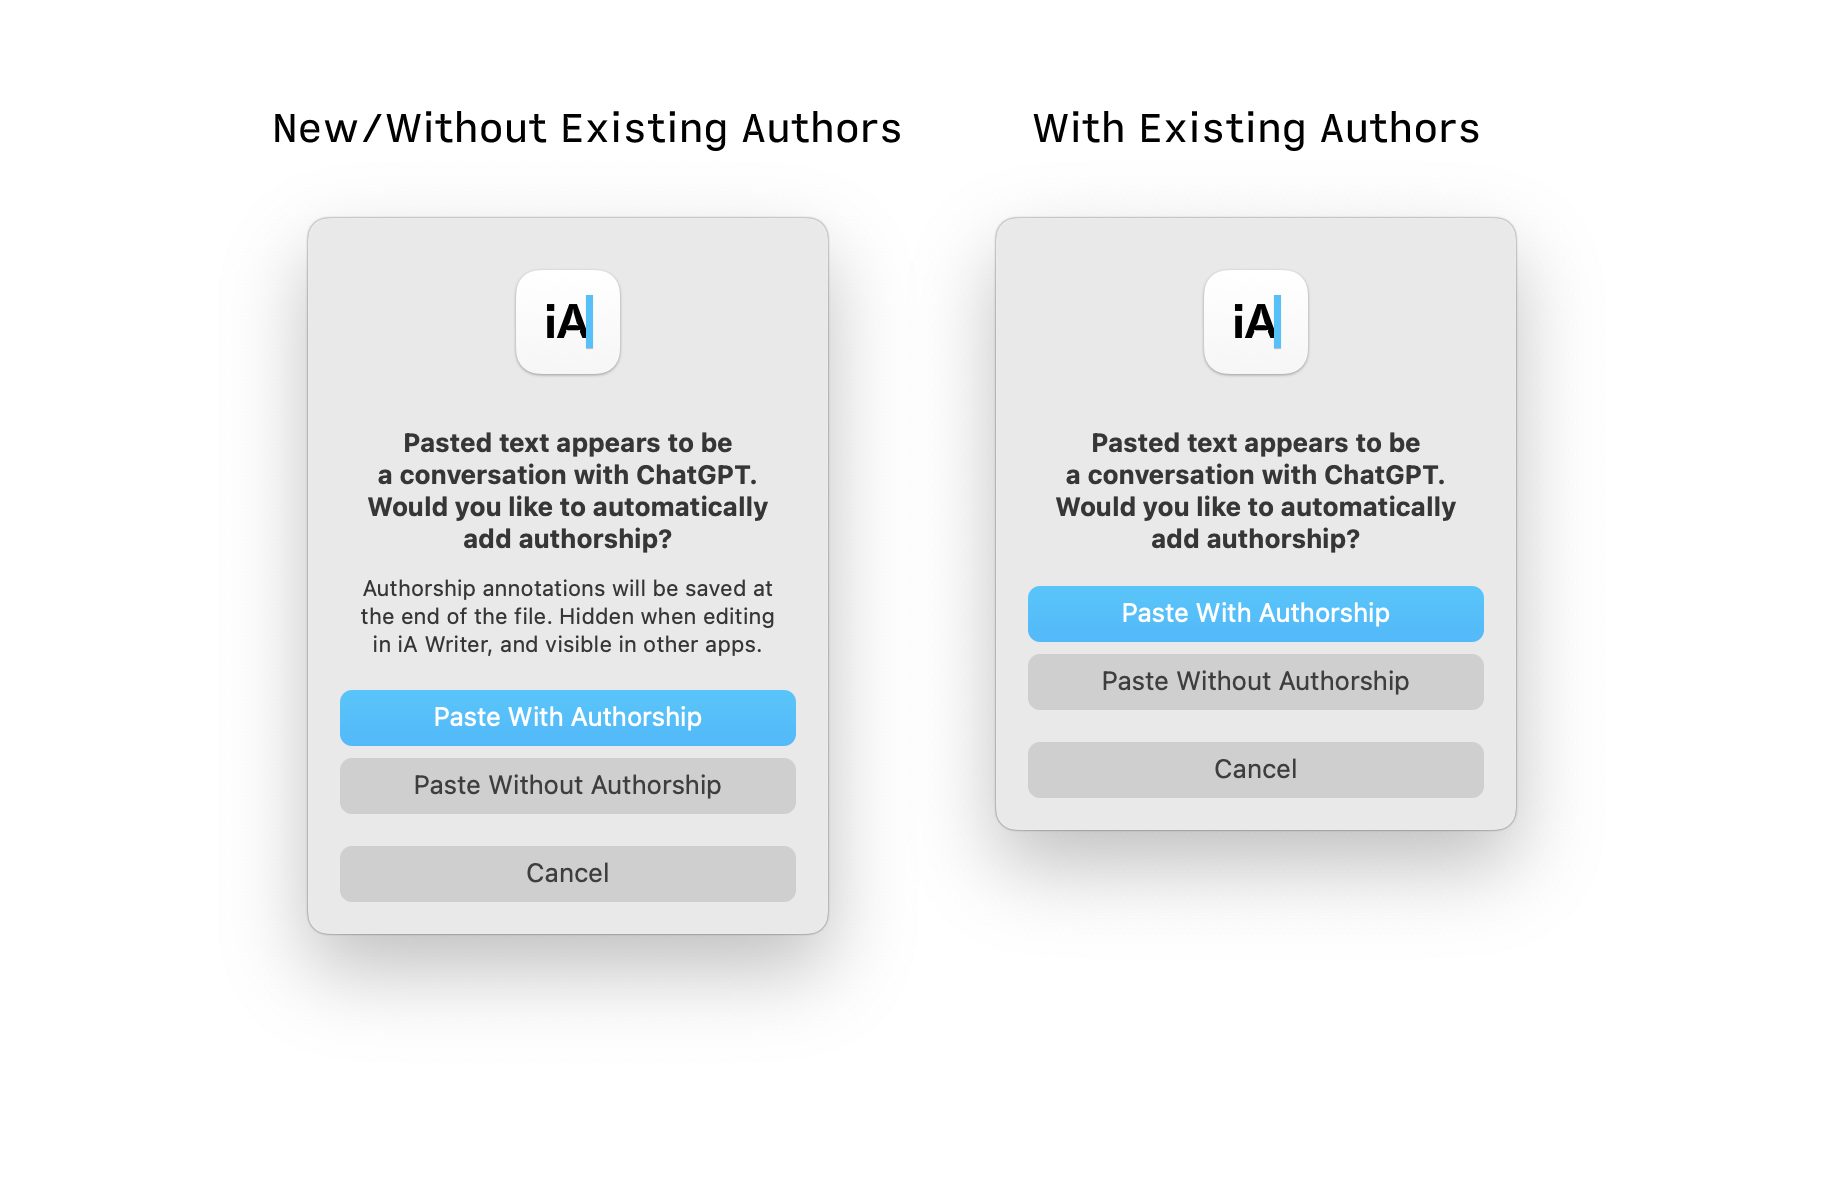
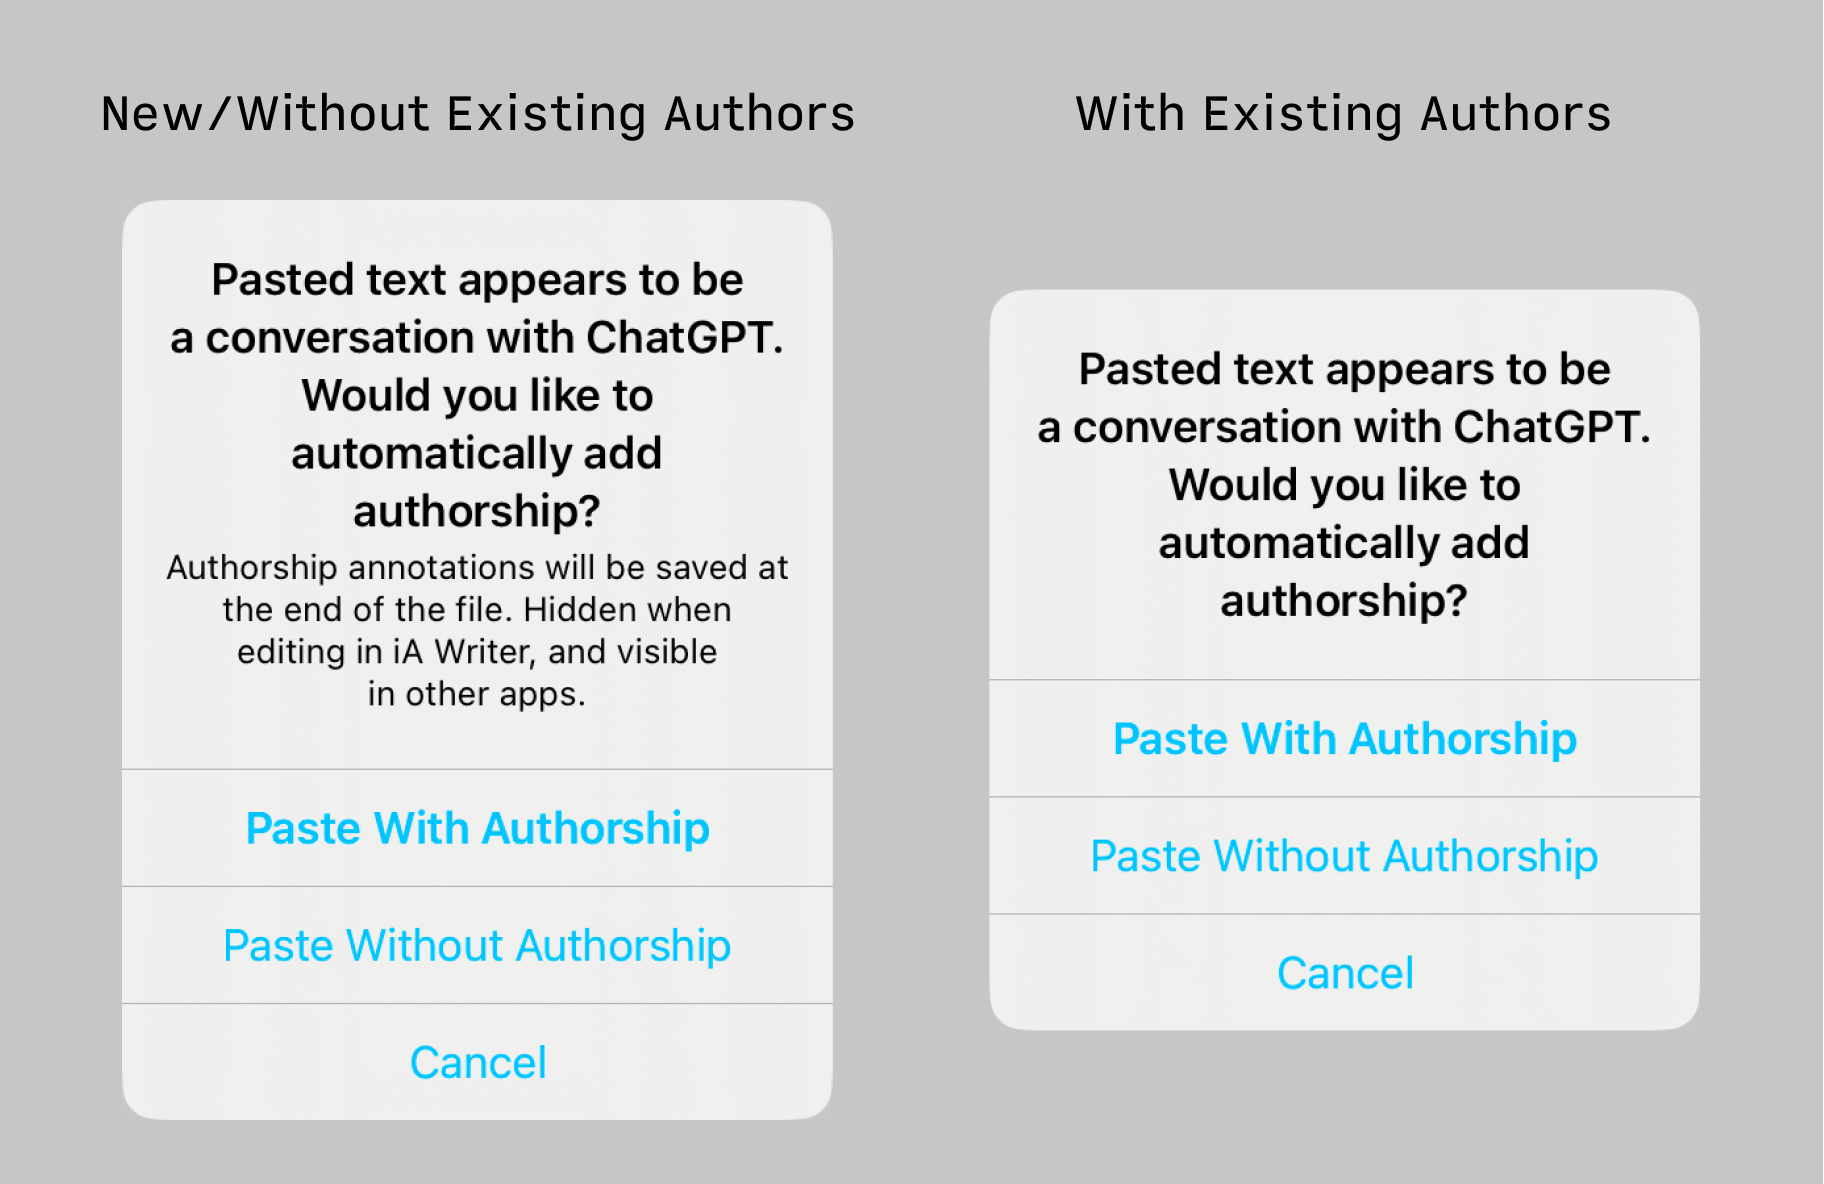
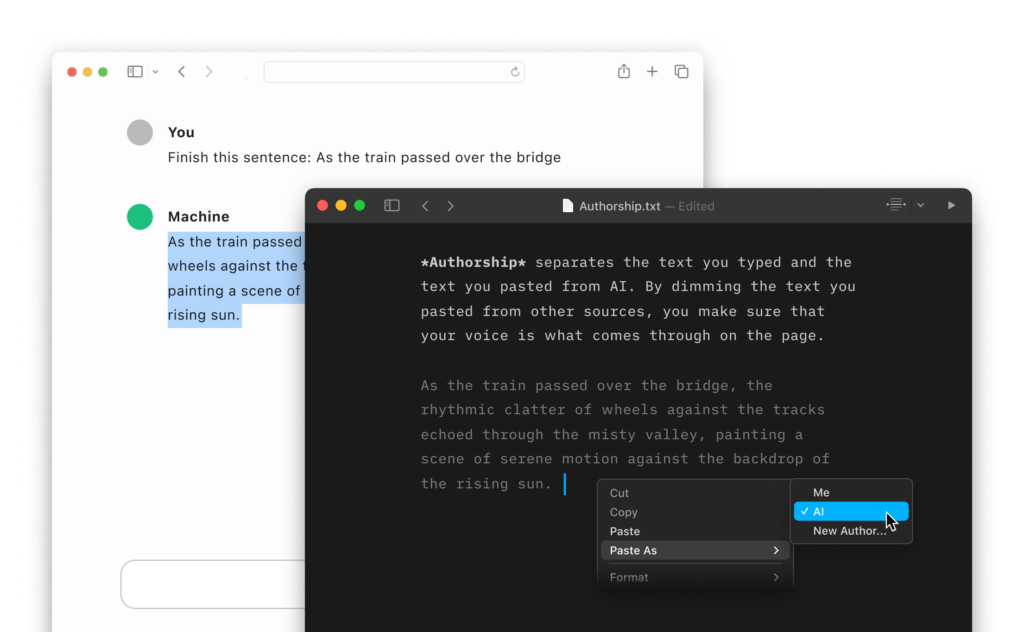
When you copy and paste a conversation from ChatGPT, the copied text contains “You” before every question, and “ChatGPT” before every answer. We recognize this pattern and offer to automatically mark authorship when coming from ChatGPT.
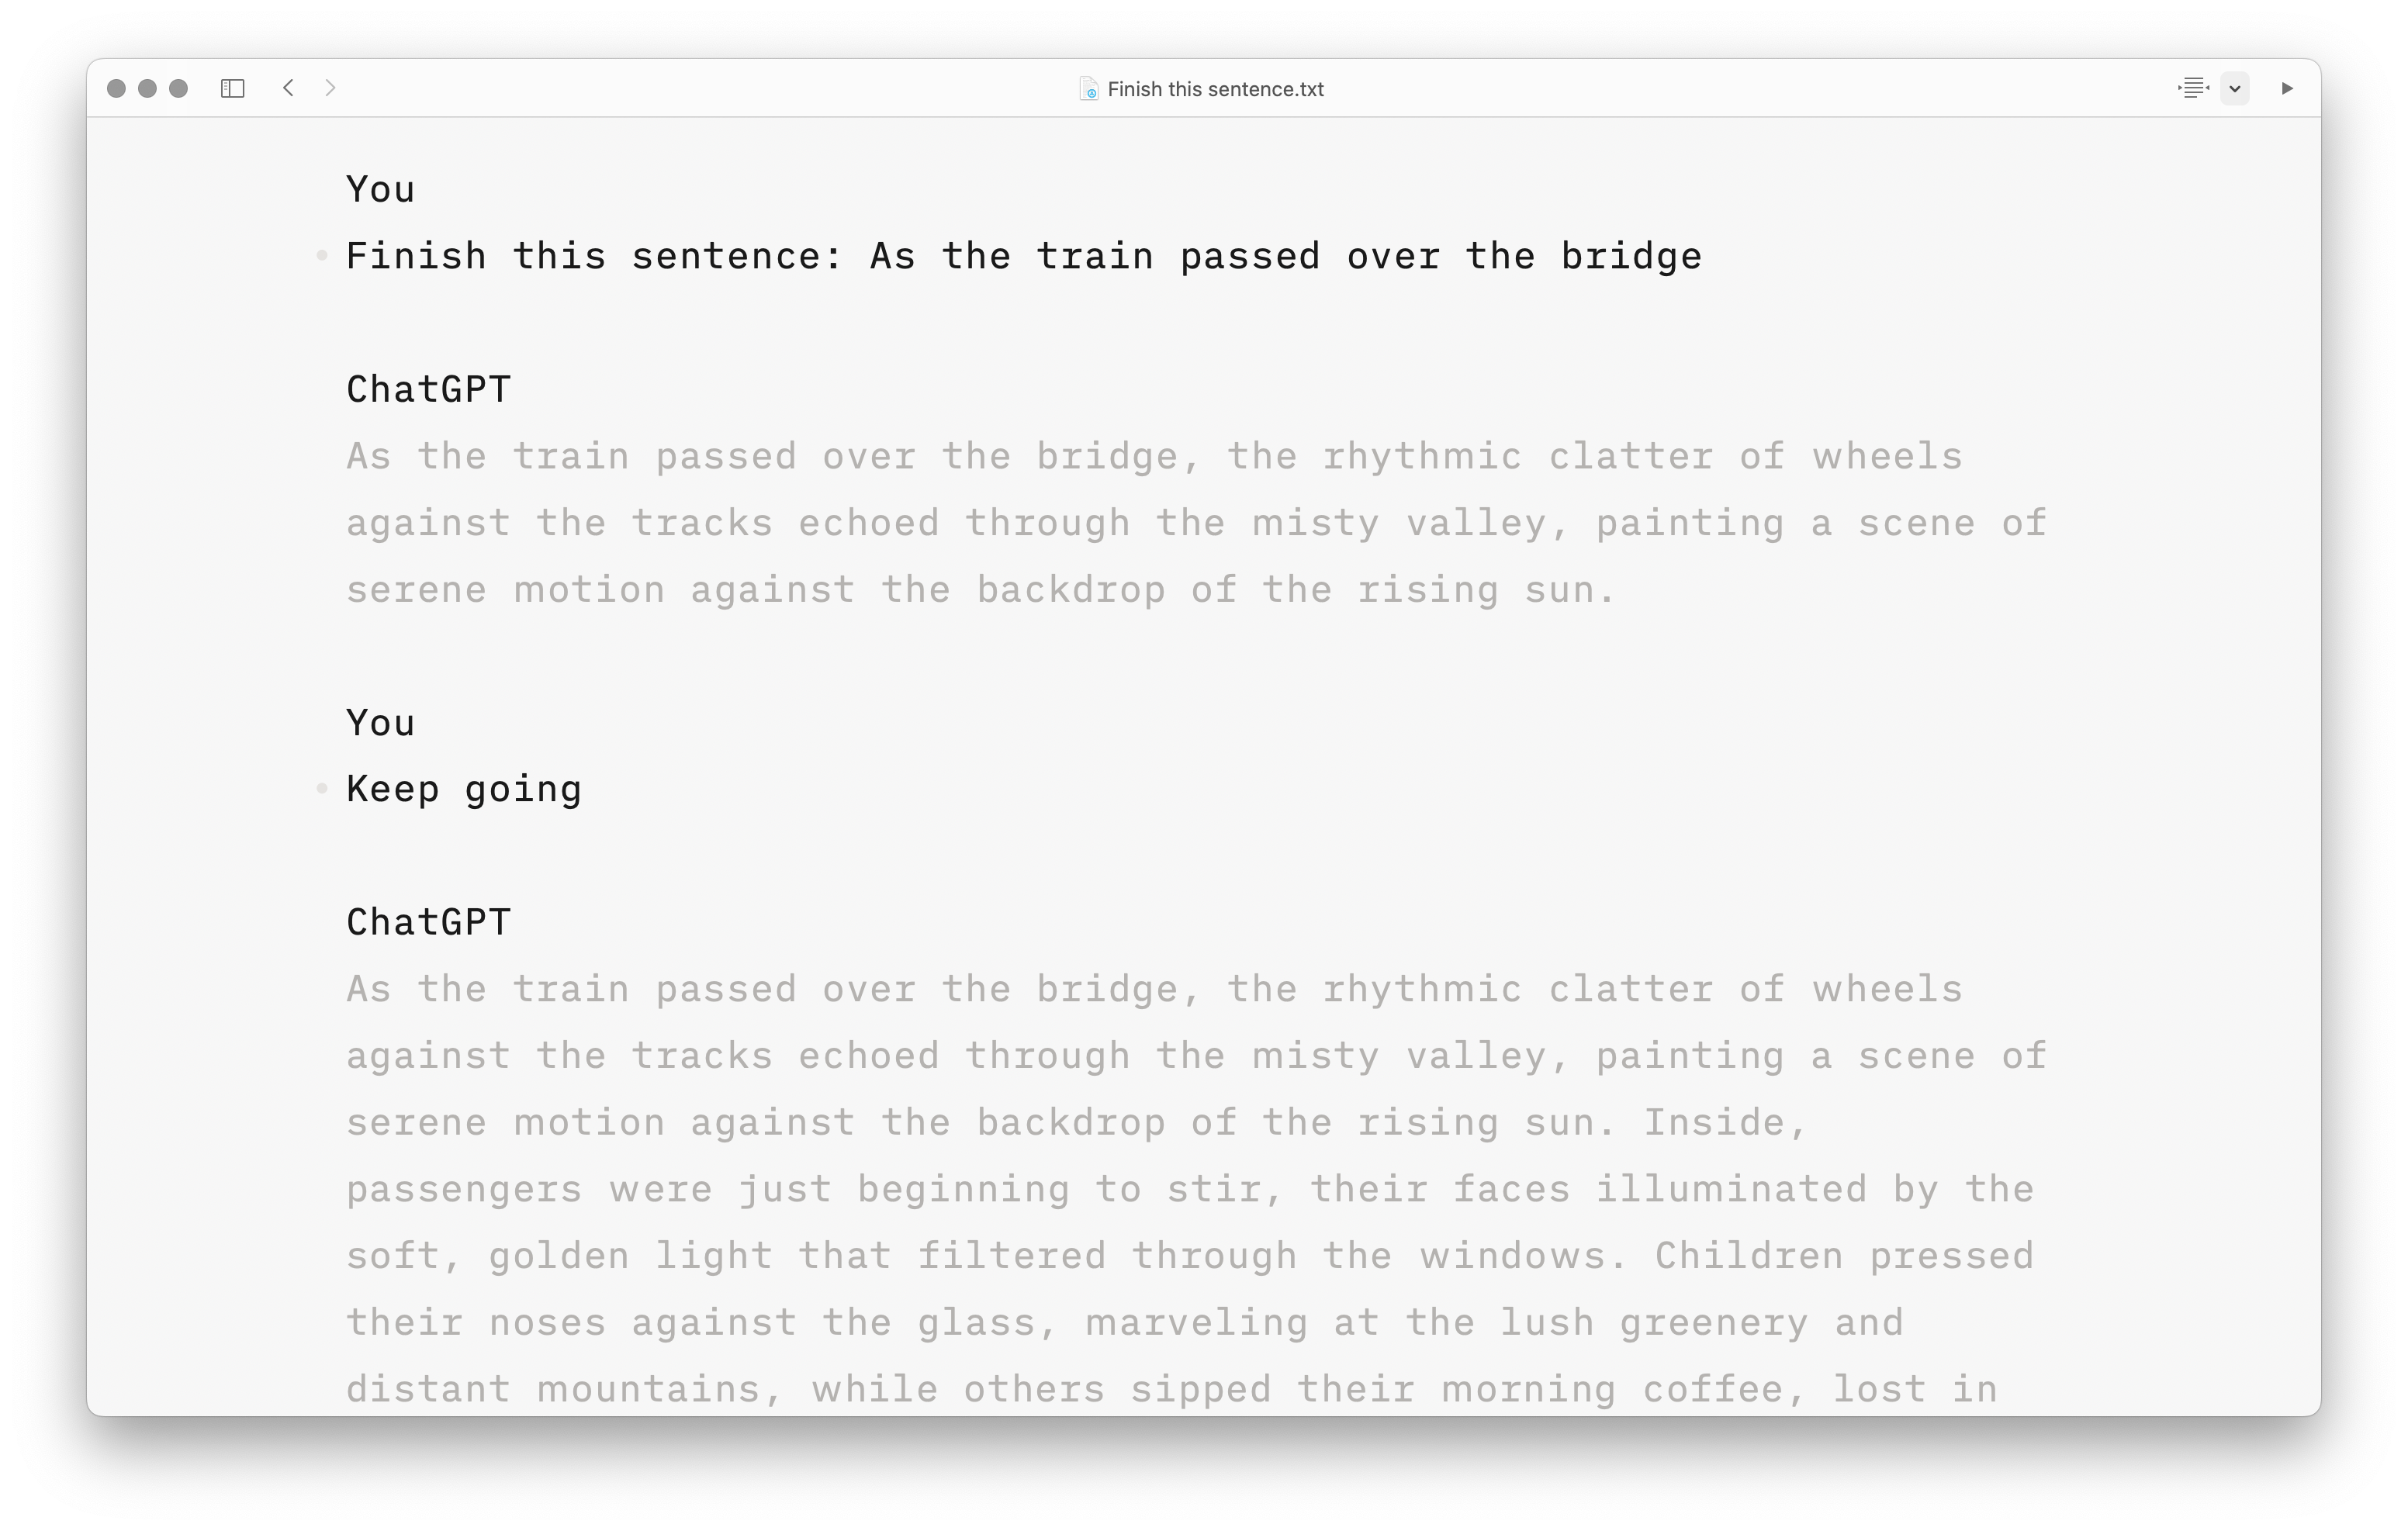
To use it : select the text you wish from ChatGPT and paste into the Editor. You’ll see a prompt letting you choose whether to paste with or without authorship.
Apart from ChatGPT, Writer will rely on you defining the authorship by yourself. Pasting content from an external source with Authorship attribution is easy.
With some text on clipboard:
| Right-Click | Right-click in Editor and select Authors → {desired author} → Paste | |
| Authors Menu | Navigate to menu bar Authors → {desired author} → Paste as {desired author} | |
| Keyboard Shortcut | Paste content as the top secondary author using the keyboard shortcut: ⇧ ⌘ V | |
💡 You can map any menu item including Authors functions. To learn more please see the support article for Shortcuts
Sometimes you may want to copy/move text from one document to another/ a new one. If your selected text contains author data, iA Writer will give you the option to Paste With Annotations or Paste:
| Paste With Annotations | Authorship information is retained and added at the end of the of the receiving document. | |
| Paste | Text is pasted without Authorship data. | |
When editing documents you can attribute existing text to a specific author. This is helpful not only for your own documents but also for shared/collaborative documents when you wish to clearly discern between authors.
After selecting a range or ranges of text:
| Right-Click | Right-click in Editor and select Authors → {desired author} → Mark Selection | |
| Authors Menu | navigate to menu bar Authors → {desired author} → Mark Selection as {desired author} | |
By default the second author (immediately following you, the primary author) is mapped to the ⇧ ⌘ V keyboard shortcut for pasting.
Since the list of Authors is flexible and unique to each user, you can map your own Paste as … and Mark selection as … to any unreserved shortcut. Here’s how:
keyboard shortcutsManaging a list of authors is easy in Writer. You can access this function in: Settings → Authors
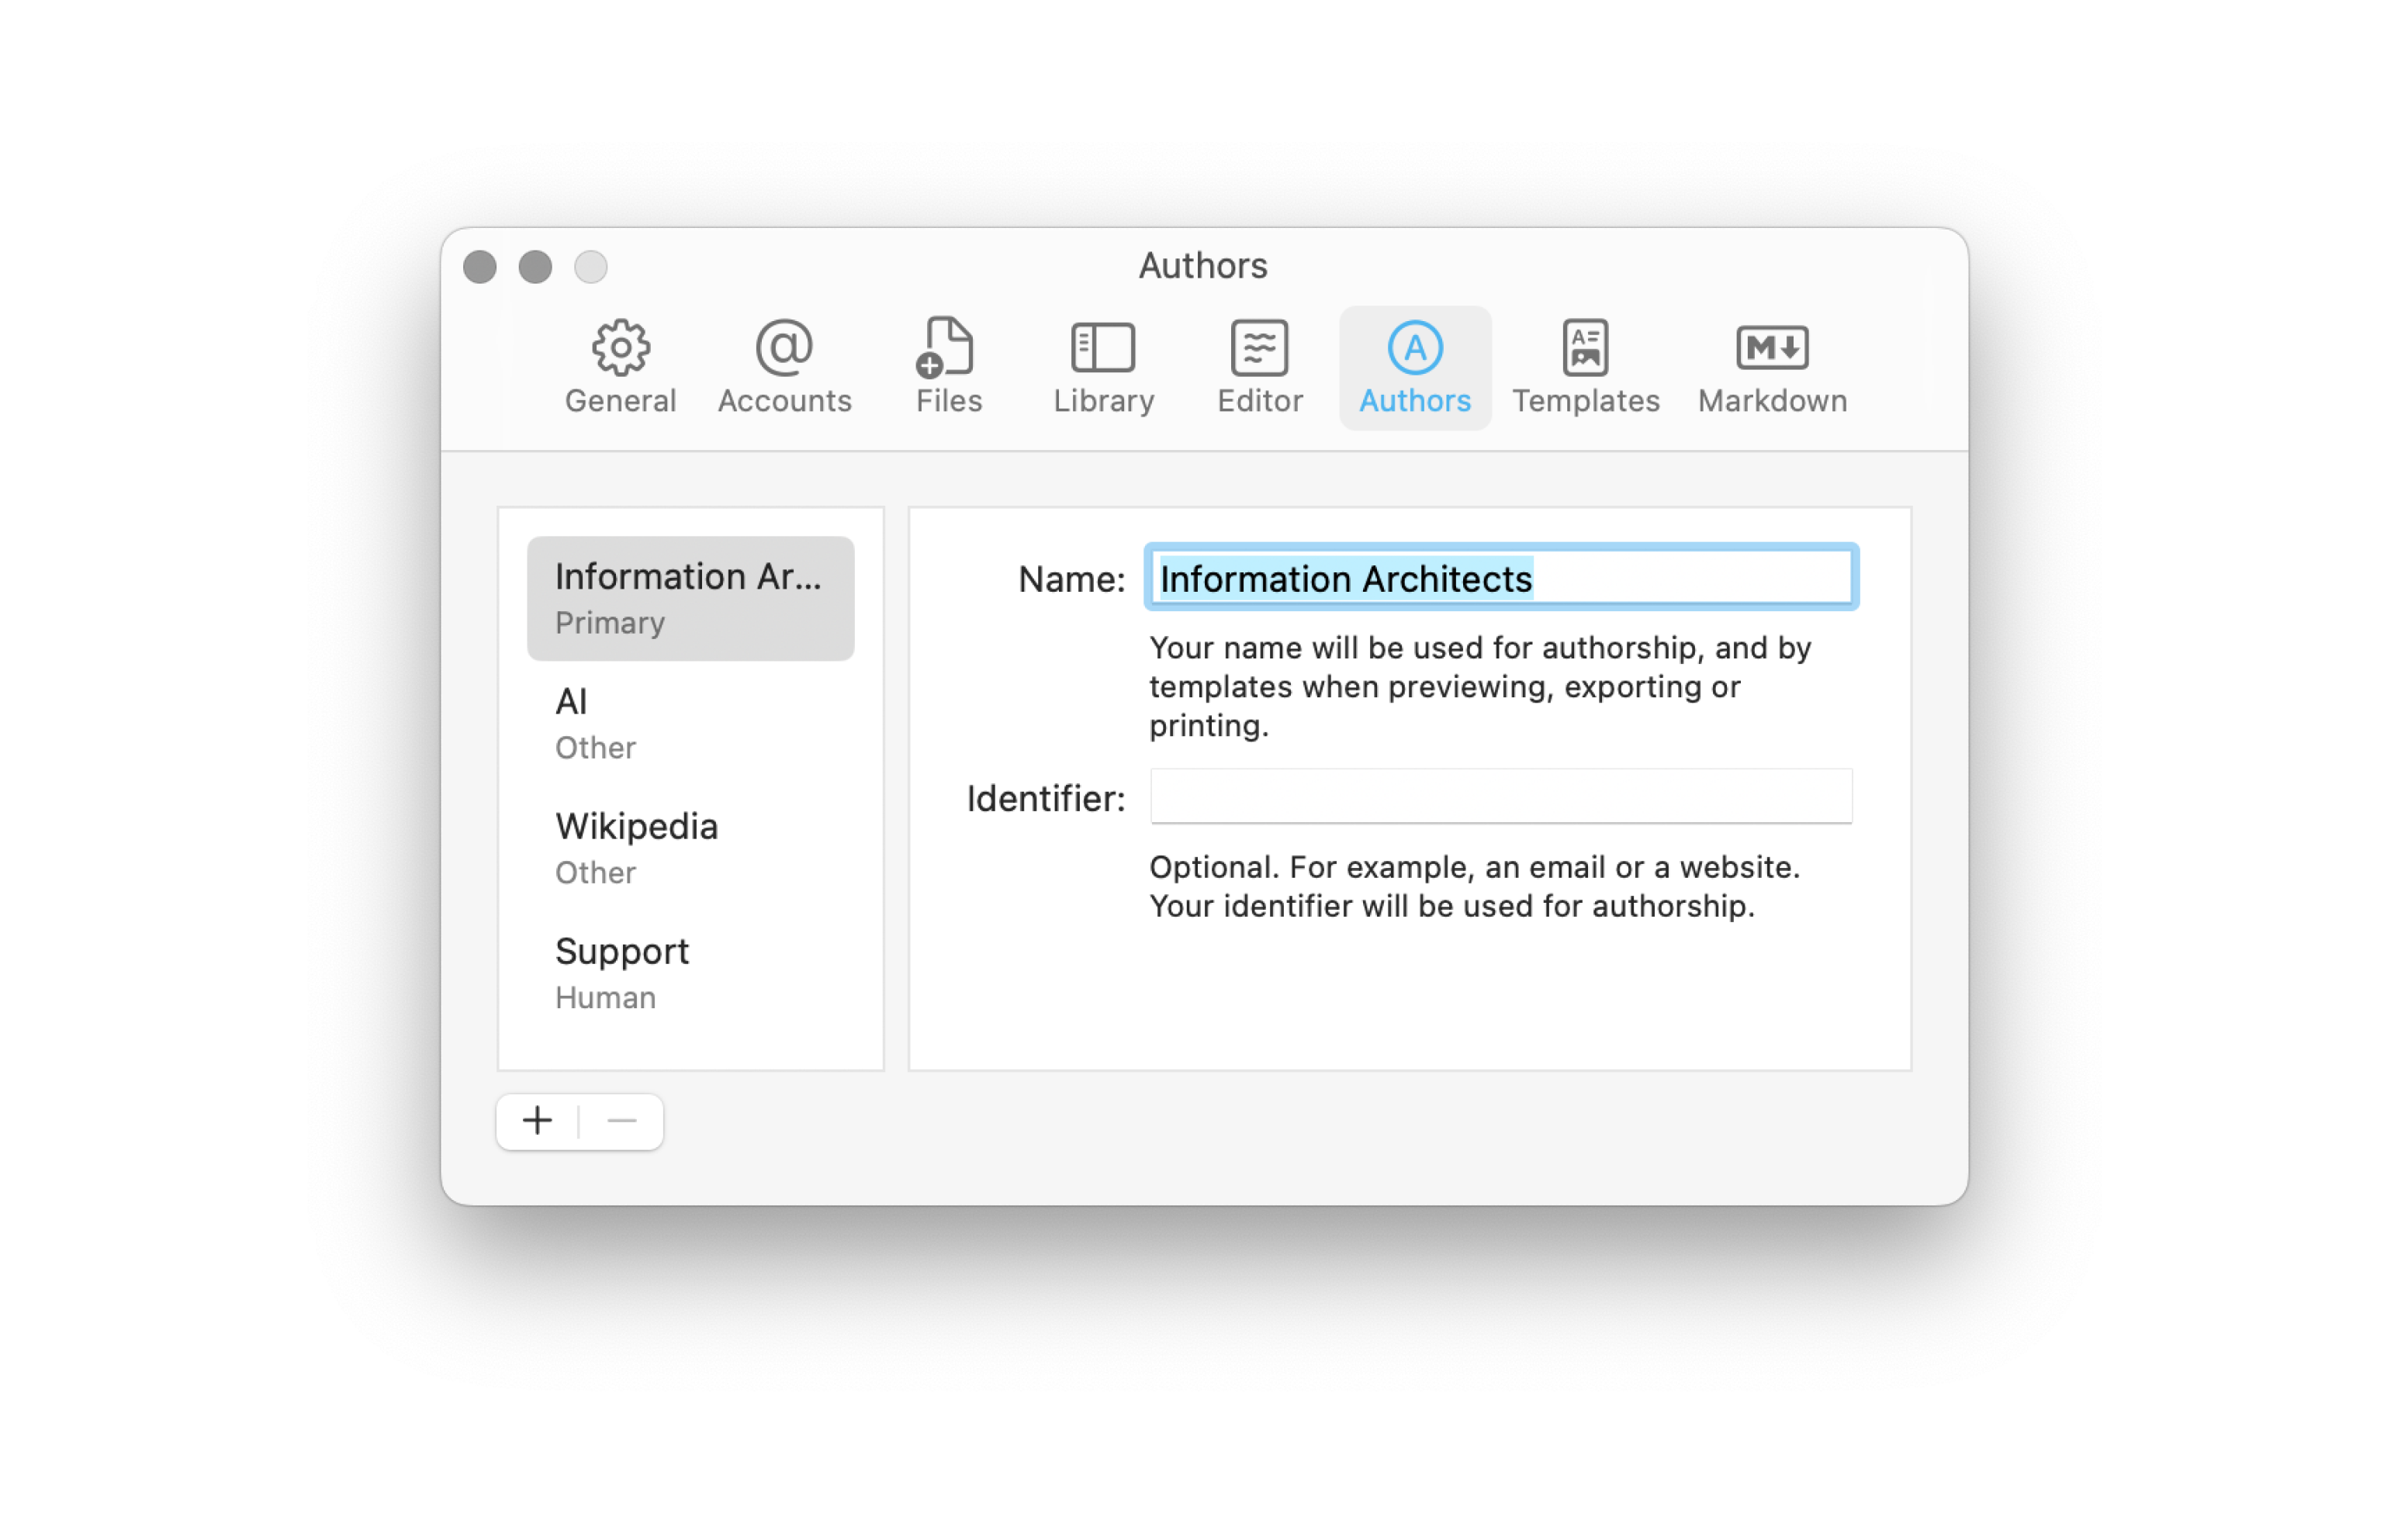
In Authors settings you can:
Click on the + to add a new author. You’ll be prompted to add a Name and can also add an identifier (like website, or email address). User the Kind dropdown to designate your author as Human or Other (i.e. Websource, AI, etc.).
When you are finished press return to save details.
To remove an existing author, select the author in the list and click on the -. Note the removing the author does not remove authorship assigned in existing documents. You can always re-add an author following steps in the section above.
💡 Authors sync to Writer on other devices with iCloud. If you add an author on one device, you’ll see it added everywhere, automatically.
| Name | Required. Name of the author. Paste and Mark menu options use this name. | |
| Identifier | Optional identifier for author. Can be used to assign a website, email, etc. Can also be used to differentiate authors with same name. | |
| Kind | Author type. Designate Human or Other for author. | |
You can reorder authors to change how they appear in menu options. Simply click (hold) and drag authors into desired order. The top author immediately following the primary author is automatically assigned to the Paste As shortcut: ⇧ ⌘ V
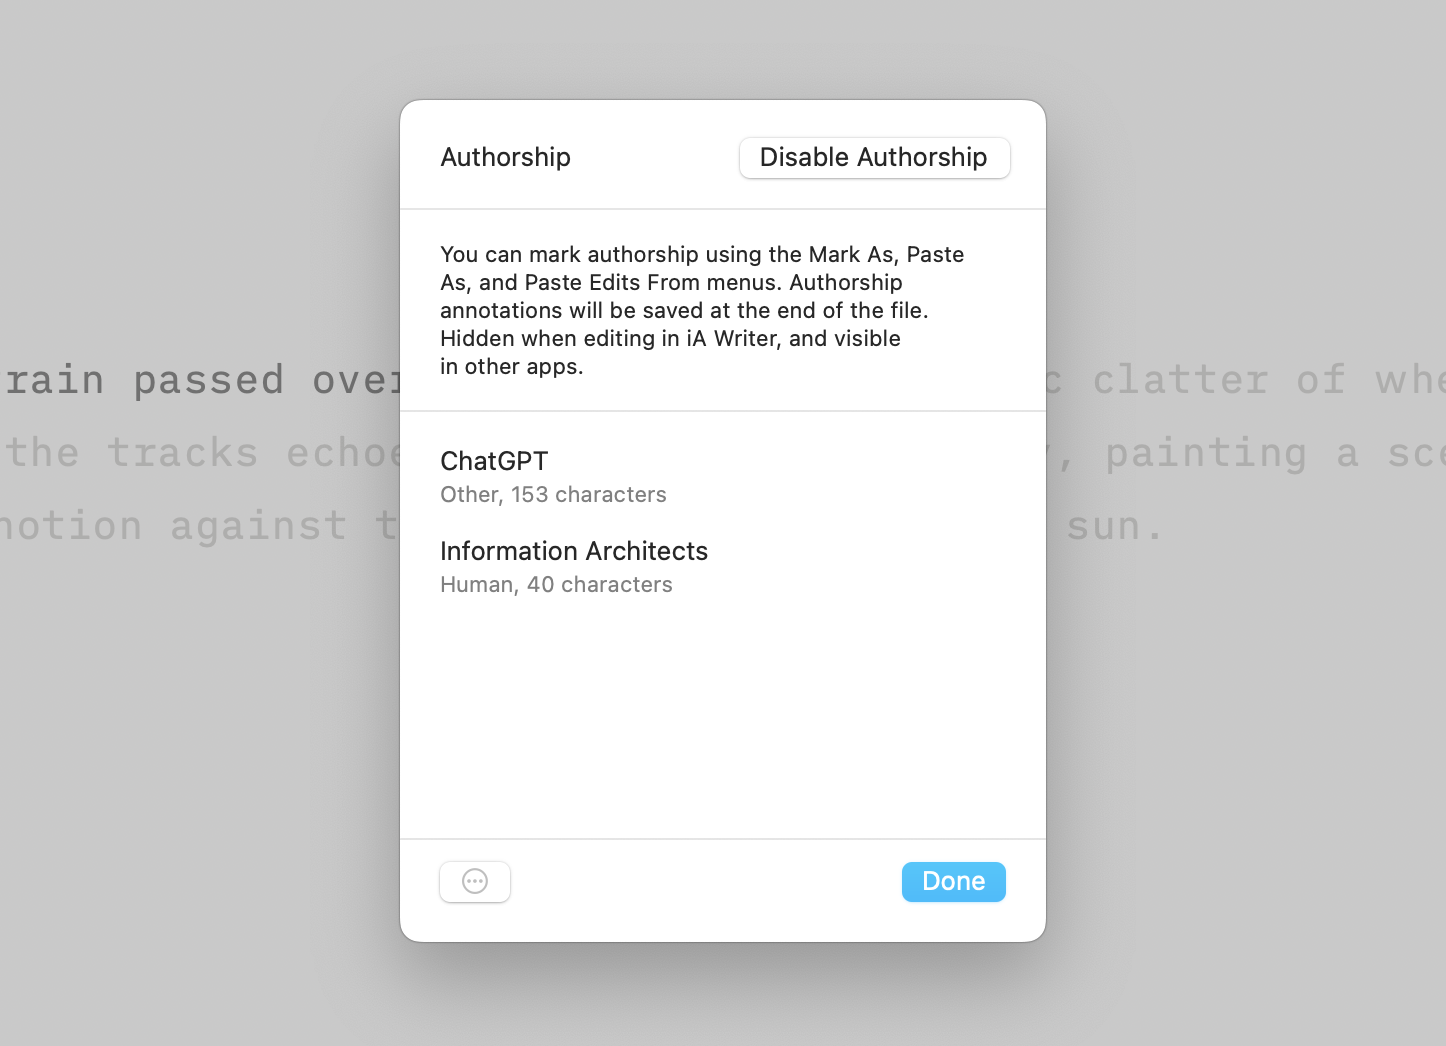
You can quickly access and manage the list of authors for any active document. With the document open in Editor navigate to Authors → Edit Authorship…:
This will present a popup with the list of authors for the document as well as a character count for each author.
You can also:
| Enable | Attributes subsequently typed text to you and allows for pasting or marking sections with authorship. | |
| Disable | Removes all authorship data from the file. | |
In a document with existing authors you can select an author and right-click or press ••• :
| Edit | Modify information such as name, identifies and kind for selected author. | |
| Replace | Allows you to transfer authorship to another author. | |
| Delete | Removes the author and associated data from file. Note: This does not remove Author from the app Settings. | |
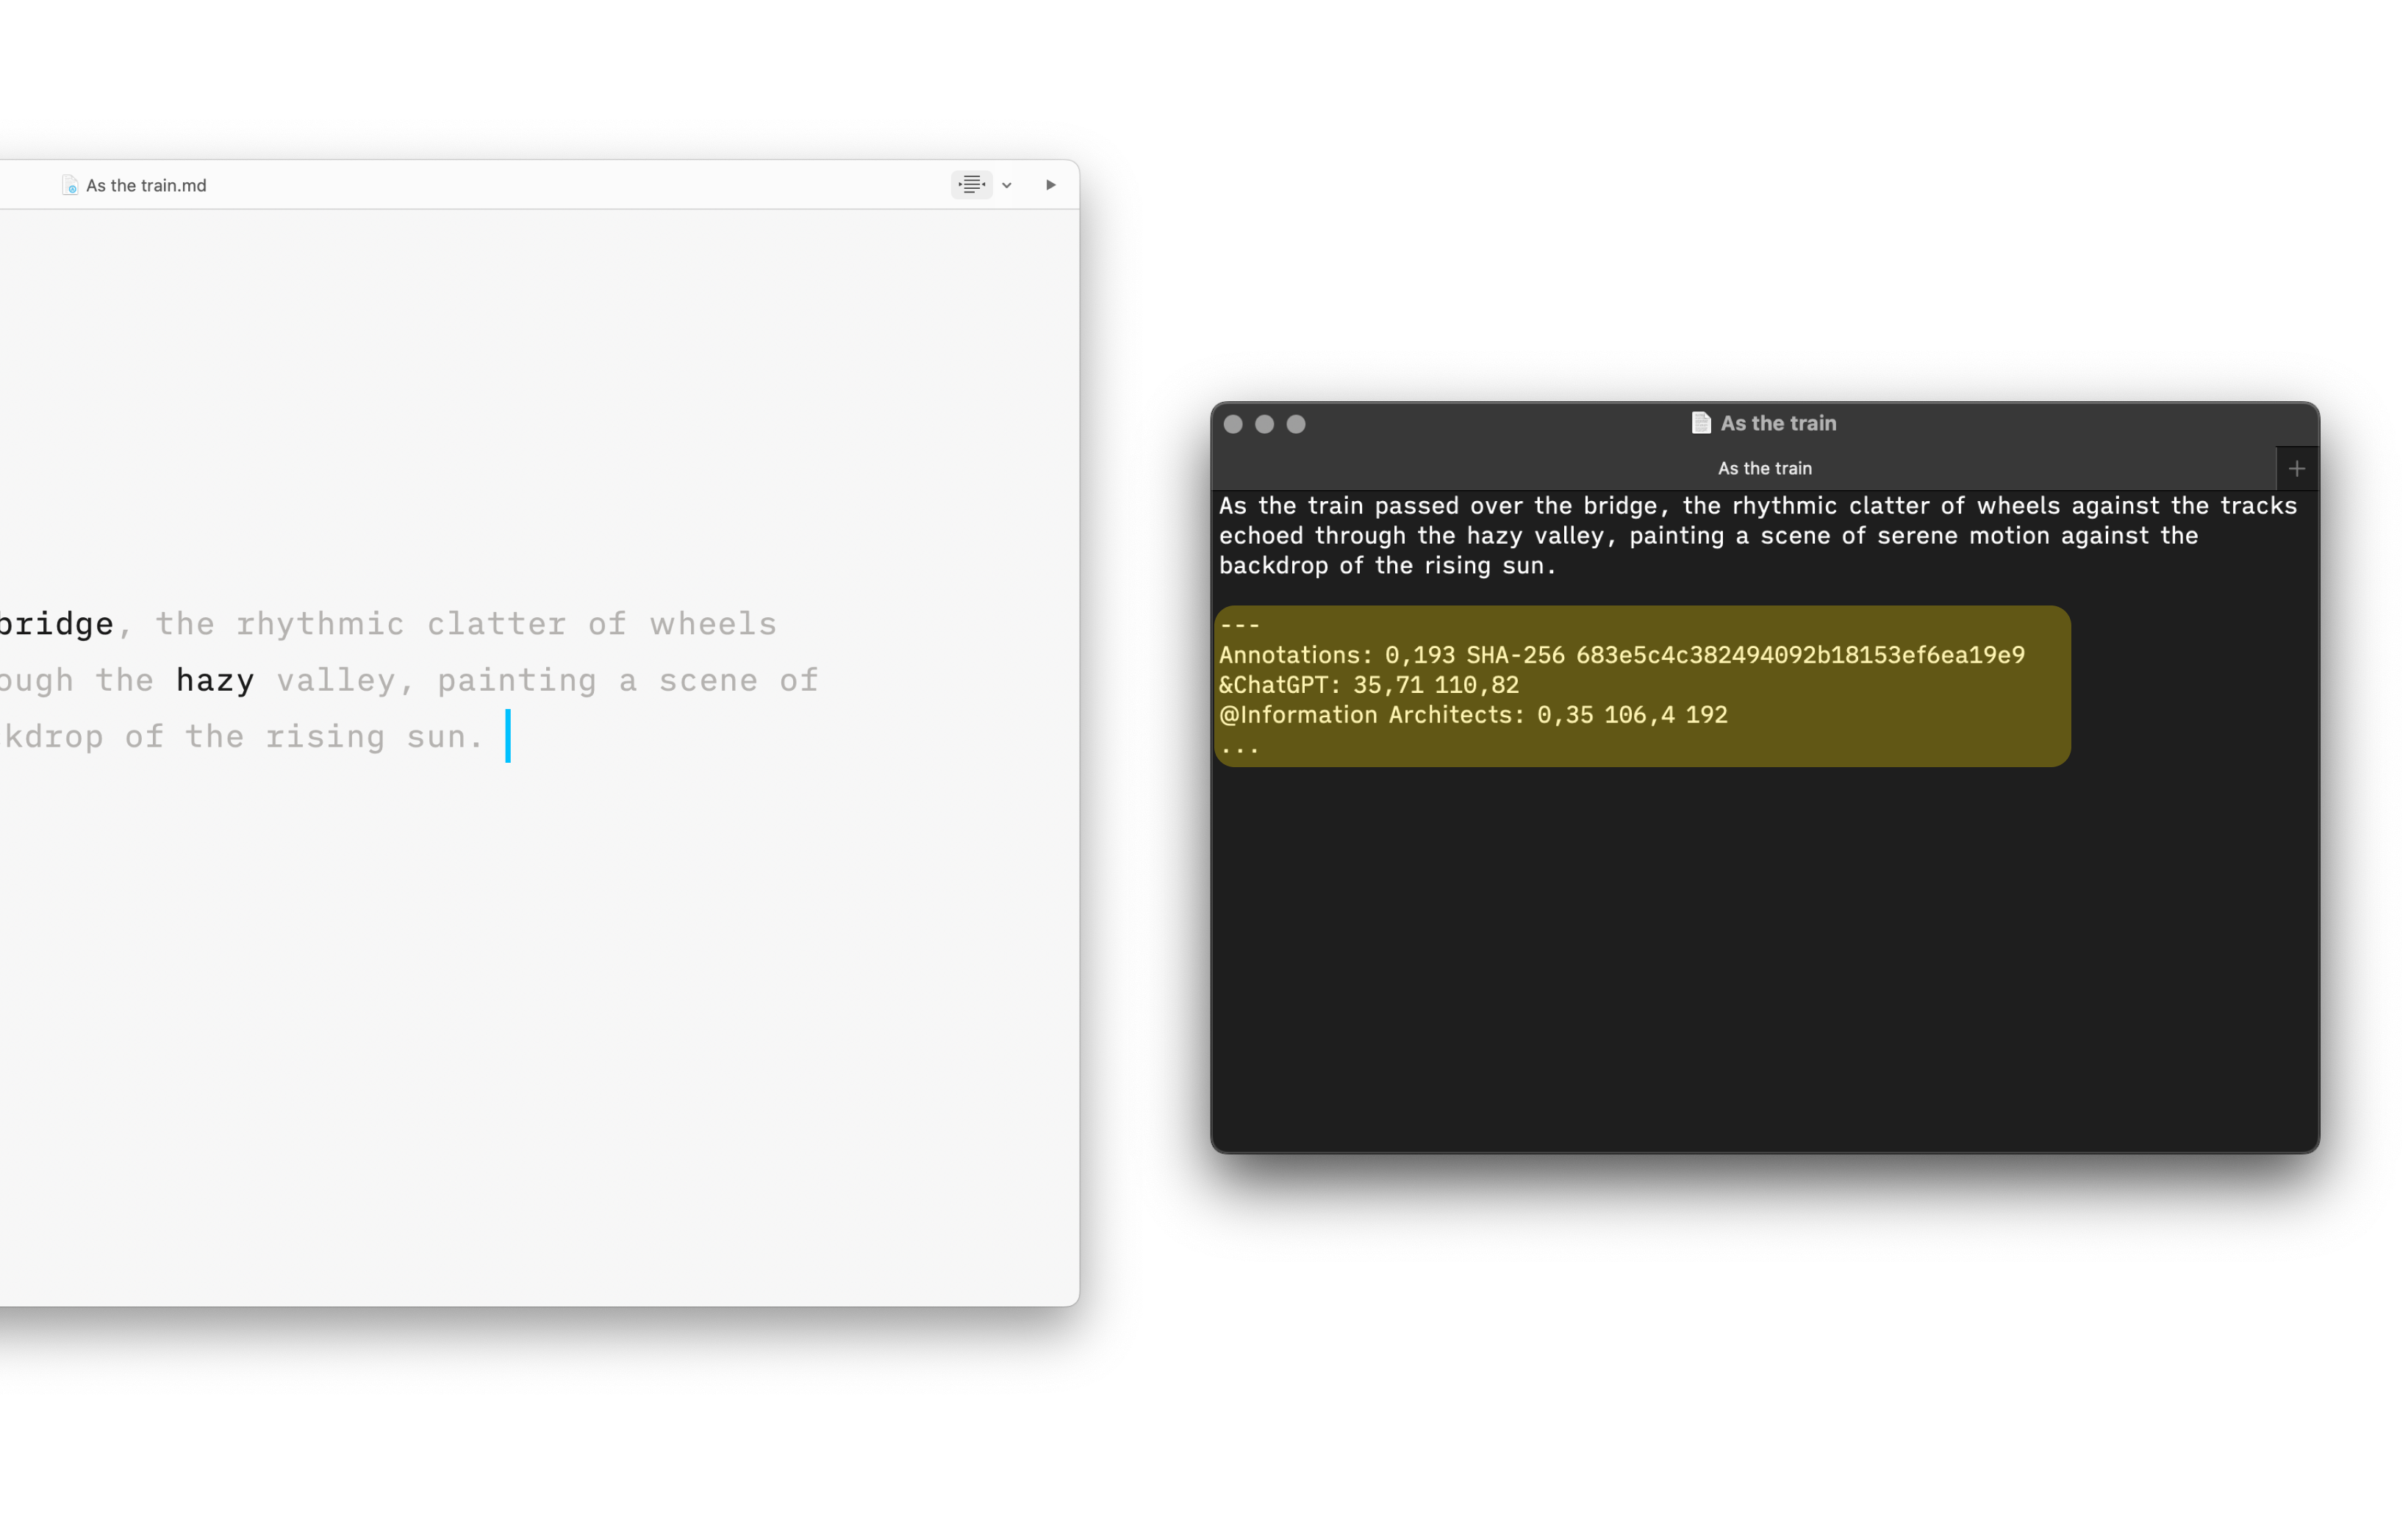
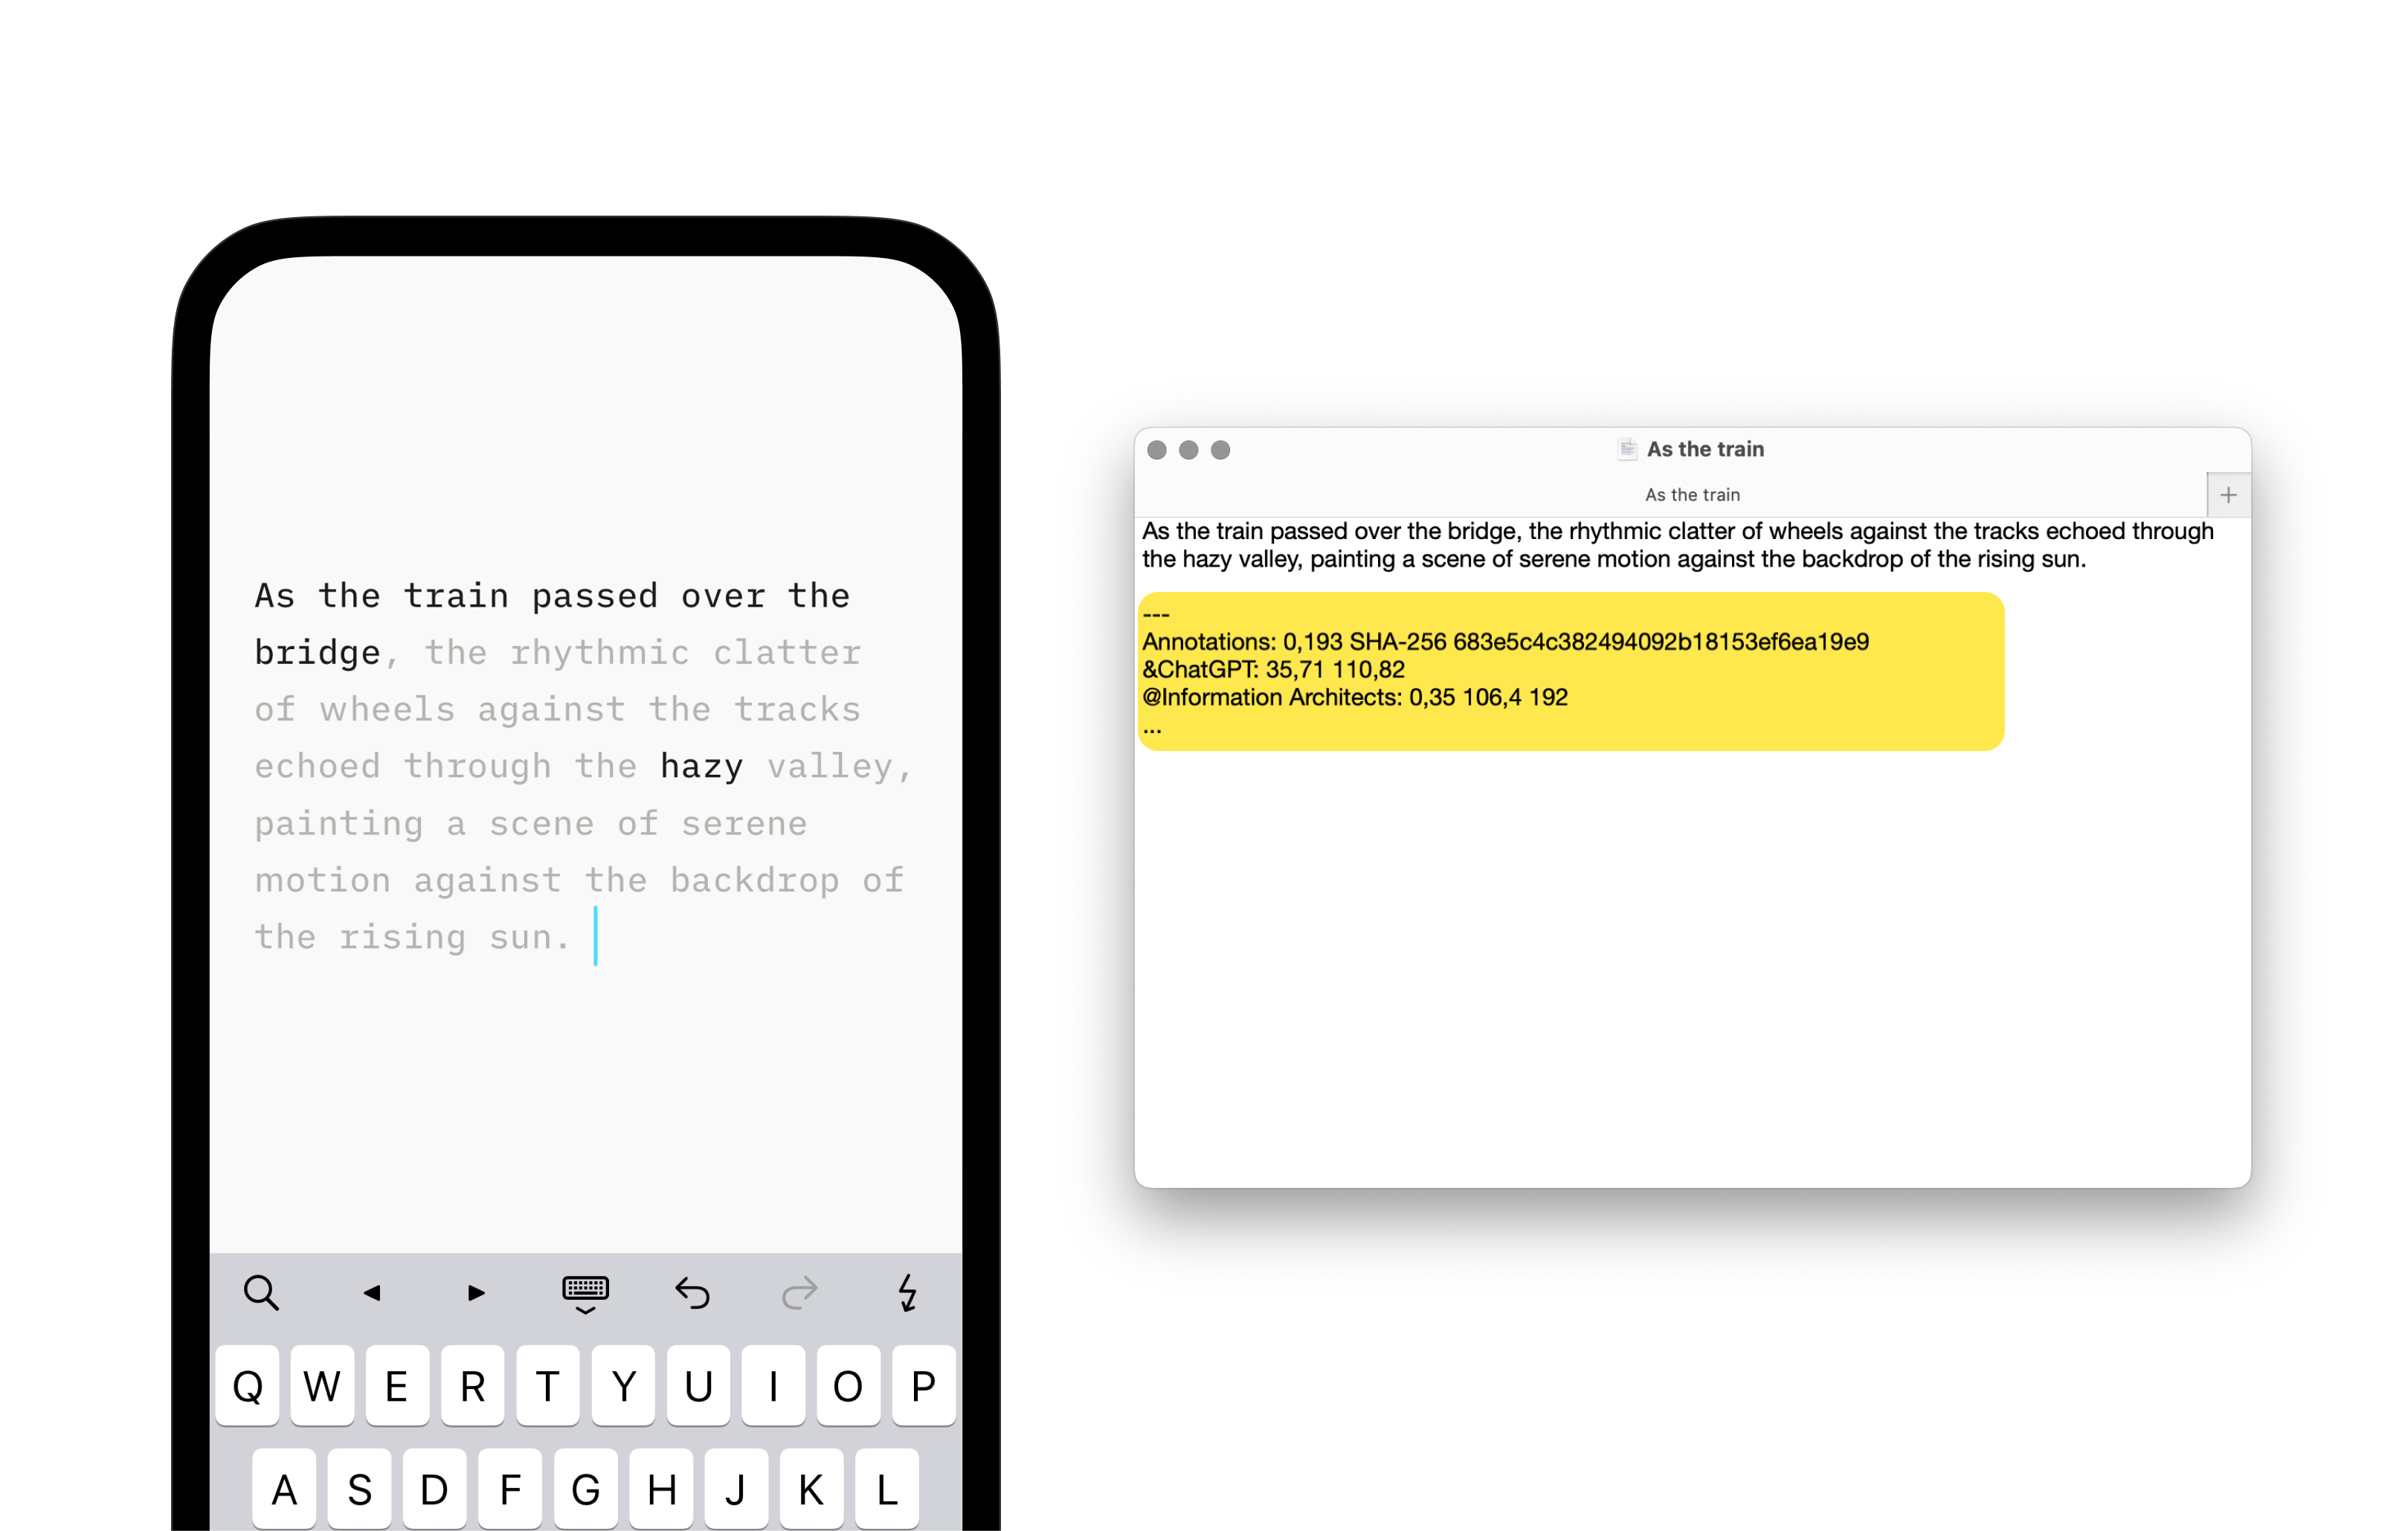
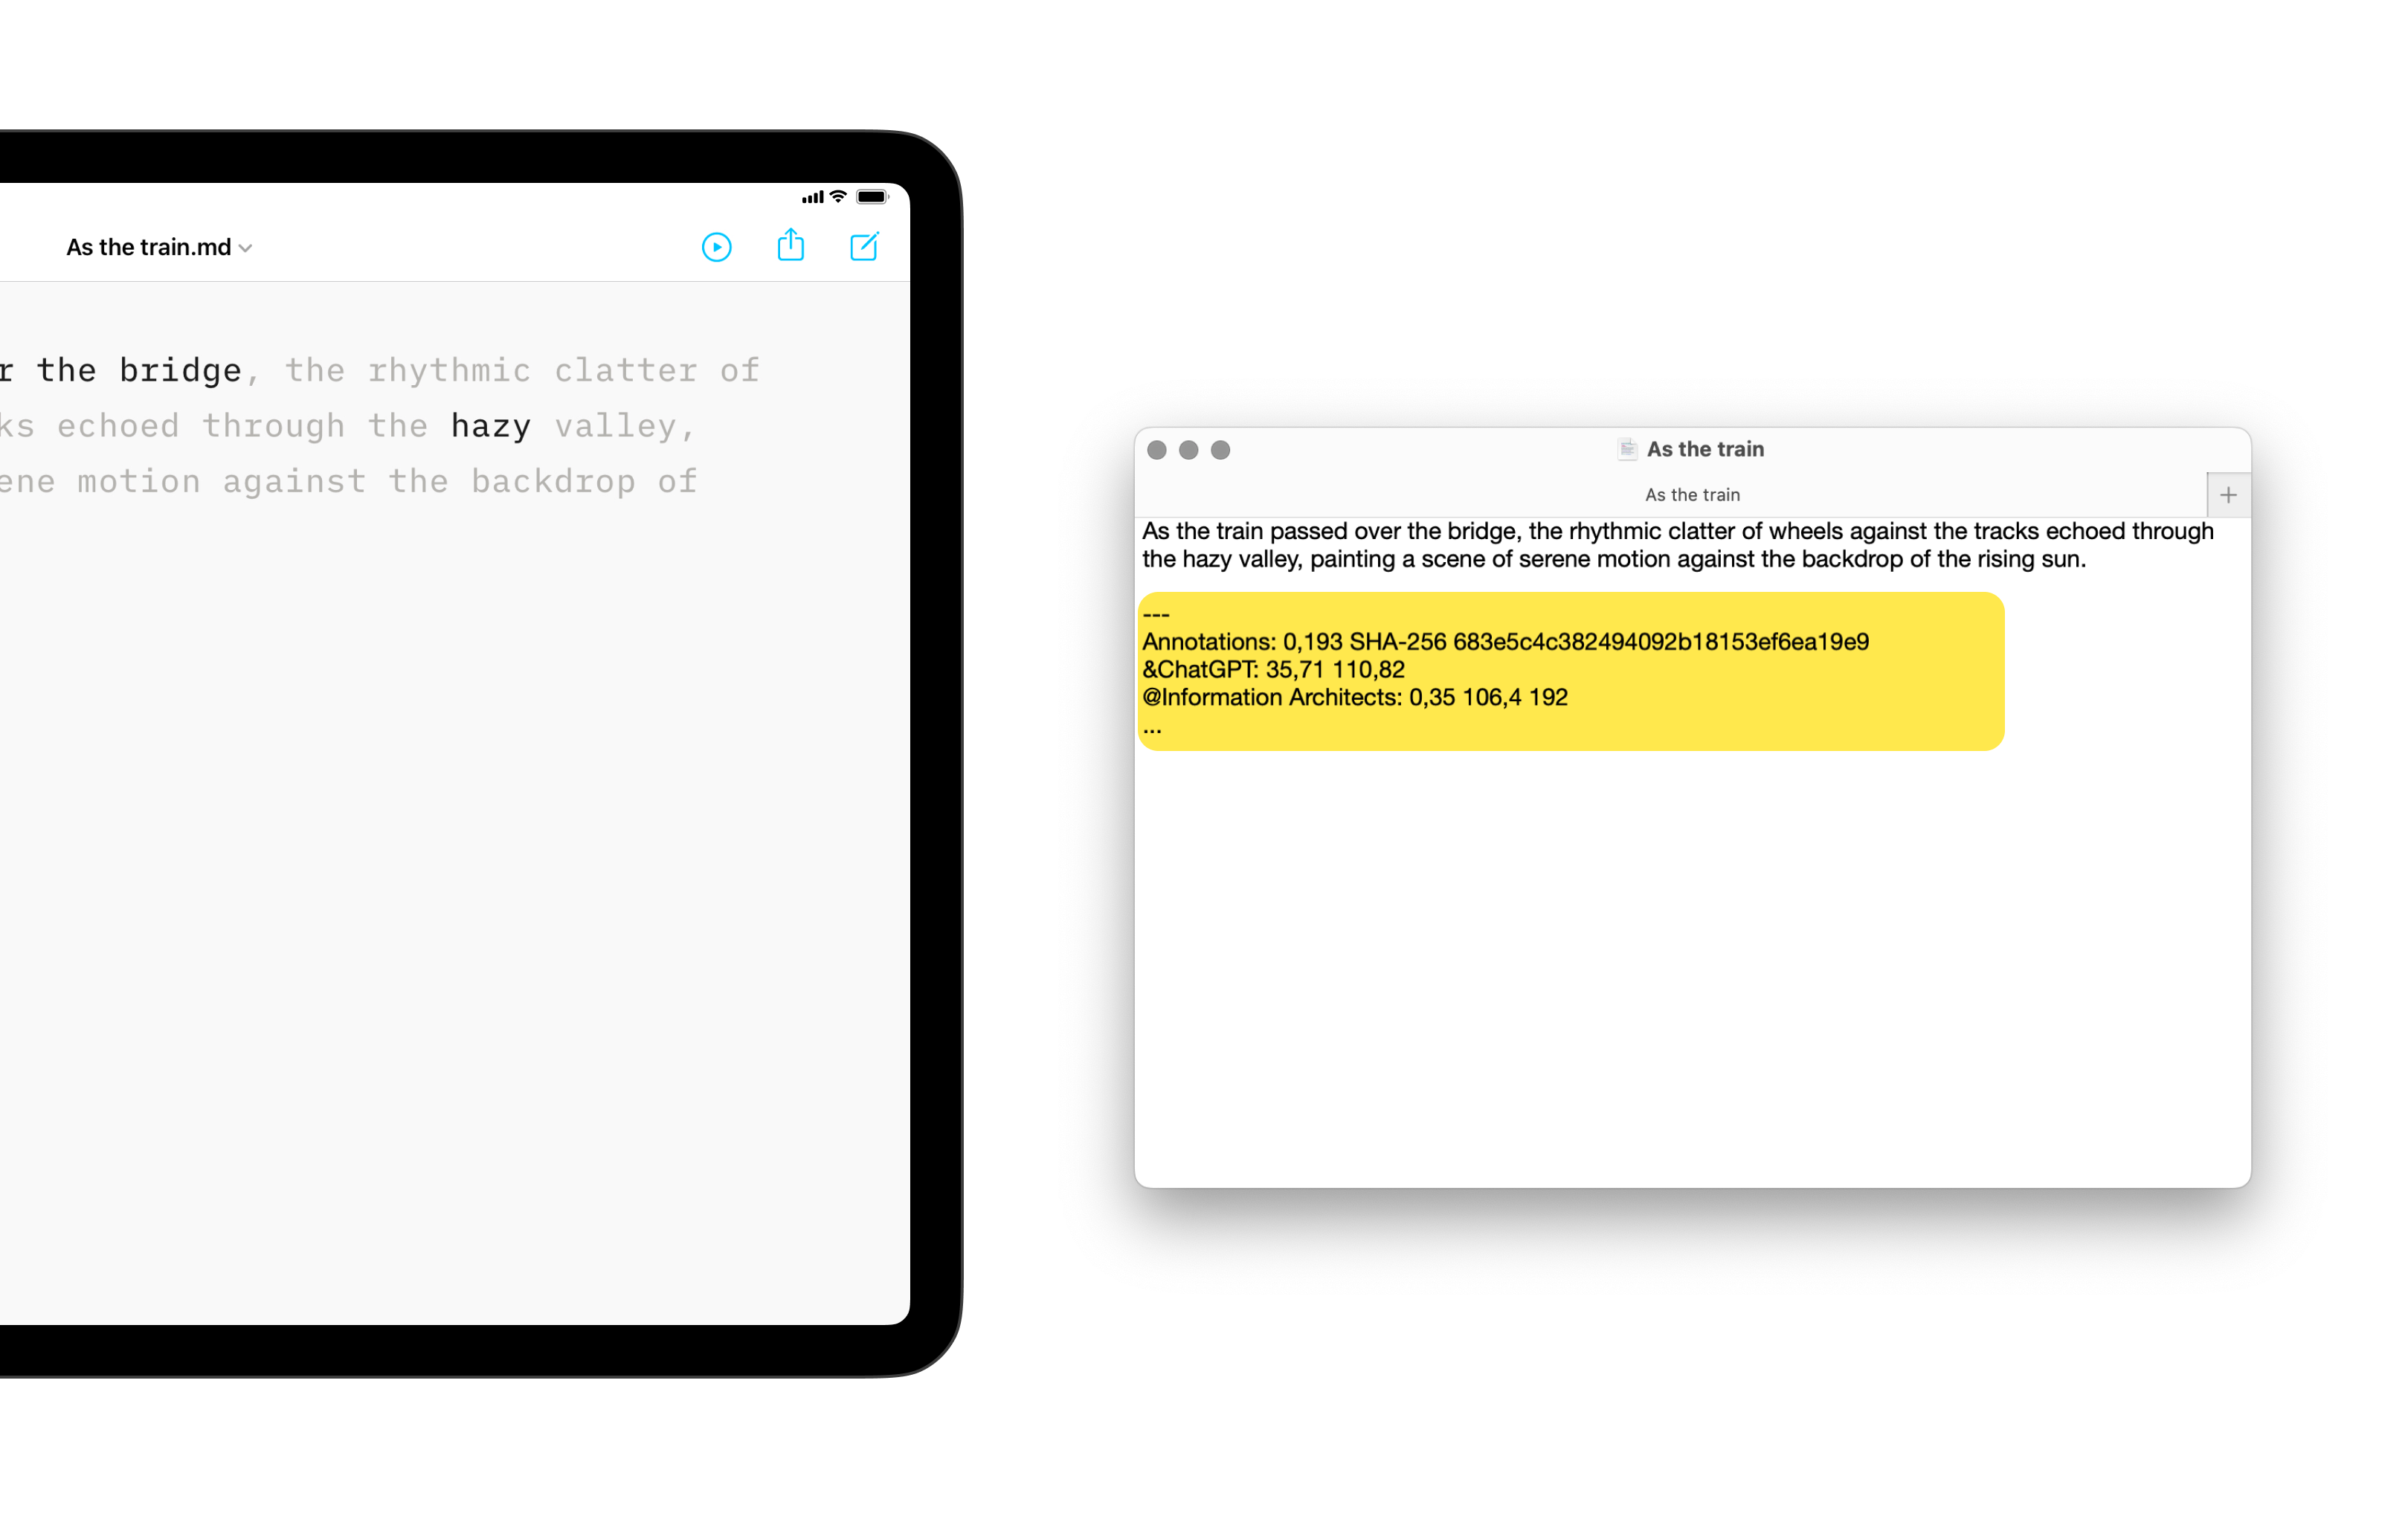
You can quickly distinguish between files including authorship data and those without. When a file has authorship annotations added, the file icon shows a blue Ⓐ.
iA Writer stores author related metadata at the end of a file. This metadata is tucked out of view in Writer’s editor, but is visible when the file is opened in other text editors/apps.
iA Writer automatically strips author metadata on export to Markdown, HTML, PDF and MS Word.
When sharing annotated files via macOS sharing options (AirDrop, email, from Finder, etc.), all file information including author metadata is shared.
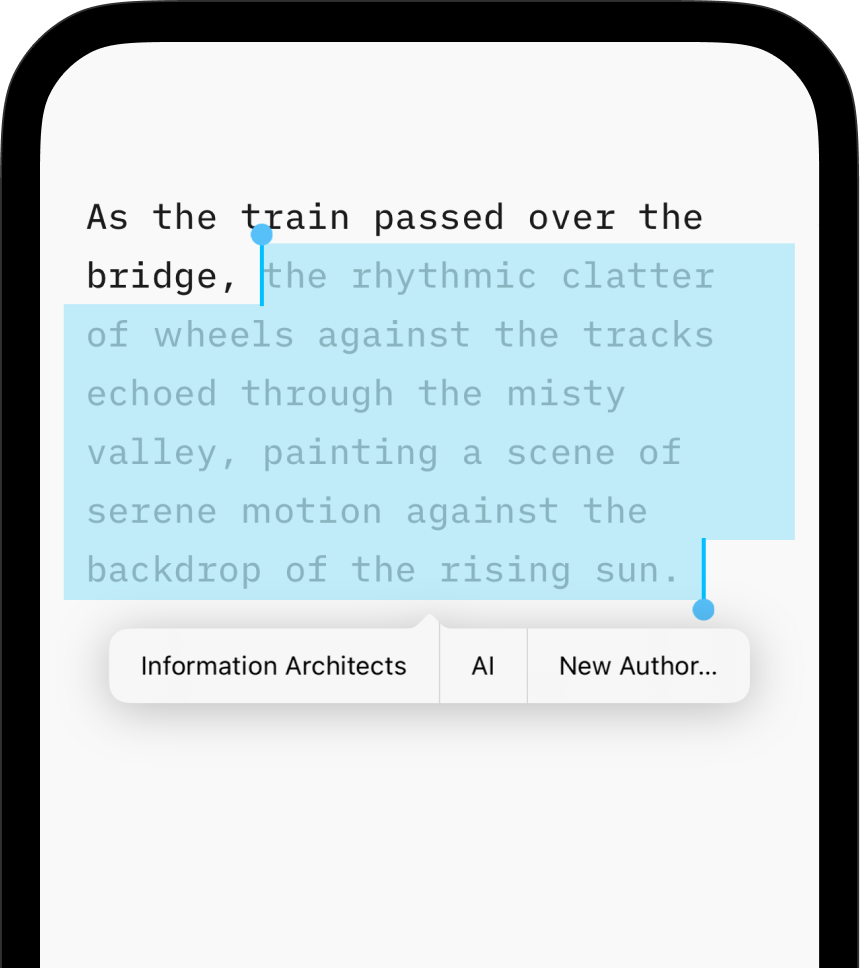
iA Writer for iPhone helps you to distinguish between Human generated text and Other sources (such as AI).
When the feature is enabled you can quickly see the difference in a document:
When you make edits to text as the primary author, your text remains in full focus and you can clearly see where your text ends and externally sourced content starts.
Note: Authorship does not modify your content in anyway and your text is not sent to a server to detect authors. Everything happens locally on your device: Your data is yours, in compliance with our Privacy Policy.
You can always mark a selection or paste as any type of author into a document. To see the distinction in the Editor you need to enable the appropriate Editor settings.
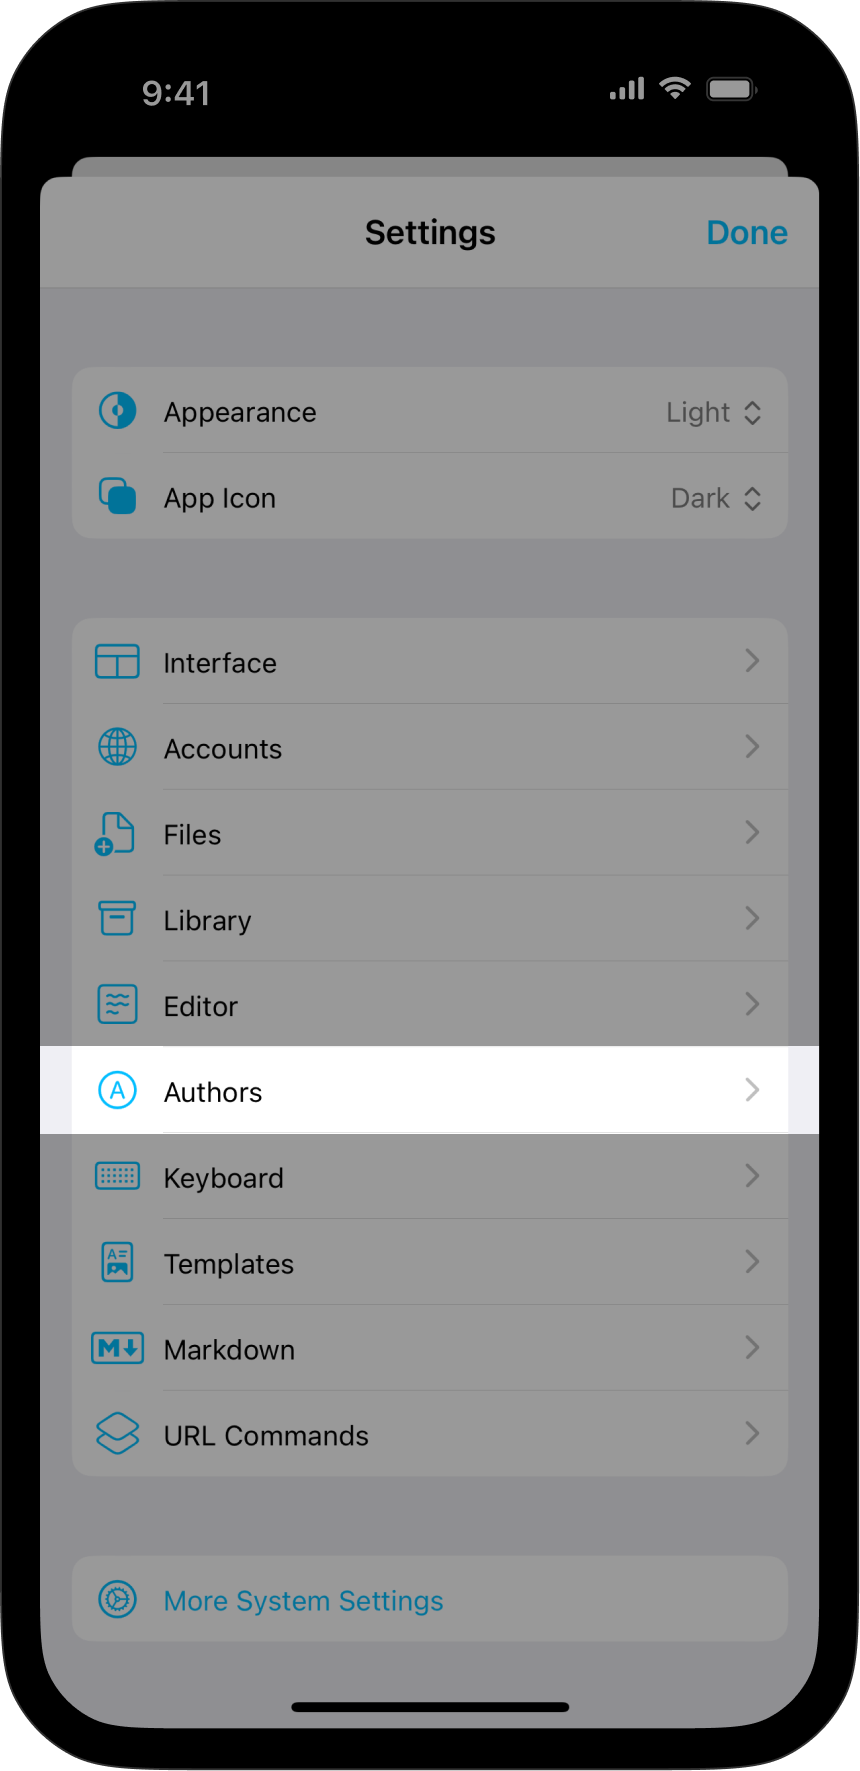
On iPhone you can enable Authors in 3 ways:
| Settings | Editor → Authors | |
| AA | Show/Hide Authors | |
| Lightning Menu | Add Show/Hide Authors action | |
On iPhone you can configure your Lightning menu with Authorship actions. Here’s how:
Actions are added to your Lightning menu for quick access at any time.
When you are just starting out with Authorship, we recommend adding the Paste as New Author and Mark as New Author actions to help you build your list of authors.
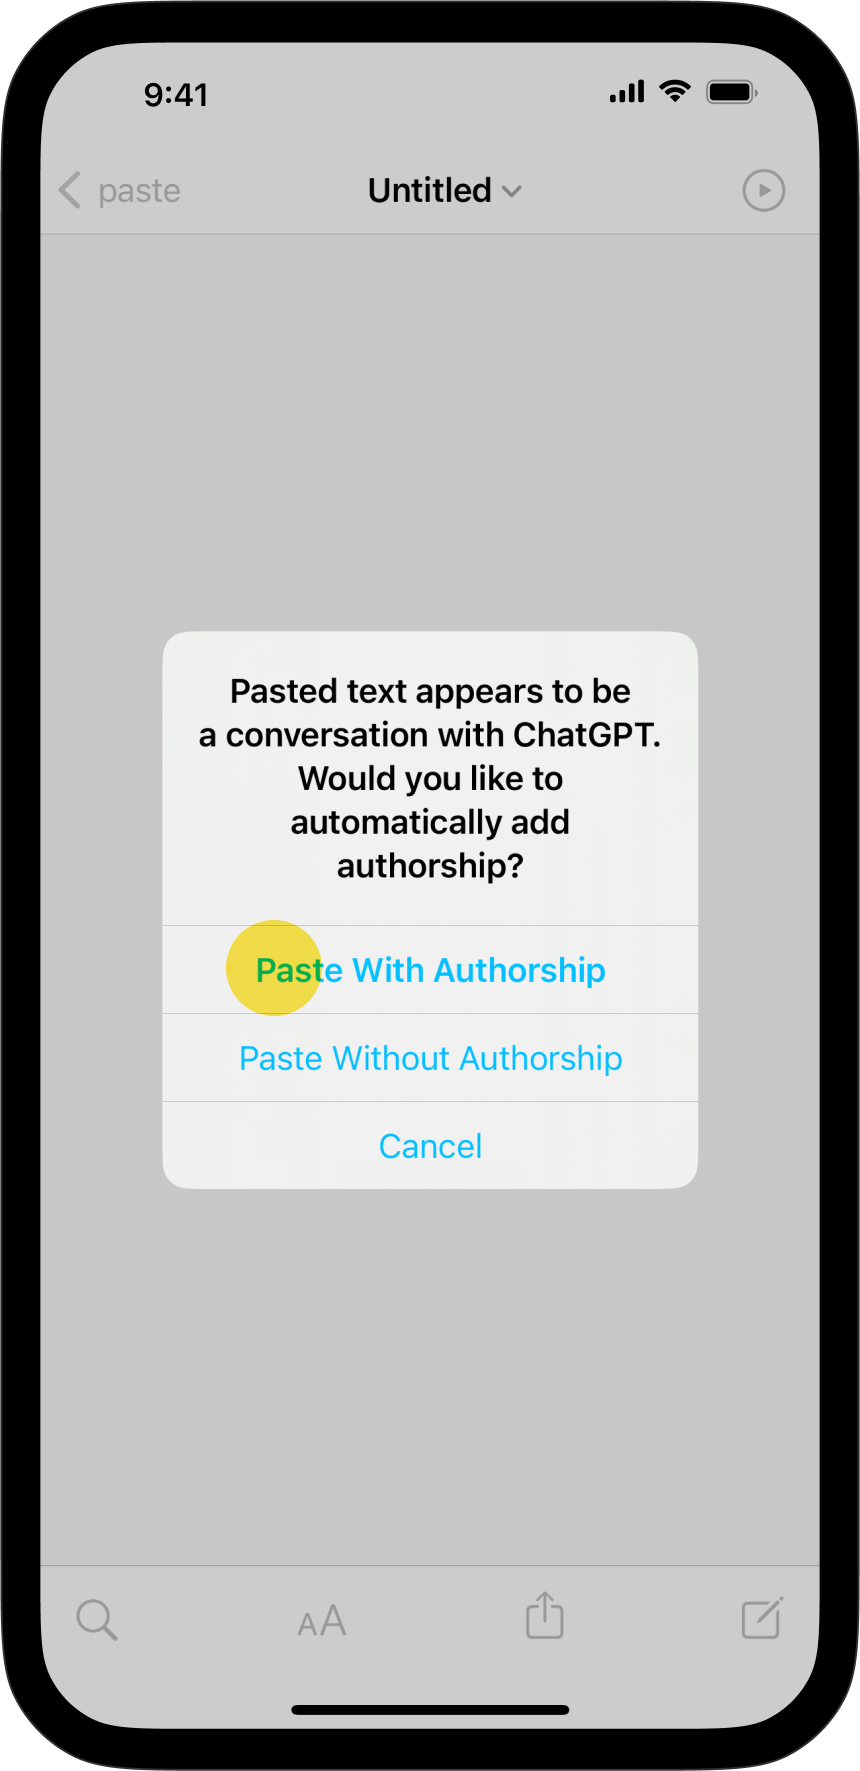
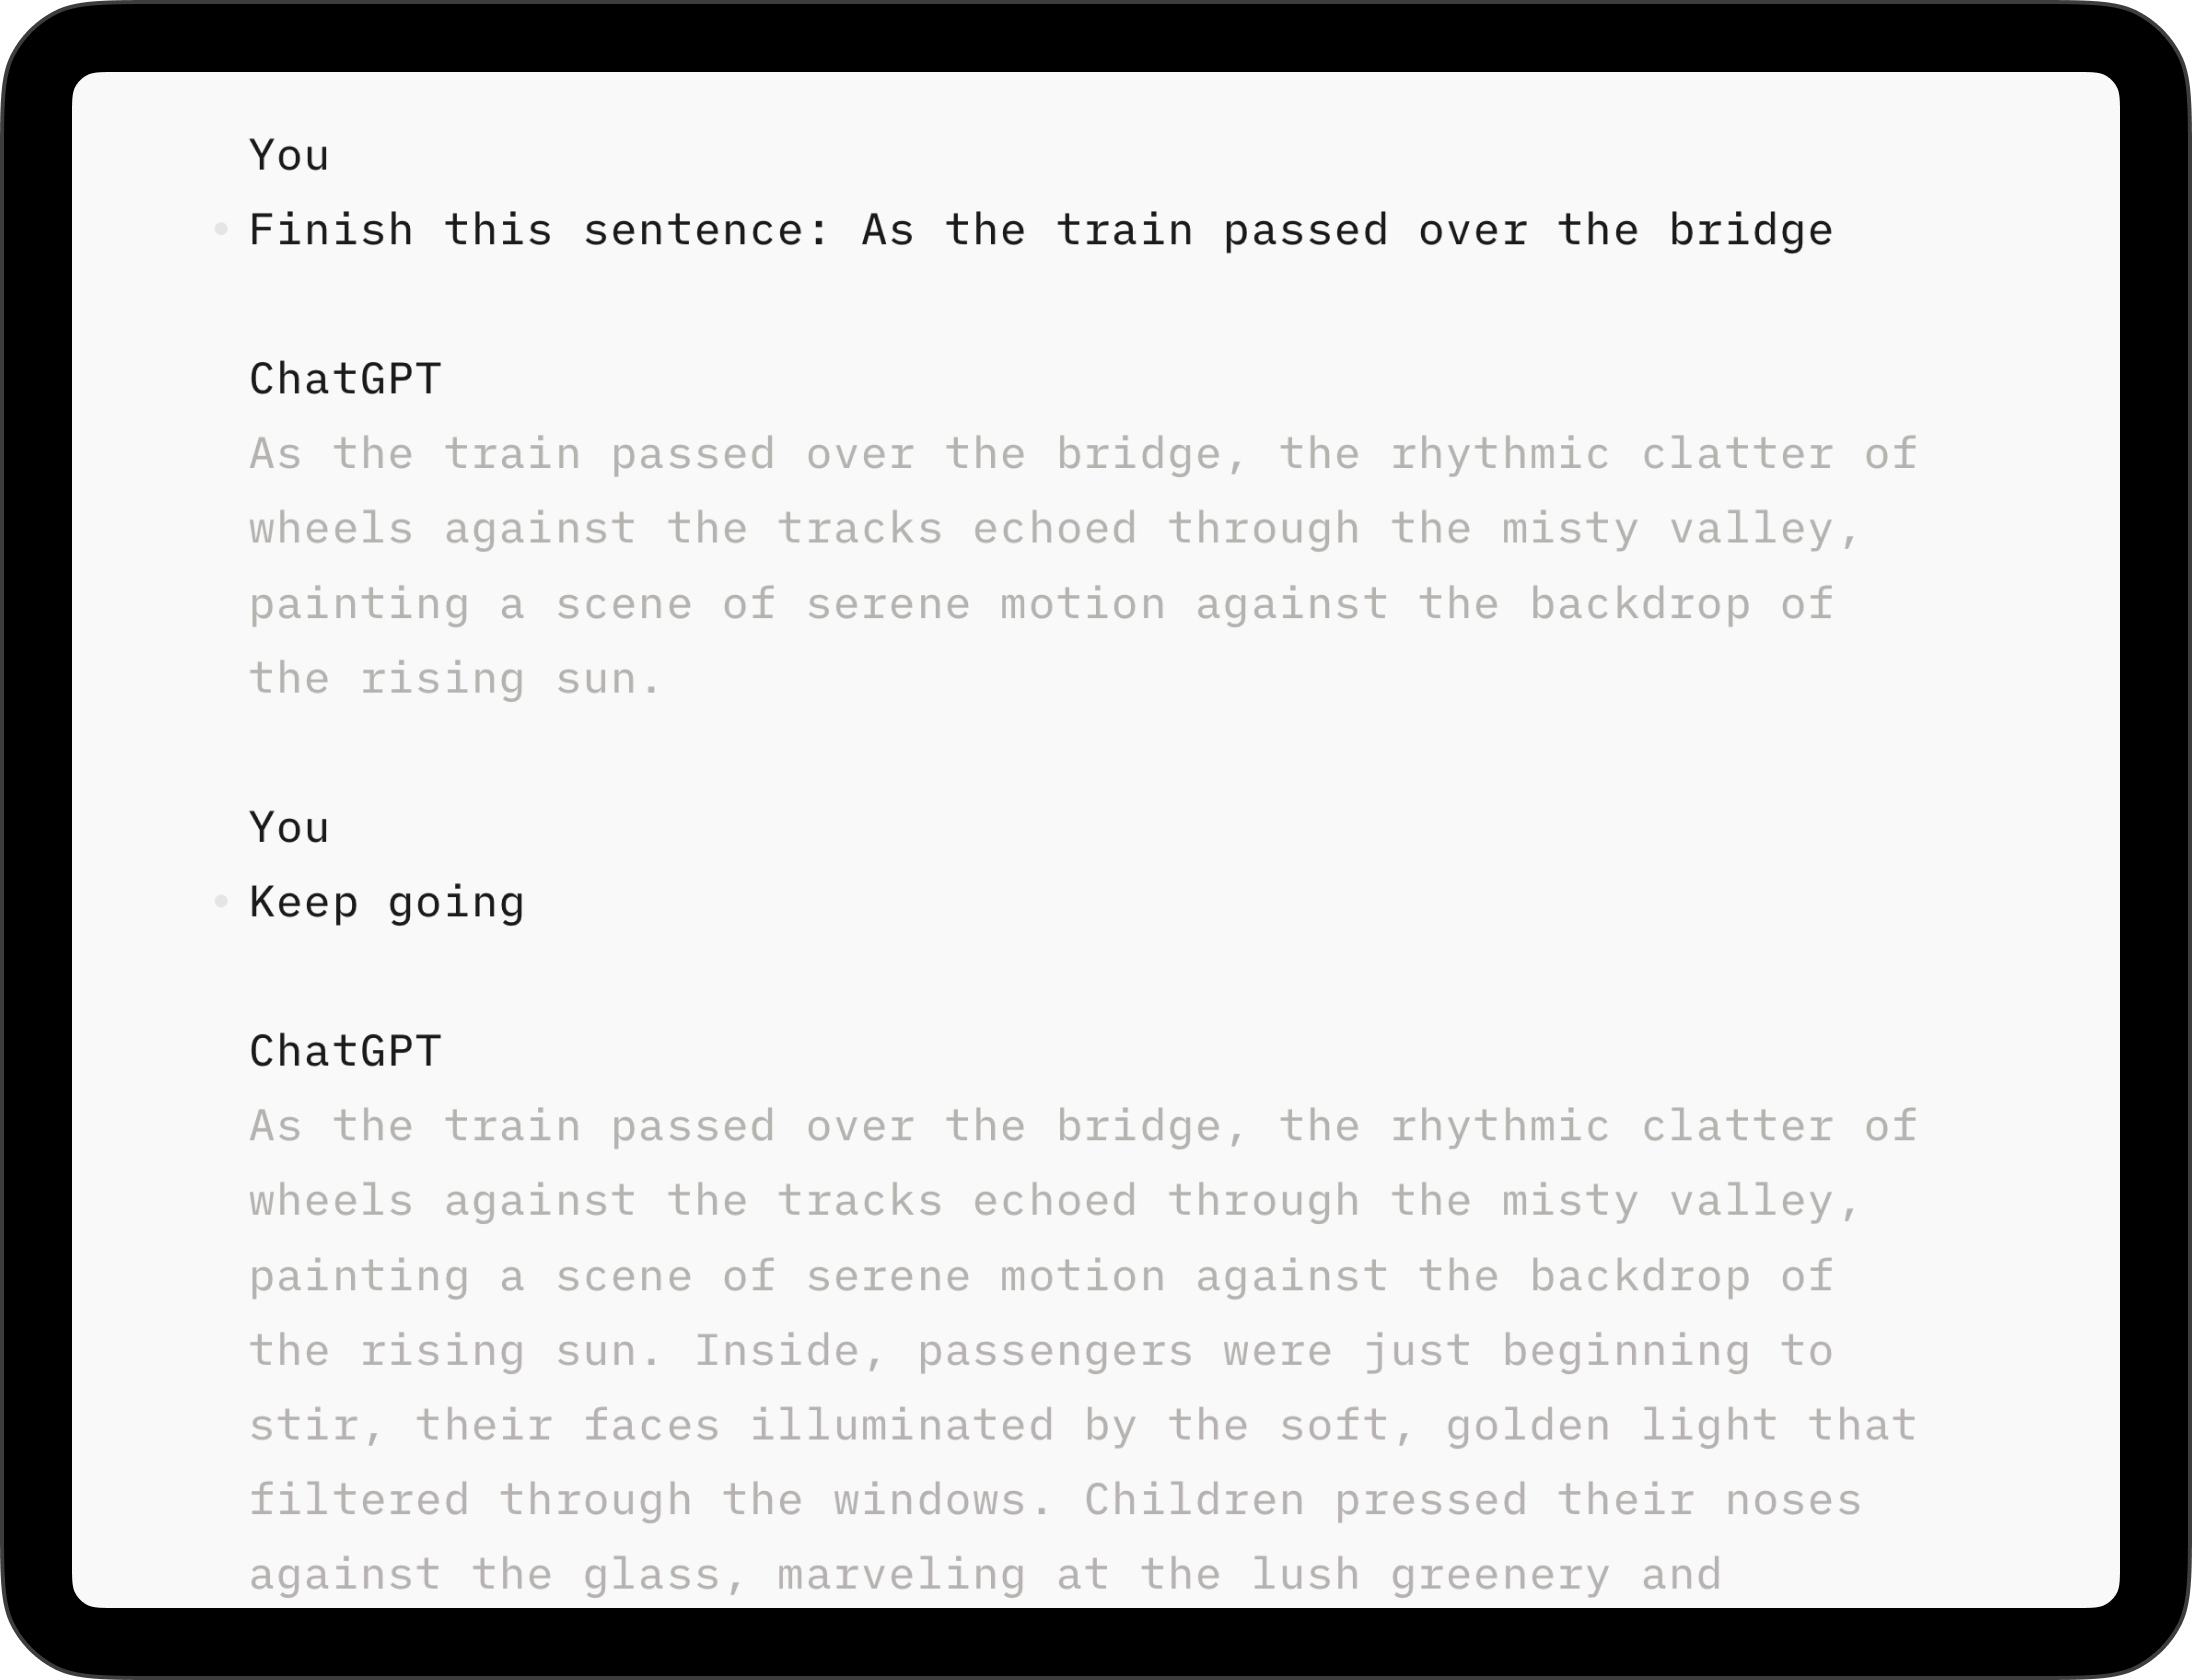
When you copy and paste a conversation from ChatGPT, the copied text contains “You” before every question, and “ChatGPT” before every answer. We recognize this pattern and offer to automatically mark authorship when coming from ChatGPT.
To use it : select the text you wish from ChatGPT and paste into the Editor. You’ll see a prompt letting you choose whether to paste with or without authorship.

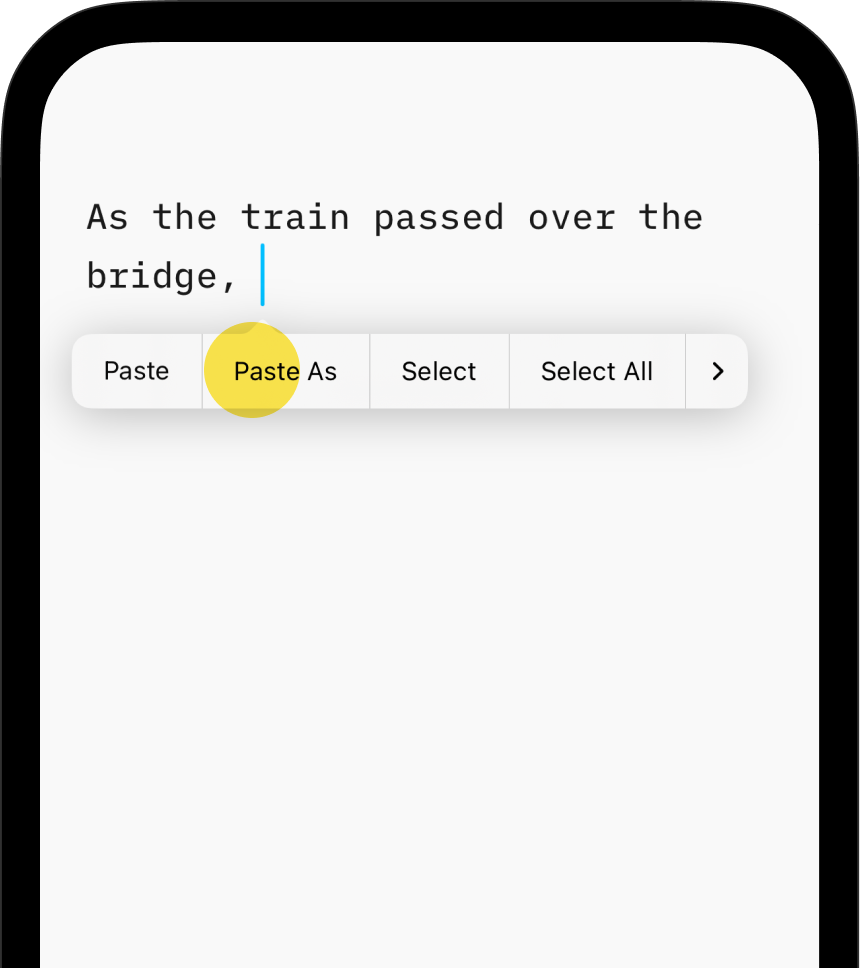
Apart from ChatGPT, Writer will rely on you defining the authorship by yourself. Pasting content from an external source with Authorship attribution is easy.
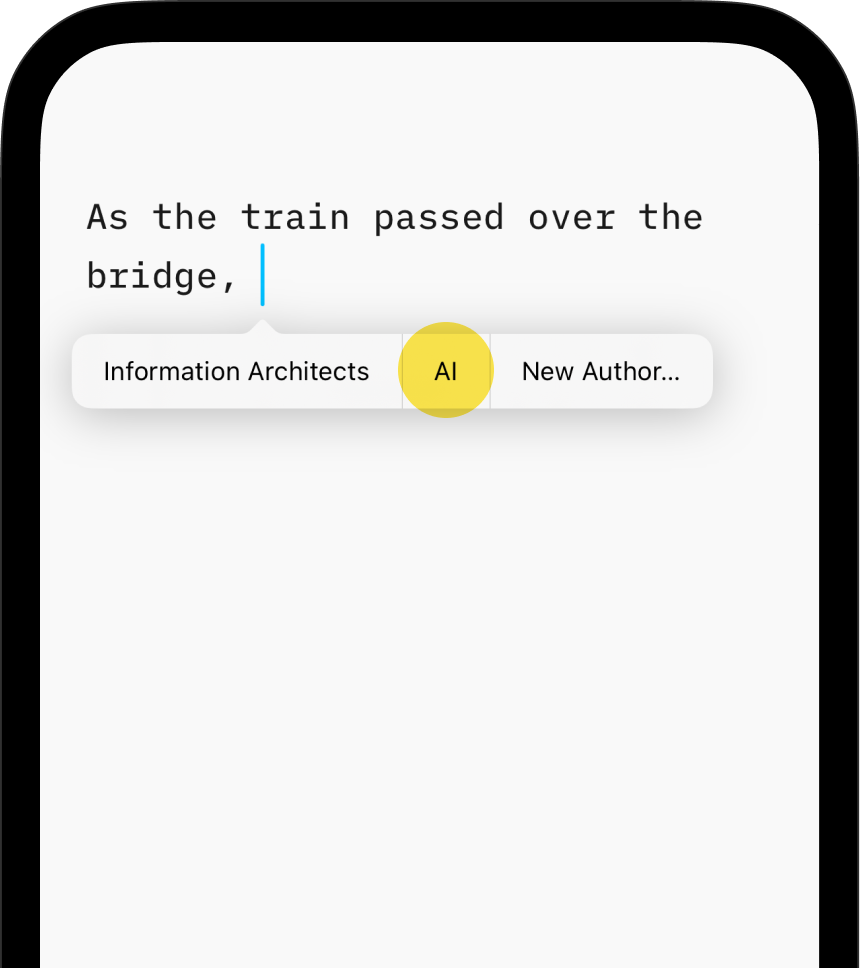
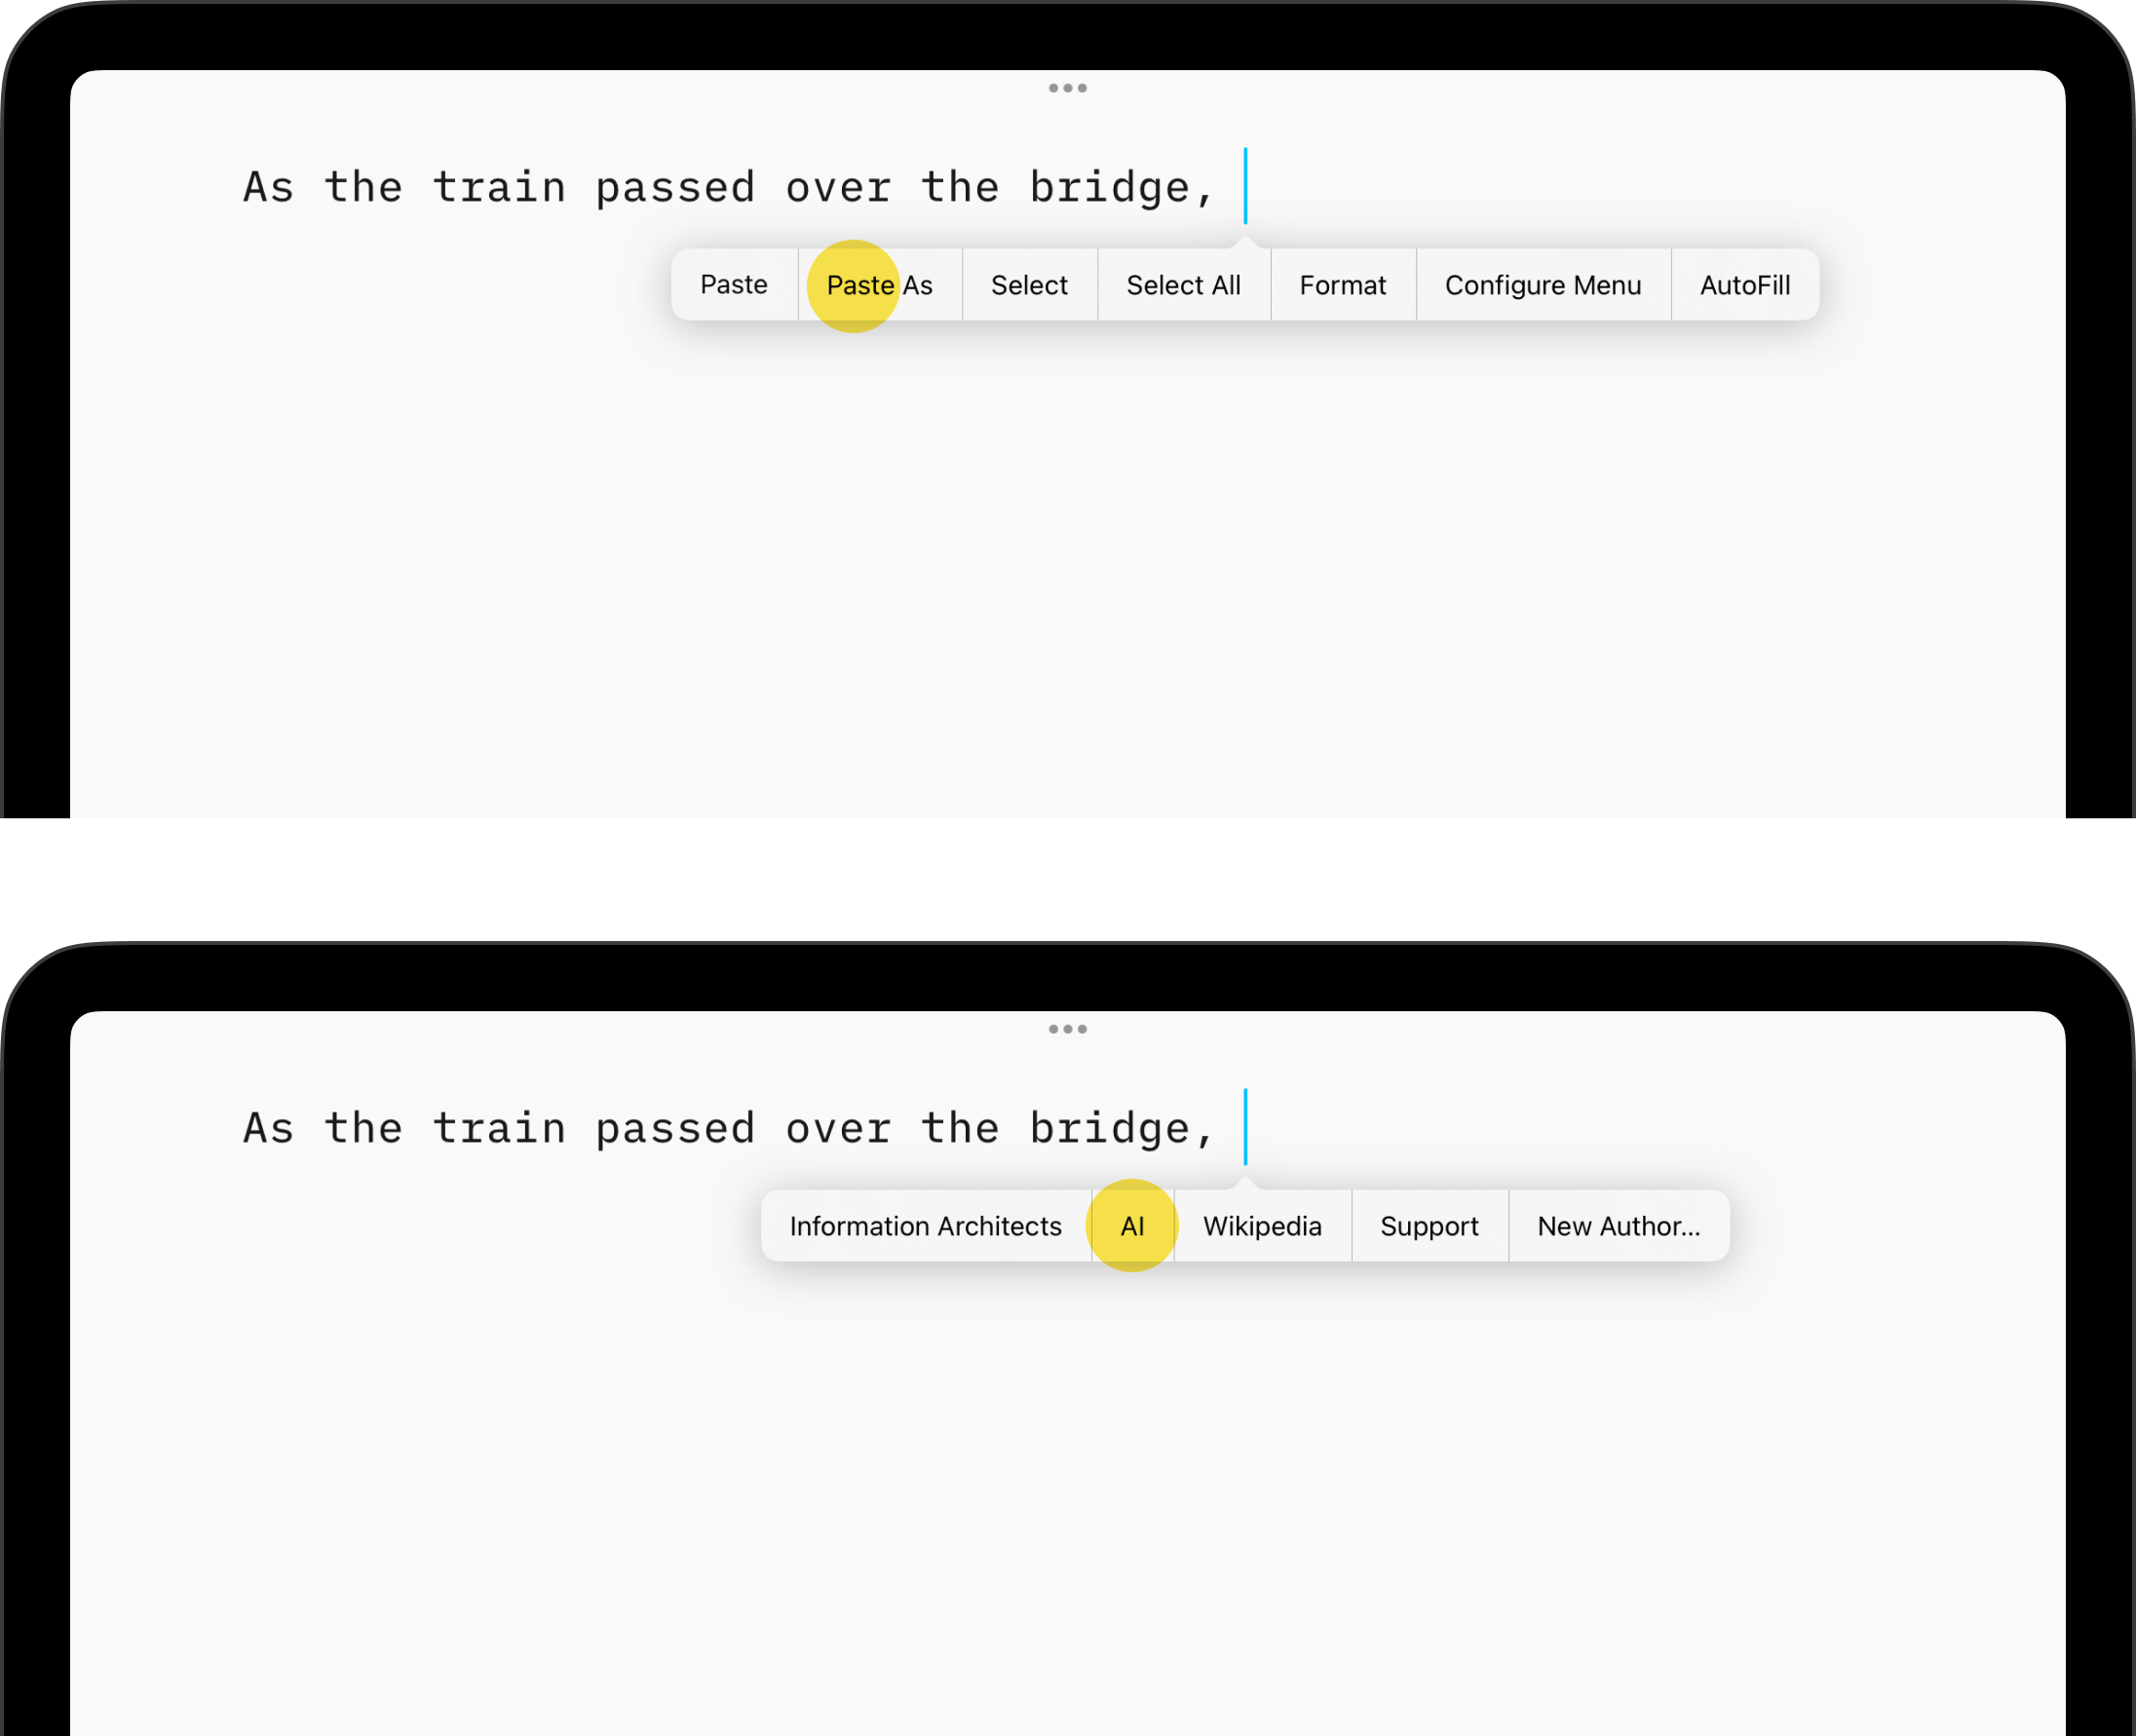
Long-press in Editor → Select Paste As → {desired author}

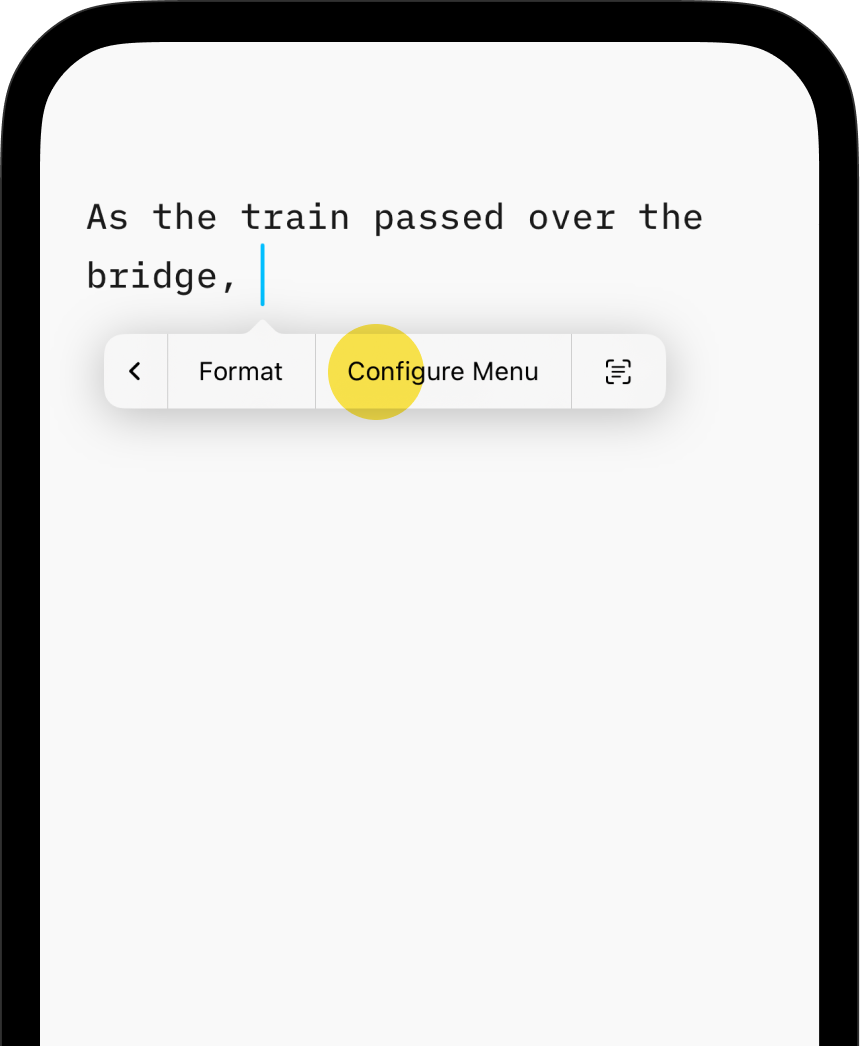
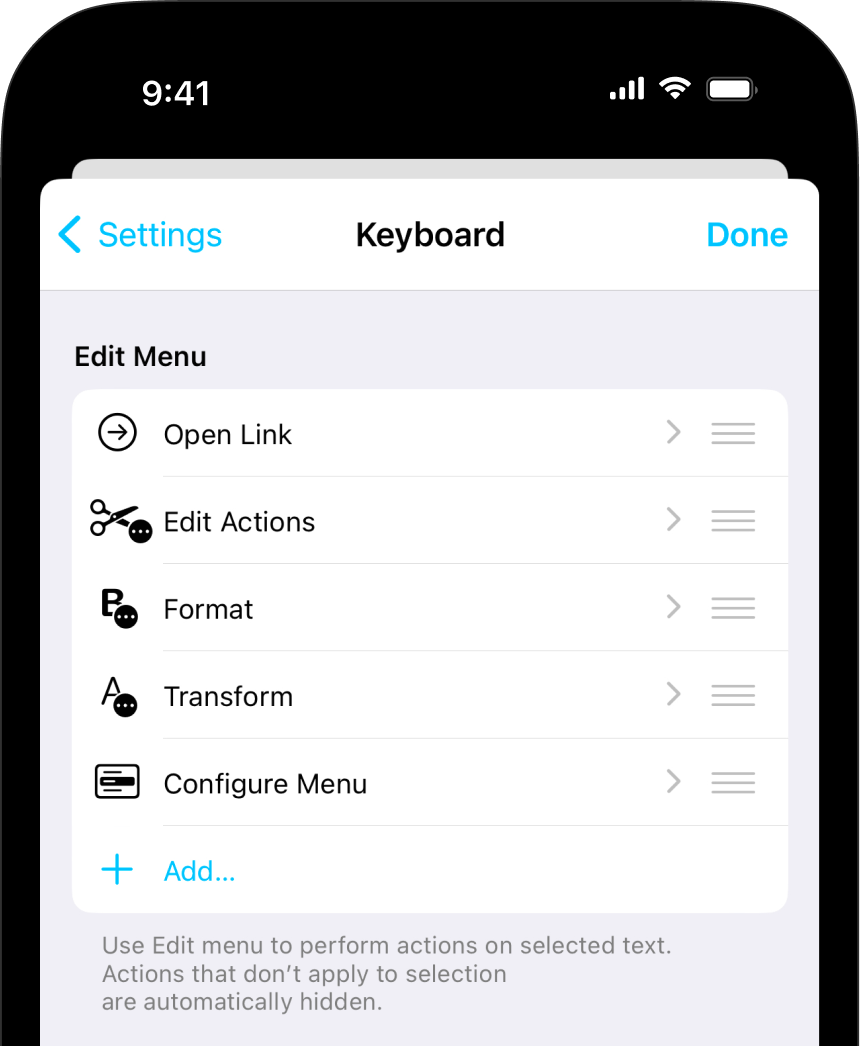
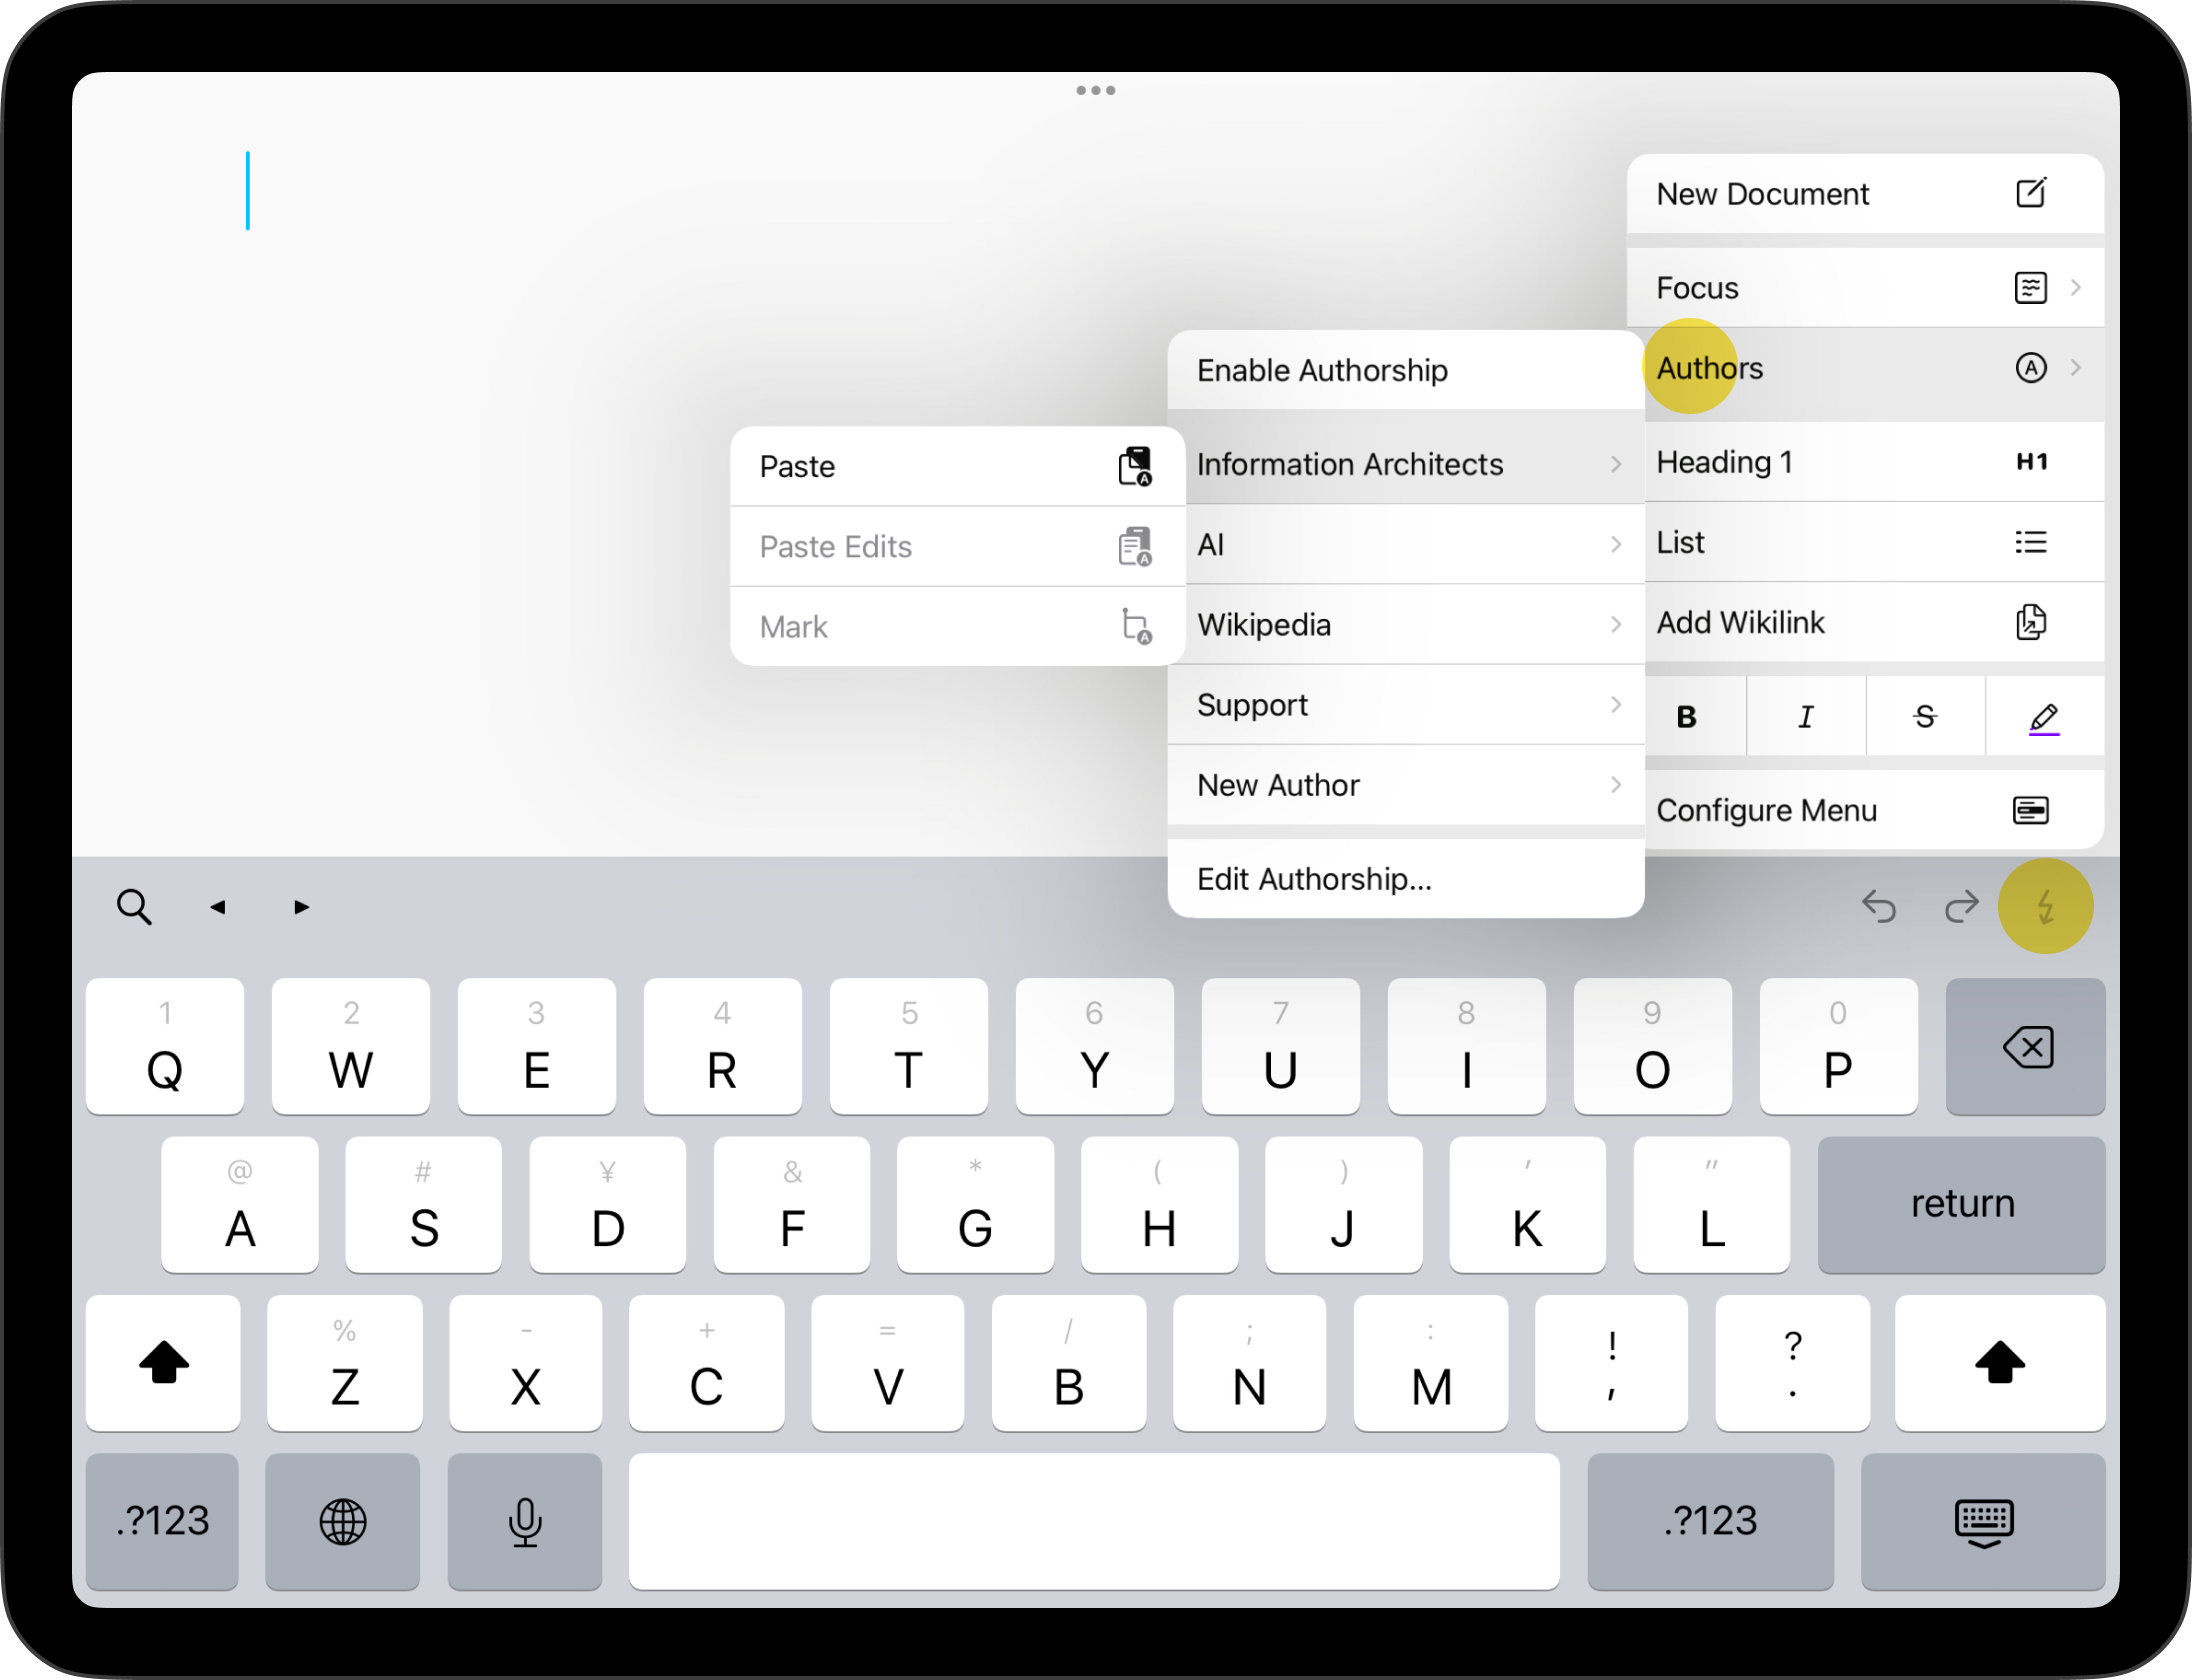
With iA Writer 7+ you can now configure the Edit menu to add your most freqeuntly used actions, including pasting and marking text selection. To configure, long press in the Editor and select the Configure Menu option. You can also navigate to: Settings → Keyboard → Edit Menu:
Pasting options are also accessible from the Lightning menu if you have added Authors action.
Sometimes you may want to copy/move text from one document to another/ a new one. If your selected text contains author data, iA Writer will give you the option to Paste With Annotations or Paste:
| Paste With Annotations | Authorship information is retained and added at the end of the of the receiving document. | |
| Paste | Text is pasted without Authorship data. | |
When editing documents you can attribute existing text to a specific author. This is helpful not only for your own documents but also for shared/collaborative documents when you wish to clearly discern between authors.
When any range of text is selected in Editor, you’ll see the Mark As option present in the Edit menu. Simply tap that then select the desired author.

Marking options are also available via the Lightning menu Authors action if it is enabled.
Managing a list of authors is easy in Writer. You can access this function in: Settings → Authors
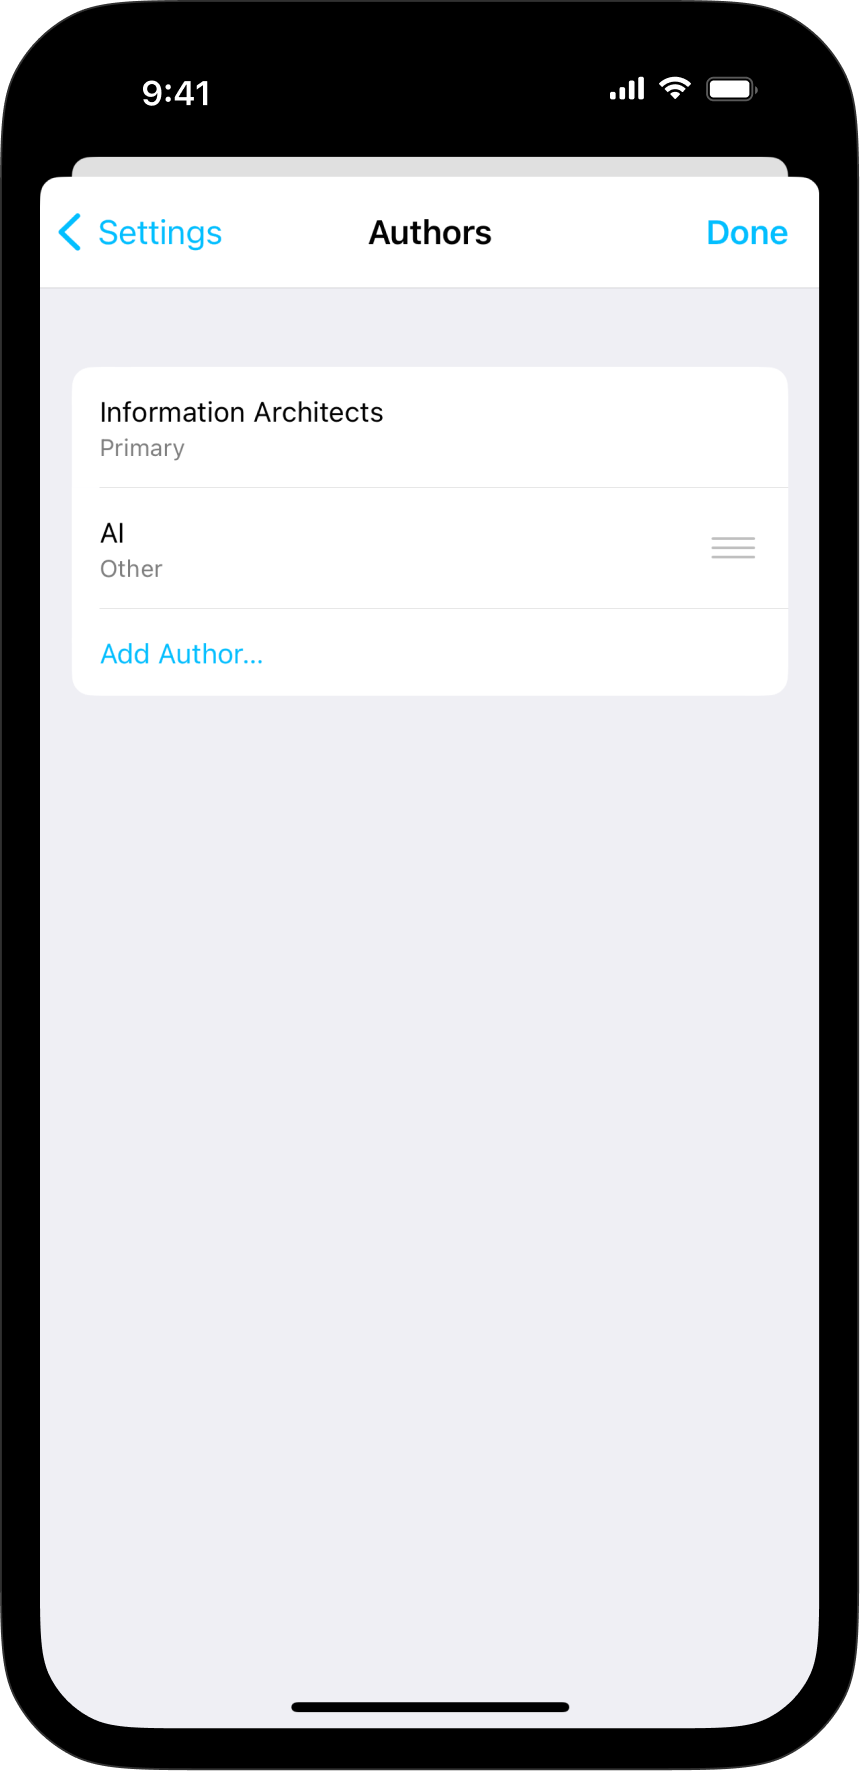
In Authors settings you can:
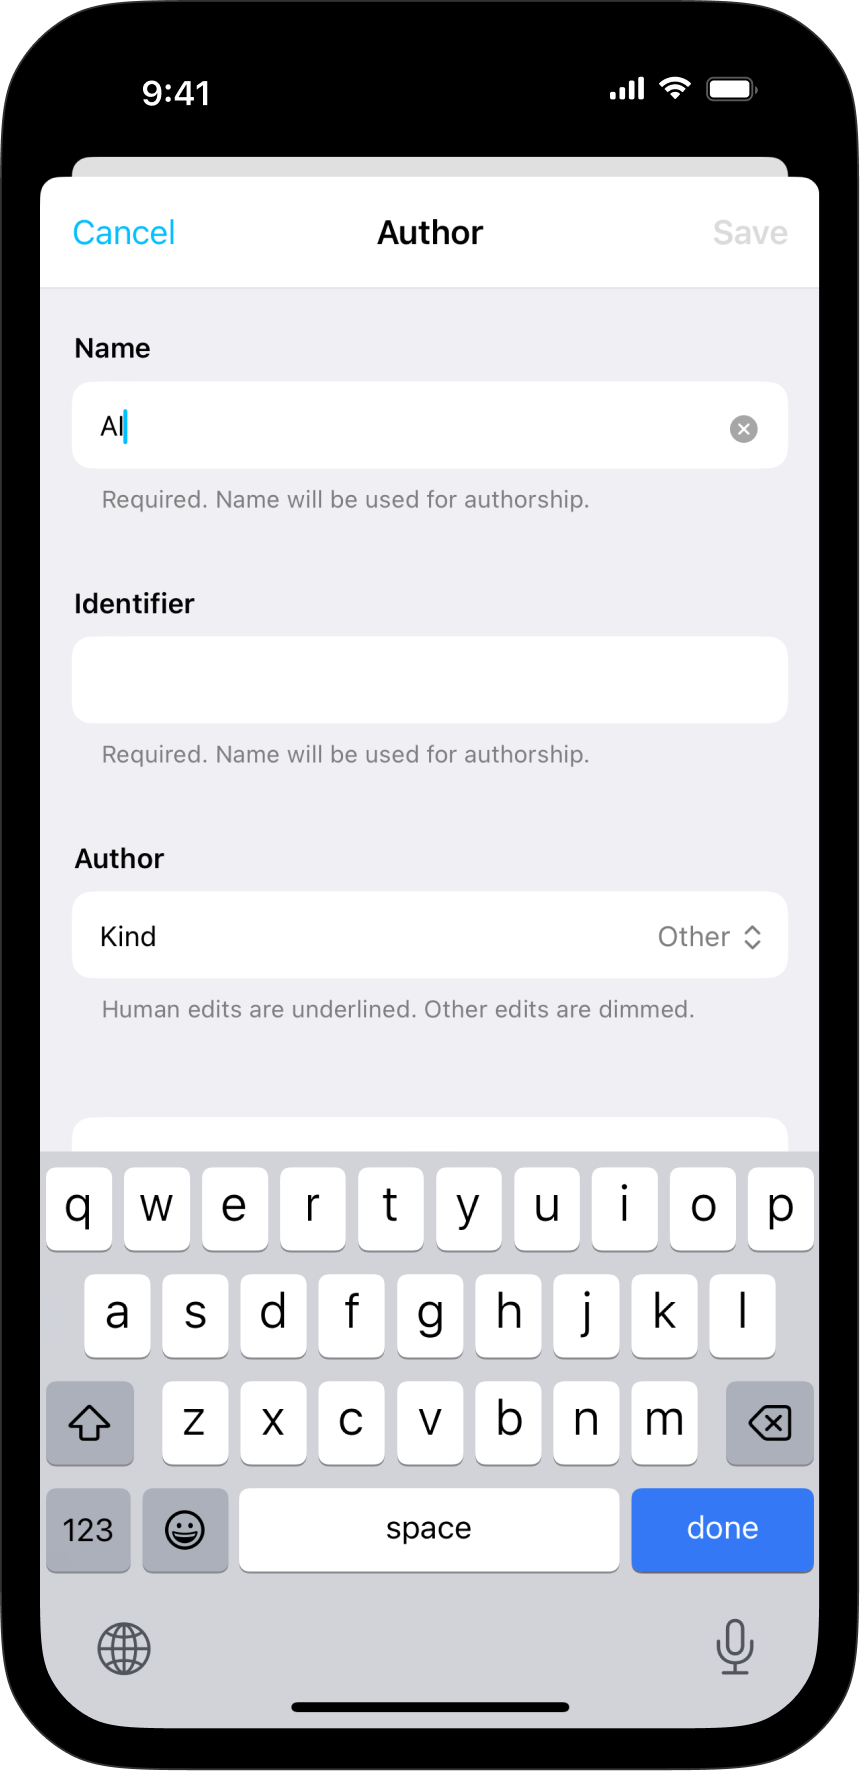
Click on the Add Author… to add a new author. You’ll be prompted to add a Name and can also add an identifier (like website, or email address). User the Kind dropdown to designate your author as Human or Other (i.e. Websource, AI, etc.).
When you are finished press Add to save details.
To remove an existing author, swipe left on the entry. Alternatively, select the author in the list, scroll down and click on Remove Author. Note the removing the author does not remove authorship assigned in existing documents. You can always re-add an author following steps in the section above.
💡 Authors sync to Writer on other devices with iCloud. If you add an author on one device, you’ll see it added everywhere, automatically.
In the Authors settings tap on desired author to edit:
| Name | Required. Name of the author. Paste and Mark menu options use this name. | |
| Identifier | Optional identifier for author. Can be used to assign a website, email, etc. Can also be used to differentiate authors with same name. | |
| Kind | Author type. Designate Human or Other for author. | |
You can reorder authors to change how they appear in menu options. Press and hold the ≡ and drag authors into desired order.
You can quickly access and manage the list of authors for any active document. With the document open in Editor tap on the filename in the toolbar then select Authorship.
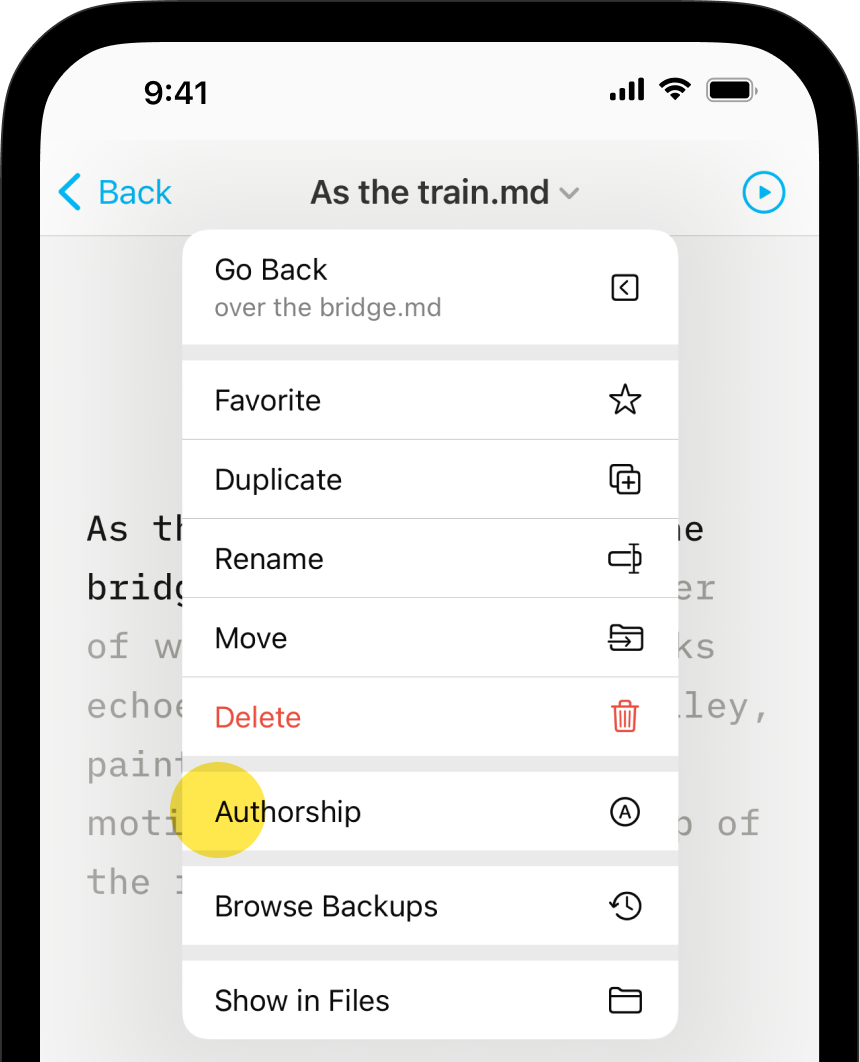
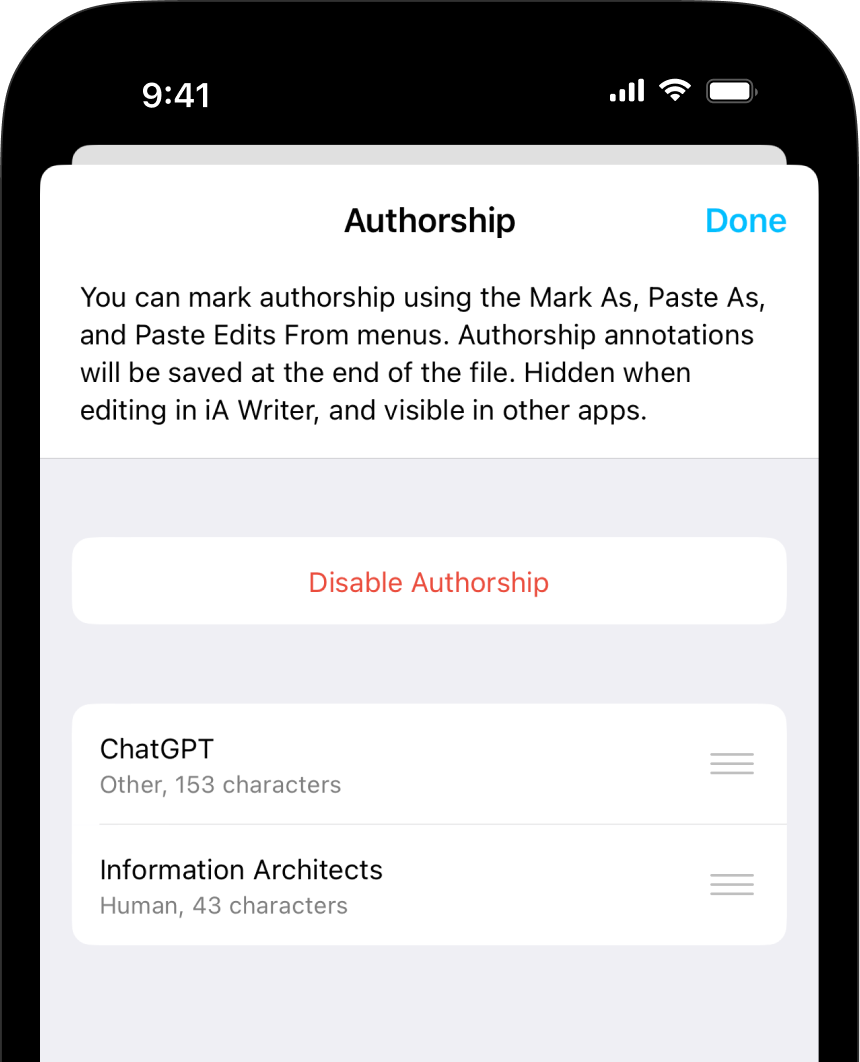
This will present a list of authors for the document as well as a character count for each author. You can also:
| Enable Authorship | Attributes subsequently typed text to you and allows for pasting or marking sections with authorship. | |
| Disable Authorship | Removes all authorship data from the file. | |
Tapping on a specific author will give you some additional options, like the ability to save, edit, replace or delete the author.
iA Writer stores author related metadata at the end of a file. This metadata is tucked out of view in Writer’s editor, but is visible when the file is opened in other text editors/apps.
You can quickly distinguish between files including authorship data and those without. When a file has authorship annotations added, the file icon shows a blue Ⓐ.
iA Writer stores author related metadata at the end of a file. This metadata is tucked out of view in Writer’s editor, but is visible when the file is opened in other text editors/apps.
iA Writer automatically strips author metadata on export to Markdown, HTML, PDF and MS Word.
When sharing annotated files via iPhoneOS sharing options (AirDrop, email, from Files, etc.), all file information including author metadata is shared.
iA Writer for iPad helps you to distinguish between Human generated text and Other sources (such as AI).
When the feature is enabled you can quickly see the difference in a document:
When you make edits to text as the primary author, your text remains in full focus and you can clearly see where your text ends and externally sourced content starts.
Note: Authorship does not modify your content in anyway and your text is not sent to a server to detect authors. Everything happens locally on your device: Your data is yours, in compliance with our Privacy Policy.
You can always mark a selection or paste as any type of author into a document. To see the distinction in the Editor you need to enable the appropriate Editor settings.
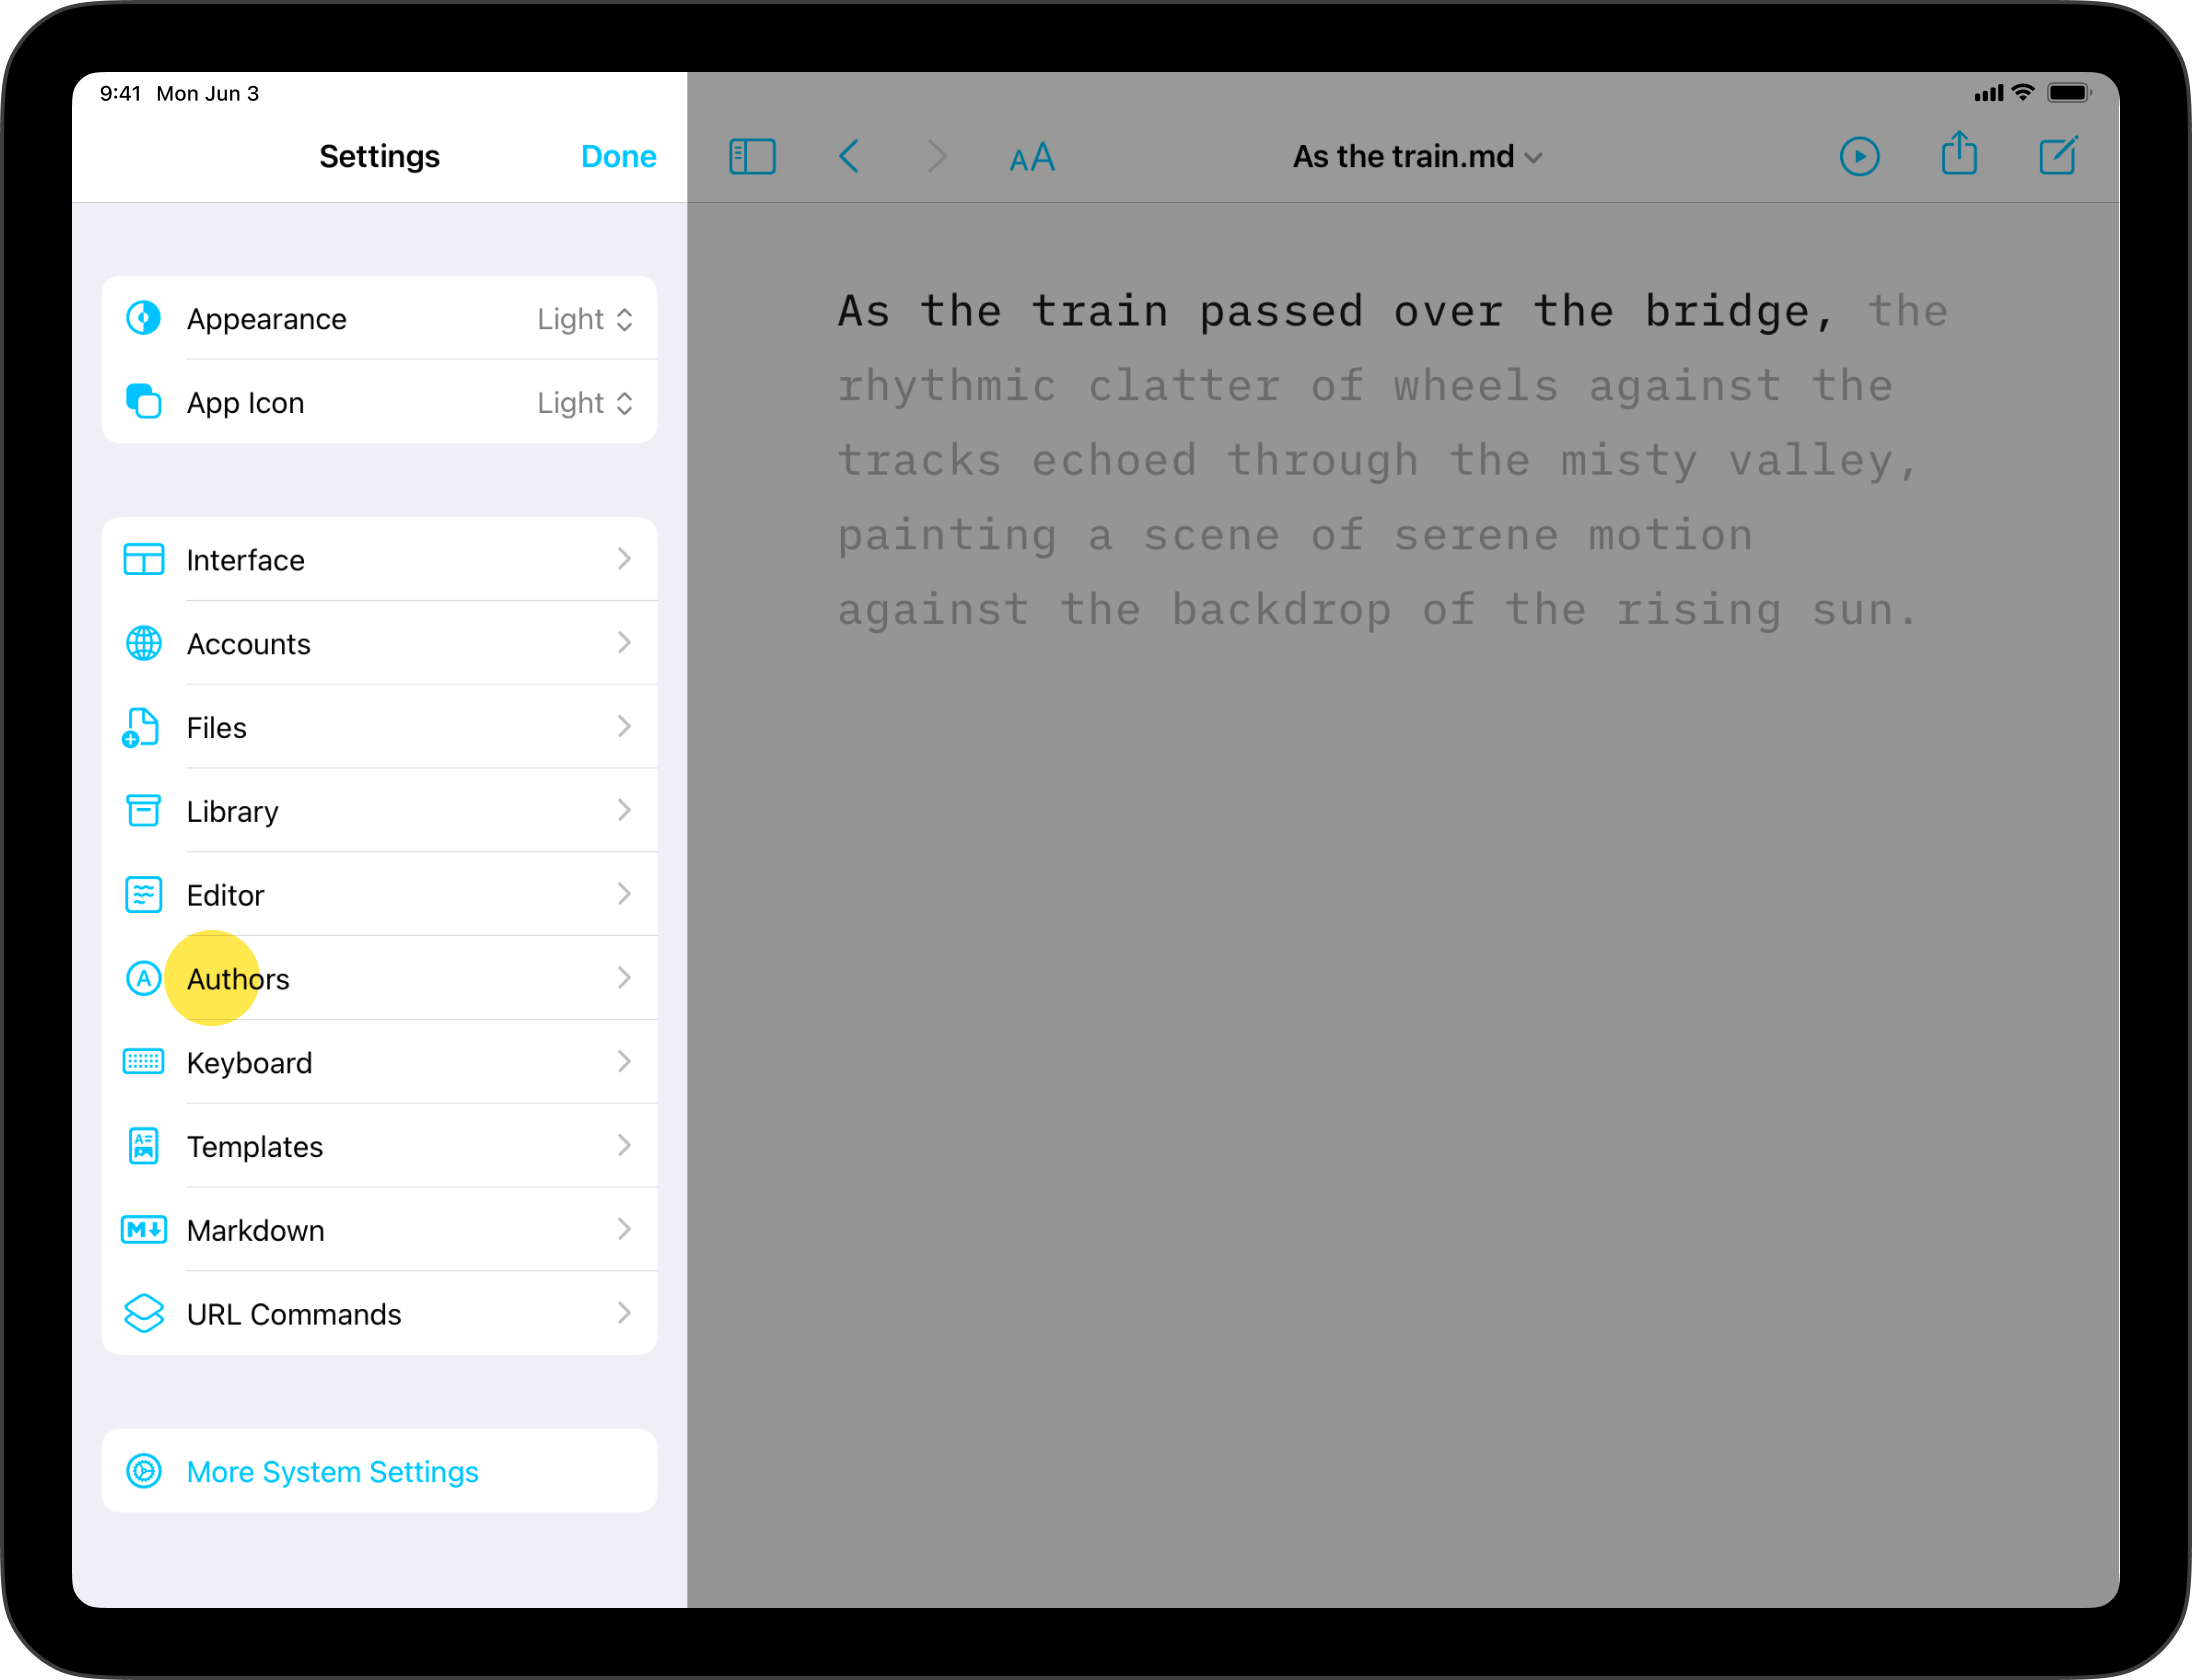
On iPad you can enable Authors in 3 ways:
| Settings | Editor → Authors | |
| AA | Show/Hide Authors | |
| Lightning Menu | Add Show/Hide Authors action | |
On iPad you can configure your Lightning menu with Authorship actions. Here’s how:
Actions are added to your Lightning menu for quick access at any time.
When you are just starting out with Authorship, we recommend adding the Paste as New Author and Mark as New Author actions to help you build your list of authors.
When you copy and paste a conversation from ChatGPT, the copied text contains “You” before every question, and “ChatGPT” before every answer. We recognize this pattern and offer to automatically mark authorship when coming from ChatGPT.
It’s really simple to use. After you’ve selected the text of your conversation, simply paste into the Editor. You’ll see a prompt letting you choose whether to paste with or without authorship.
Apart from ChatGPT, Writer will rely on you defining the authorship by yourself. Pasting content from an external source with Authorship attribution is easy.
Long-press in Editor → Select Paste As → {desired author}
With iA Writer 7+ you can now configure the Edit menu to add your most frequently used actions, including pasting and marking text selection. To configure, navigate to: Settings → Keyboard → Edit Menu:

You can also access pasting option from the Lightning menu if you have added Authors action.
Sometimes you may want to copy/move text from one document to another/ a new one. If your selected text contains author data, iA Writer will give you the option to Paste With Annotations or Paste:
| Paste With Annotations | Authorship information is retained and added at the end of the of the receiving document. | |
| Paste | Text is pasted without Authorship data. | |
When editing documents you can attribute existing text to a specific author. This is helpful not only for your own documents but also for shared/collaborative documents when you wish to clearly discern between authors.
When any range of text is selected in Editor, you’ll see the Mark As option present in the Edit menu. Simply tap that then select the desired author.

Marking options are also available via the Lightning menu **Authors** action if it is enabled.
Managing a list of authors is easy in Writer. You can access this function in: Settings → Authors
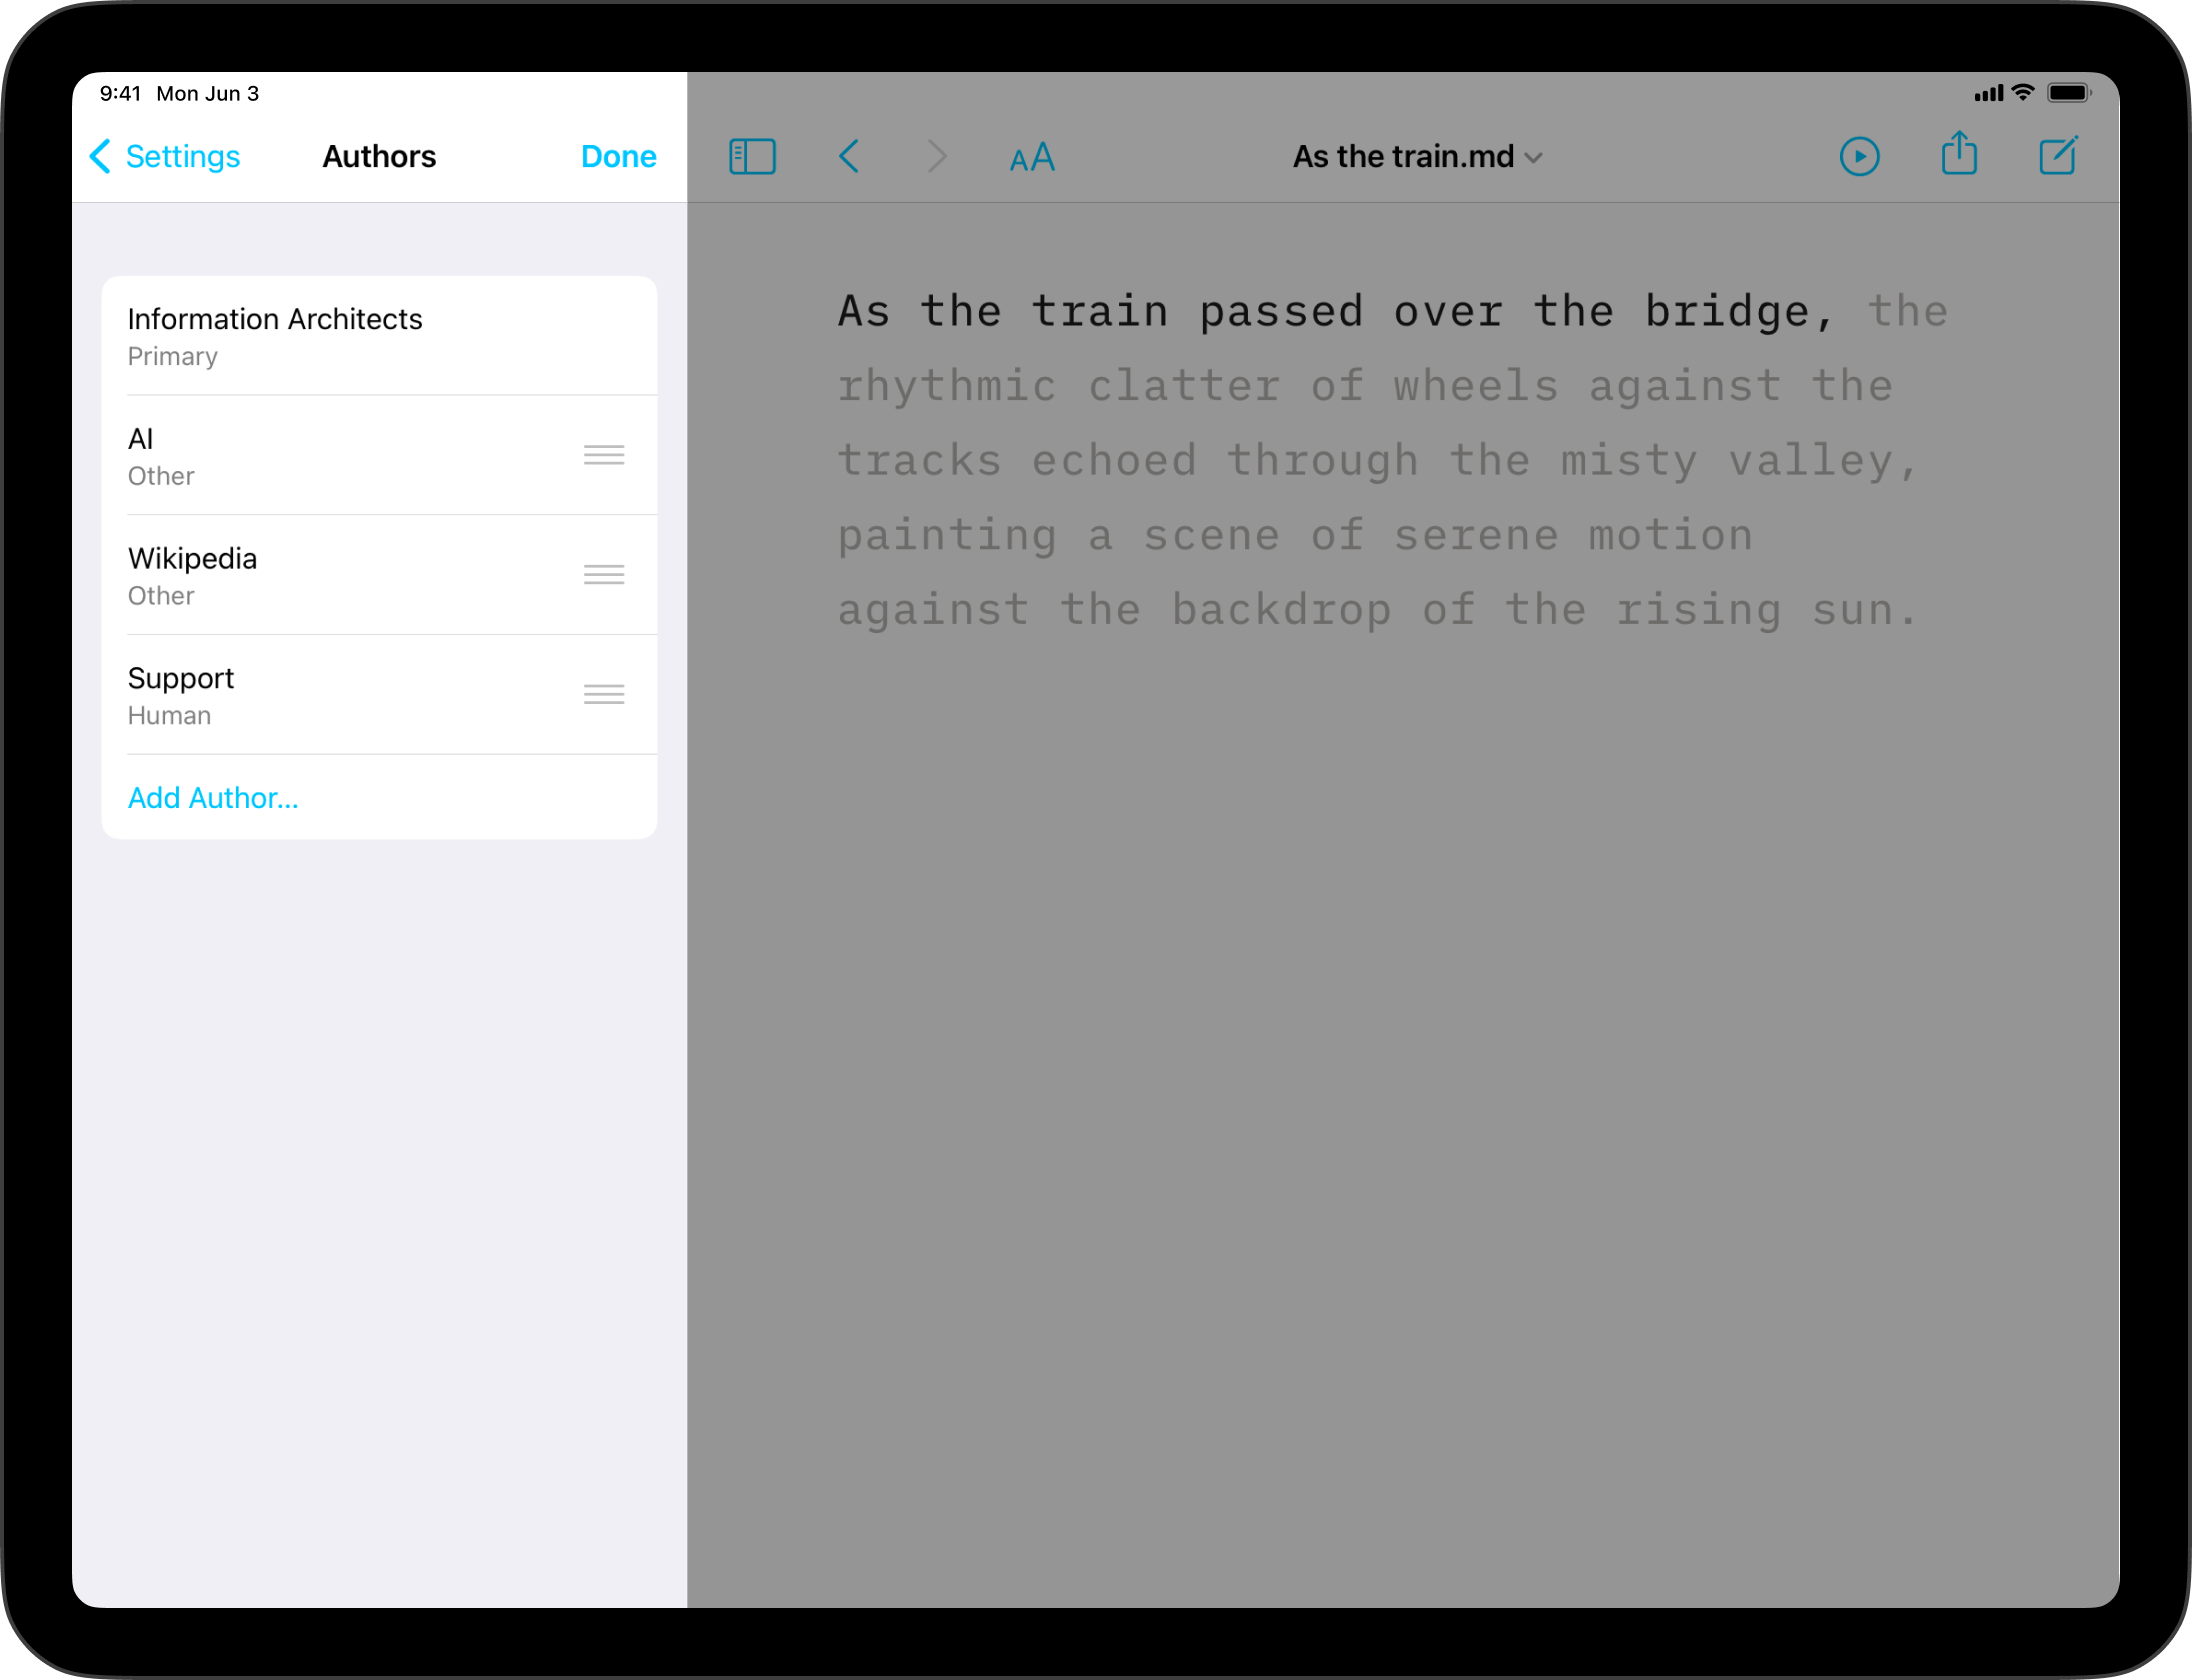
In Authors settings you can:
Click on the Add Author… to add a new author. You’ll be prompted to add a Name and can also add an identifier (like website, or email address). User the Kind dropdown to designate your author as Human or Other (i.e. Websource, AI, etc.).
When you are finished press Add to save details.
To remove an existing author, swipe left on the entry. Alternatively, select the author in the list, scroll down and click on Remove Author. Note the removing the author does not remove authorship assigned in existing documents. You can always re-add an author following steps in the section above.
💡 Authors sync to Writer on other devices with iCloud. If you add an author on one device, you’ll see it added everywhere, automatically.
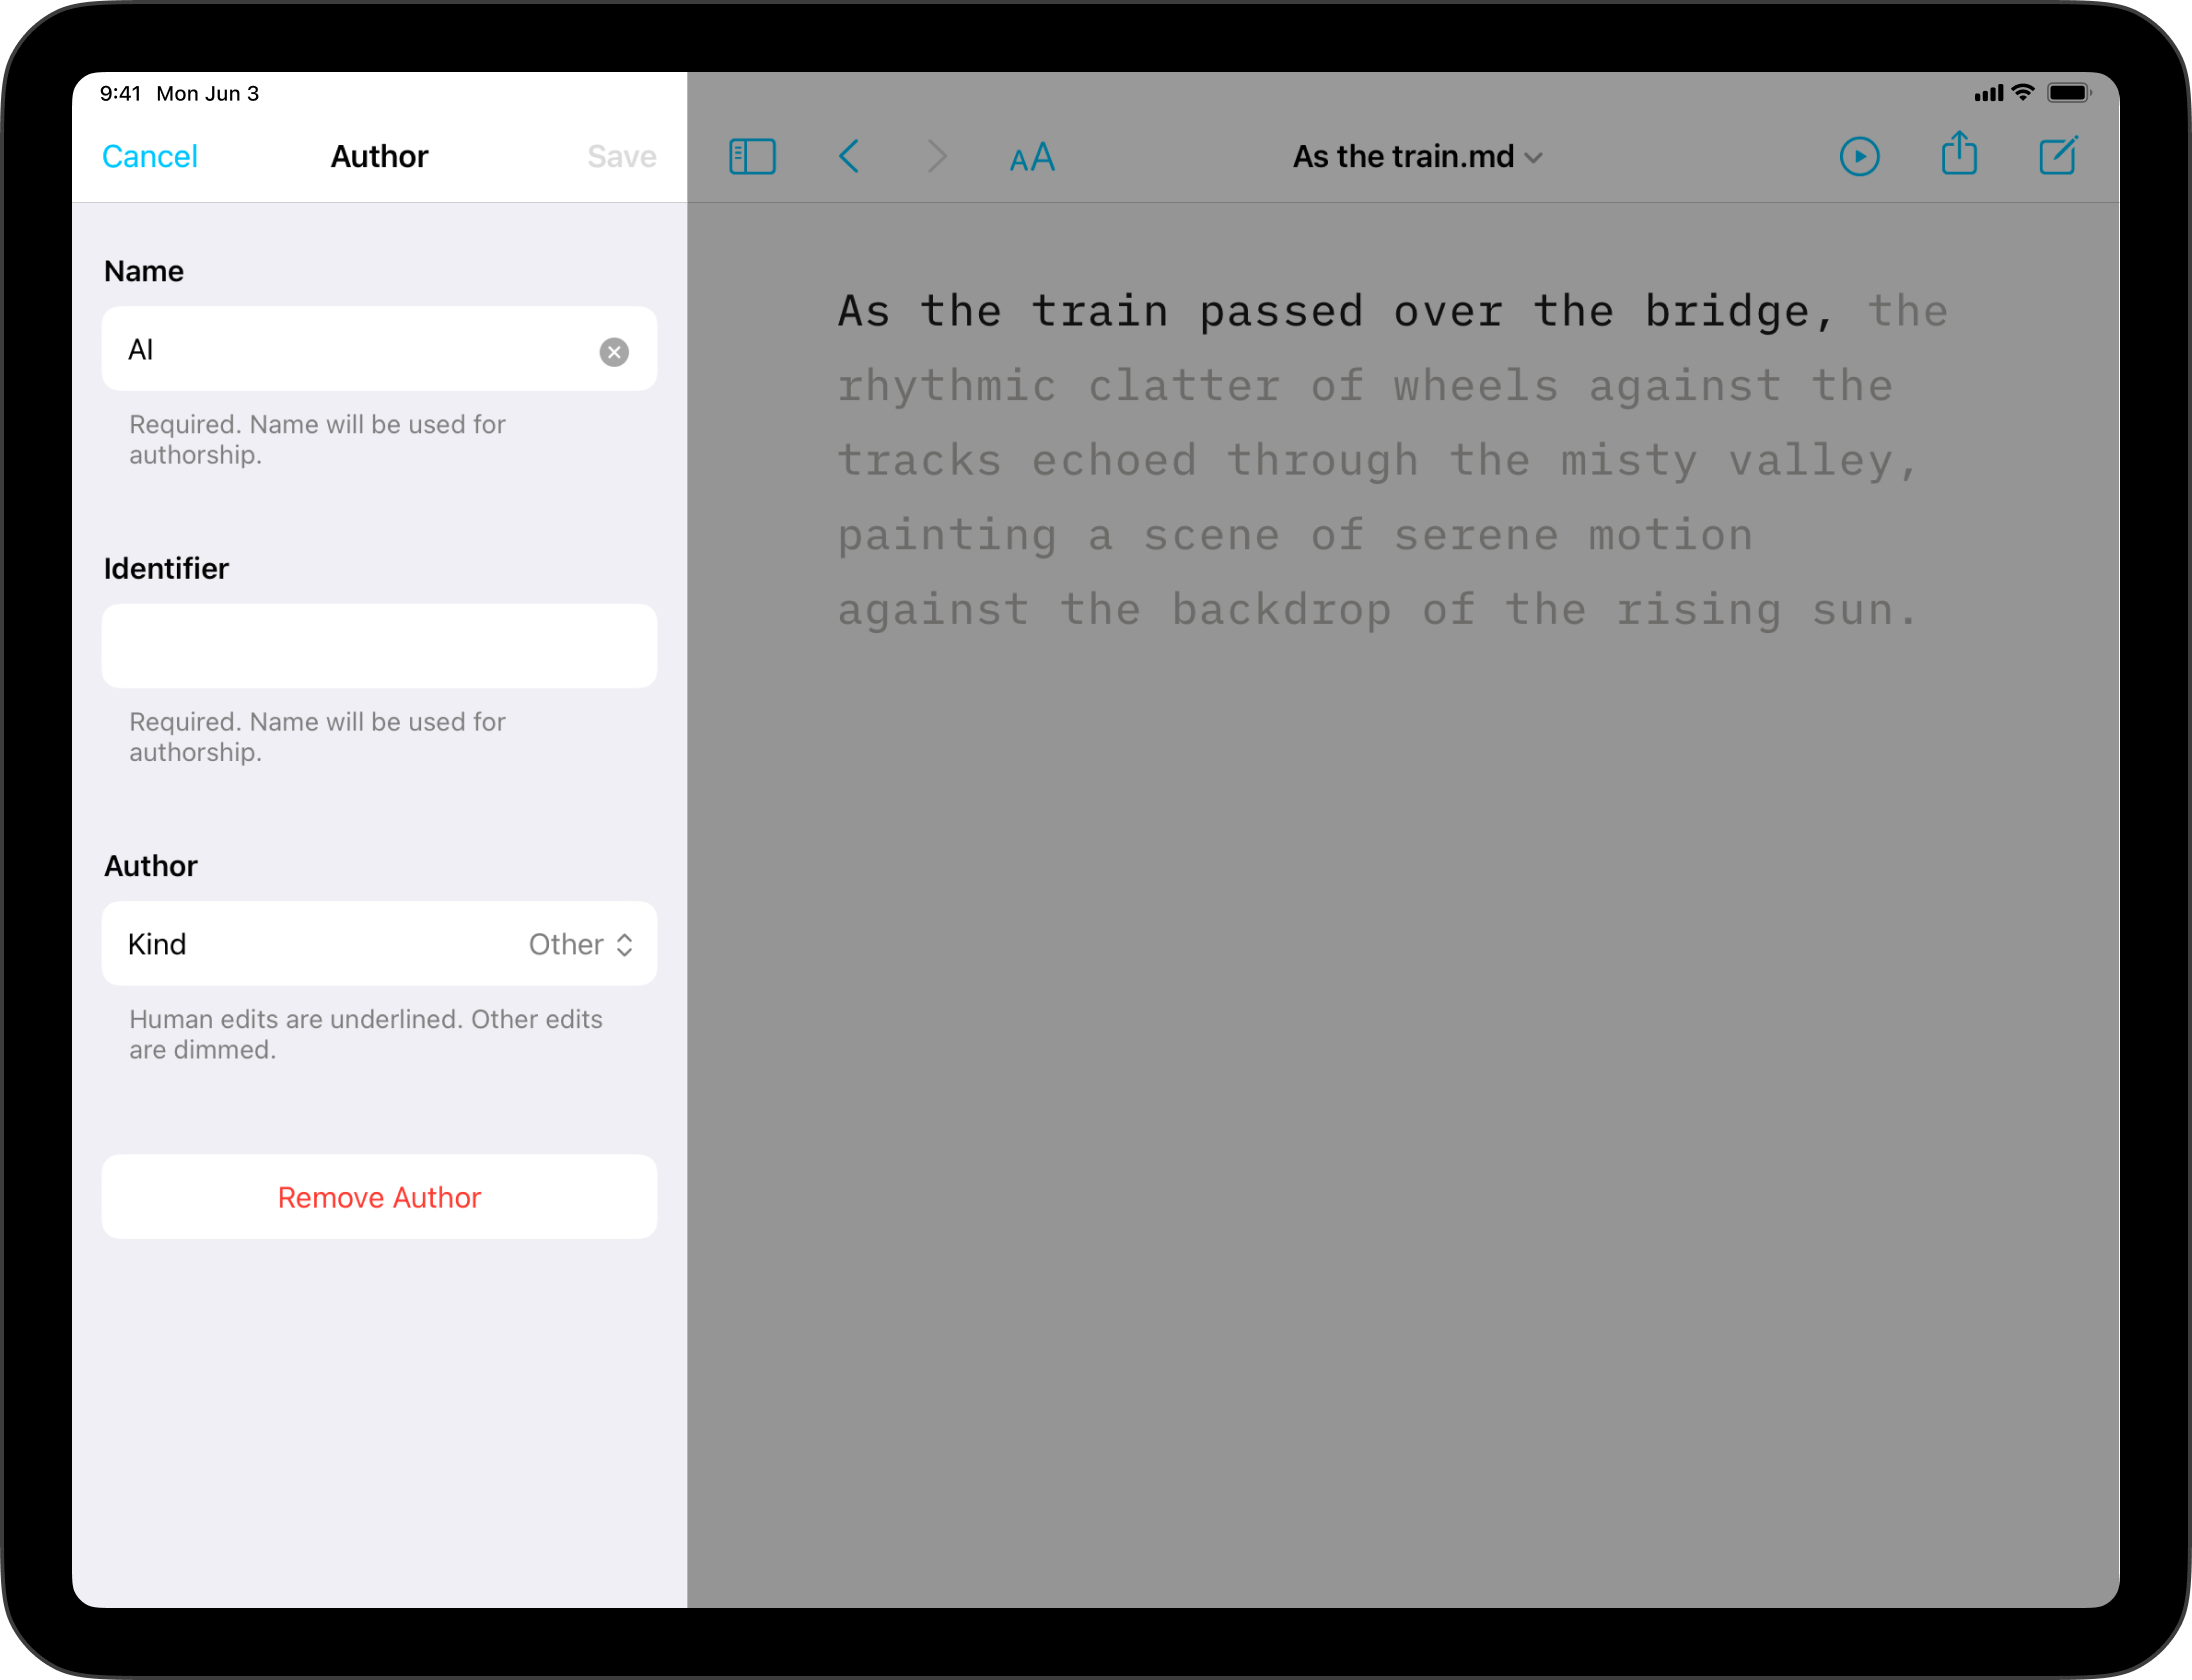
In the Authors settings tap on desired author to edit:
| Name | Required. Name of the author. Paste and Mark menu options use this name. | |
| Identifier | Optional identifier for author. Can be used to assign a website, email, etc. Can also be used to differentiate authors with same name. | |
| Kind | Author type. Designate Human or Other for author. | |
You can reorder authors to change how they appear in menu options. Press and hold the ≡ and drag authors into desired order.
You can quickly access and manage the list of authors for any active document. With the document open in Editor tap on the filename in the toolbar then select Authorship.
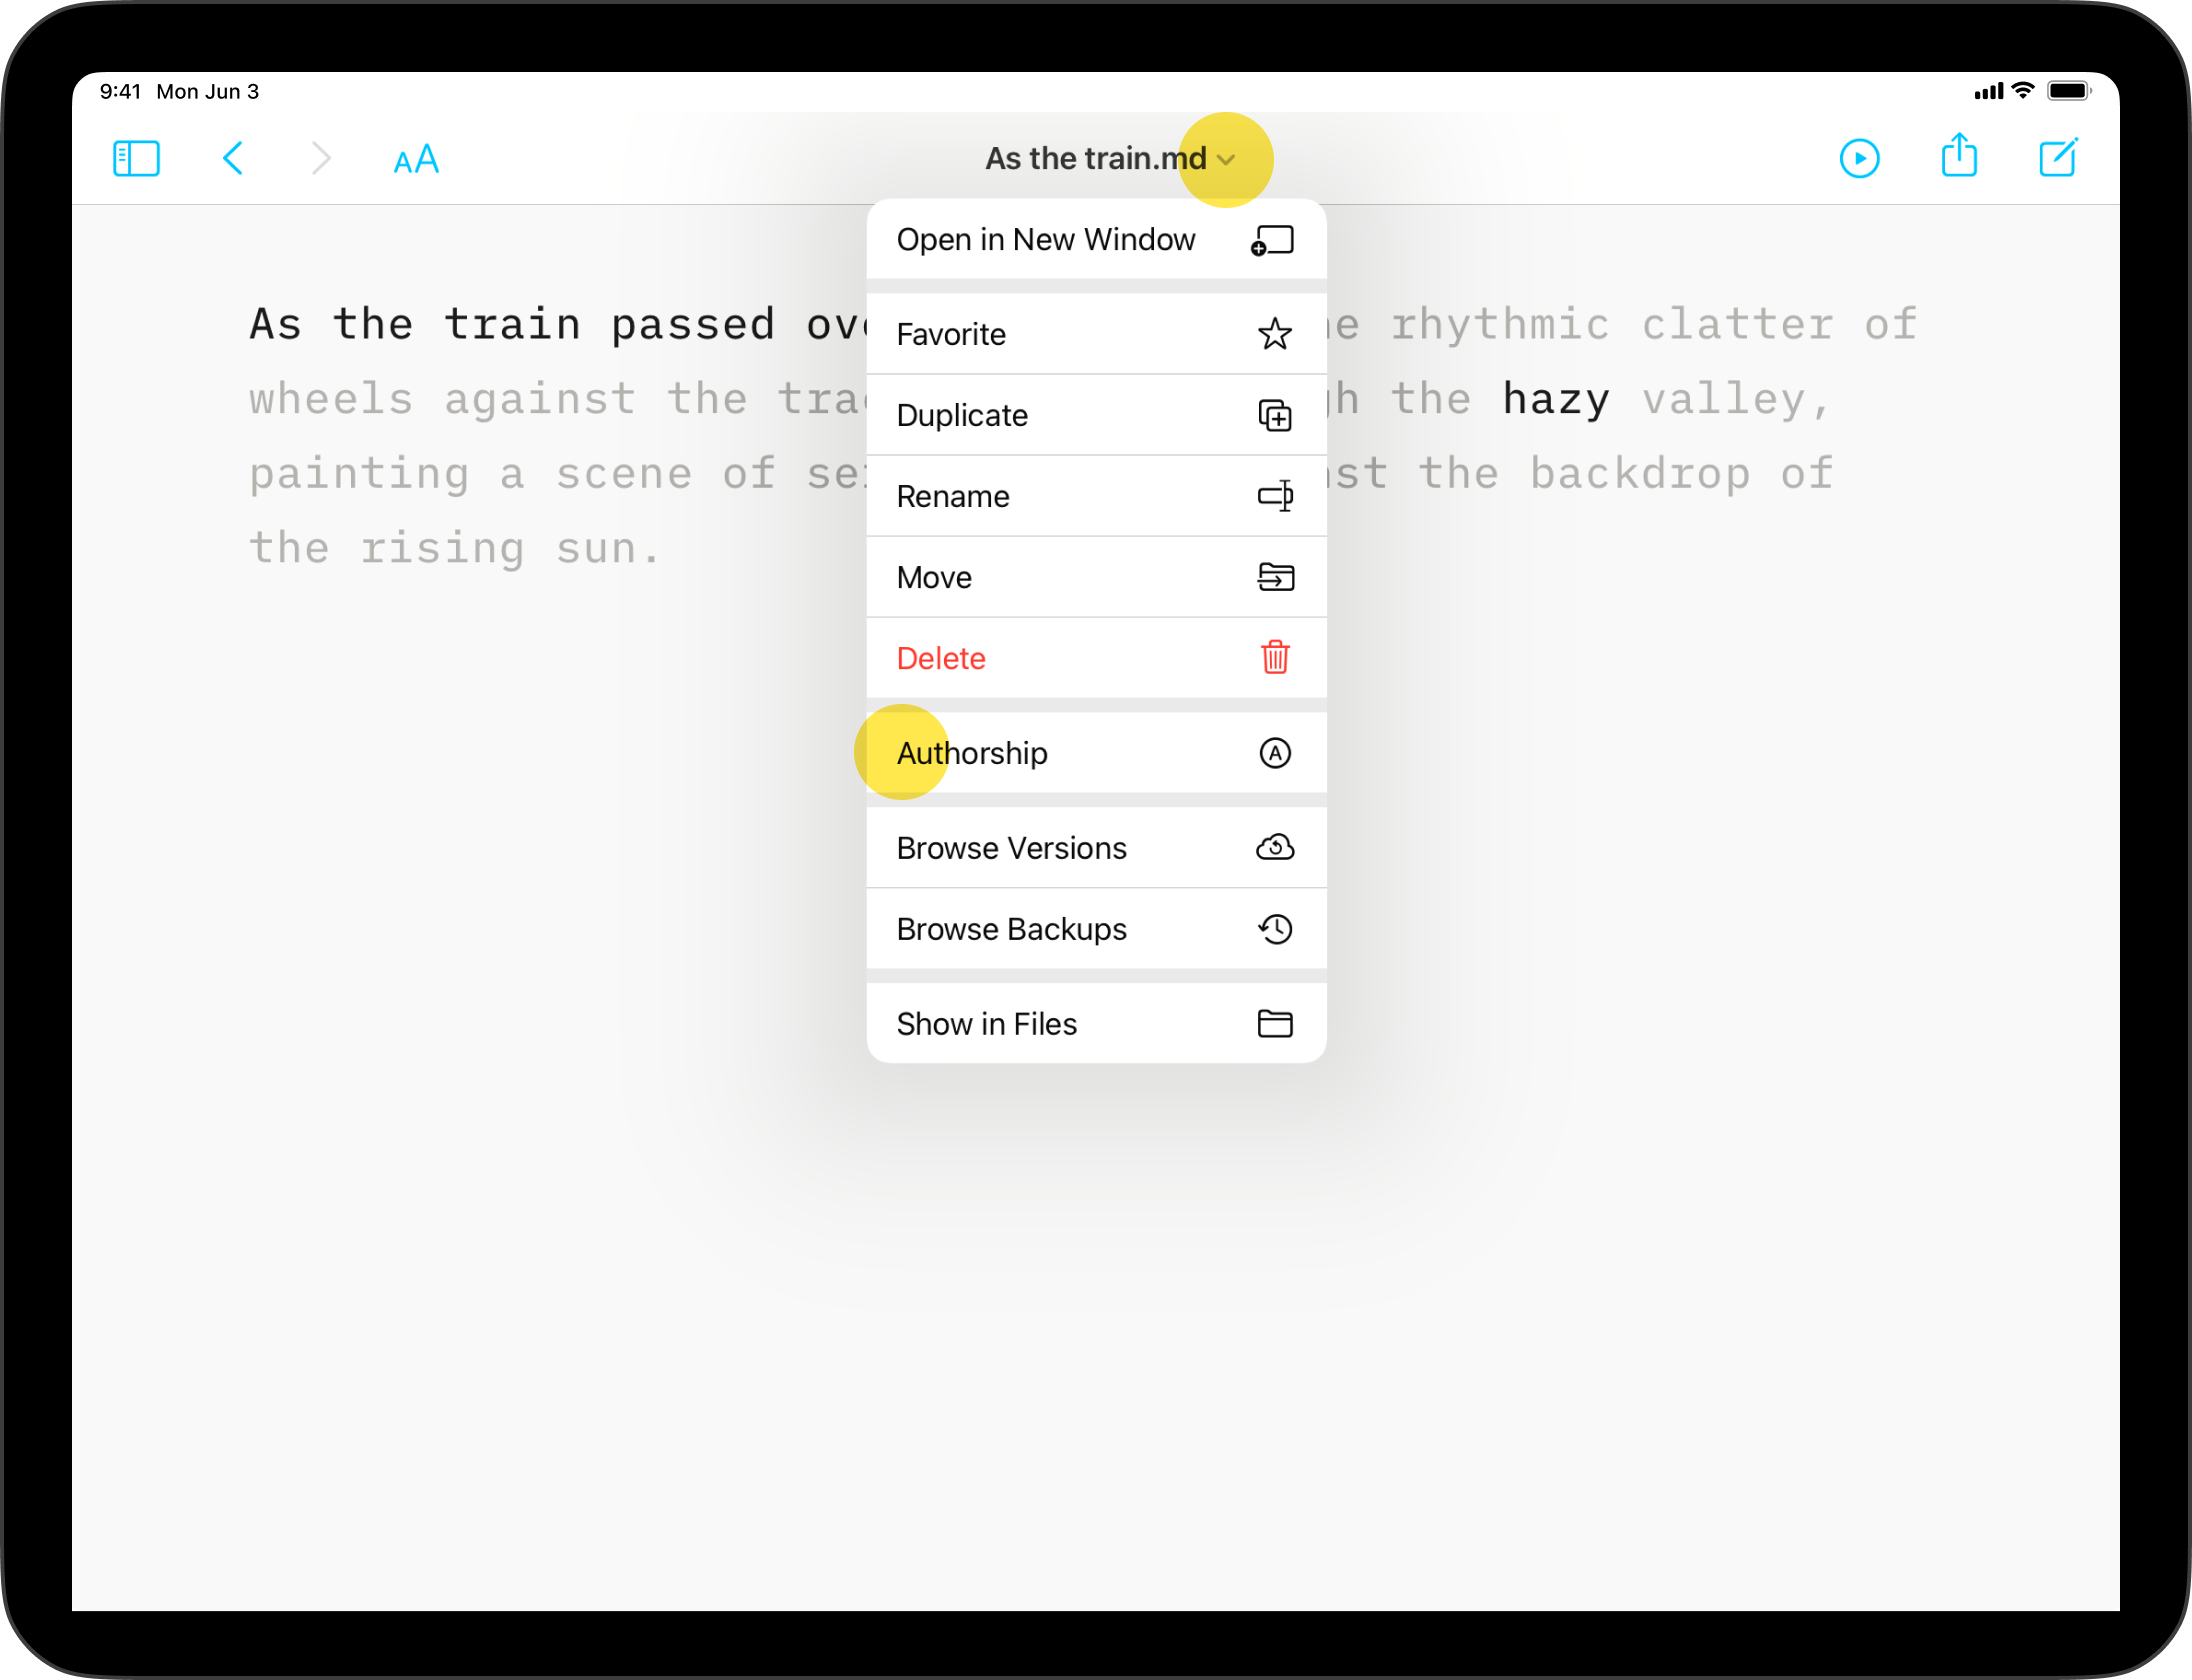
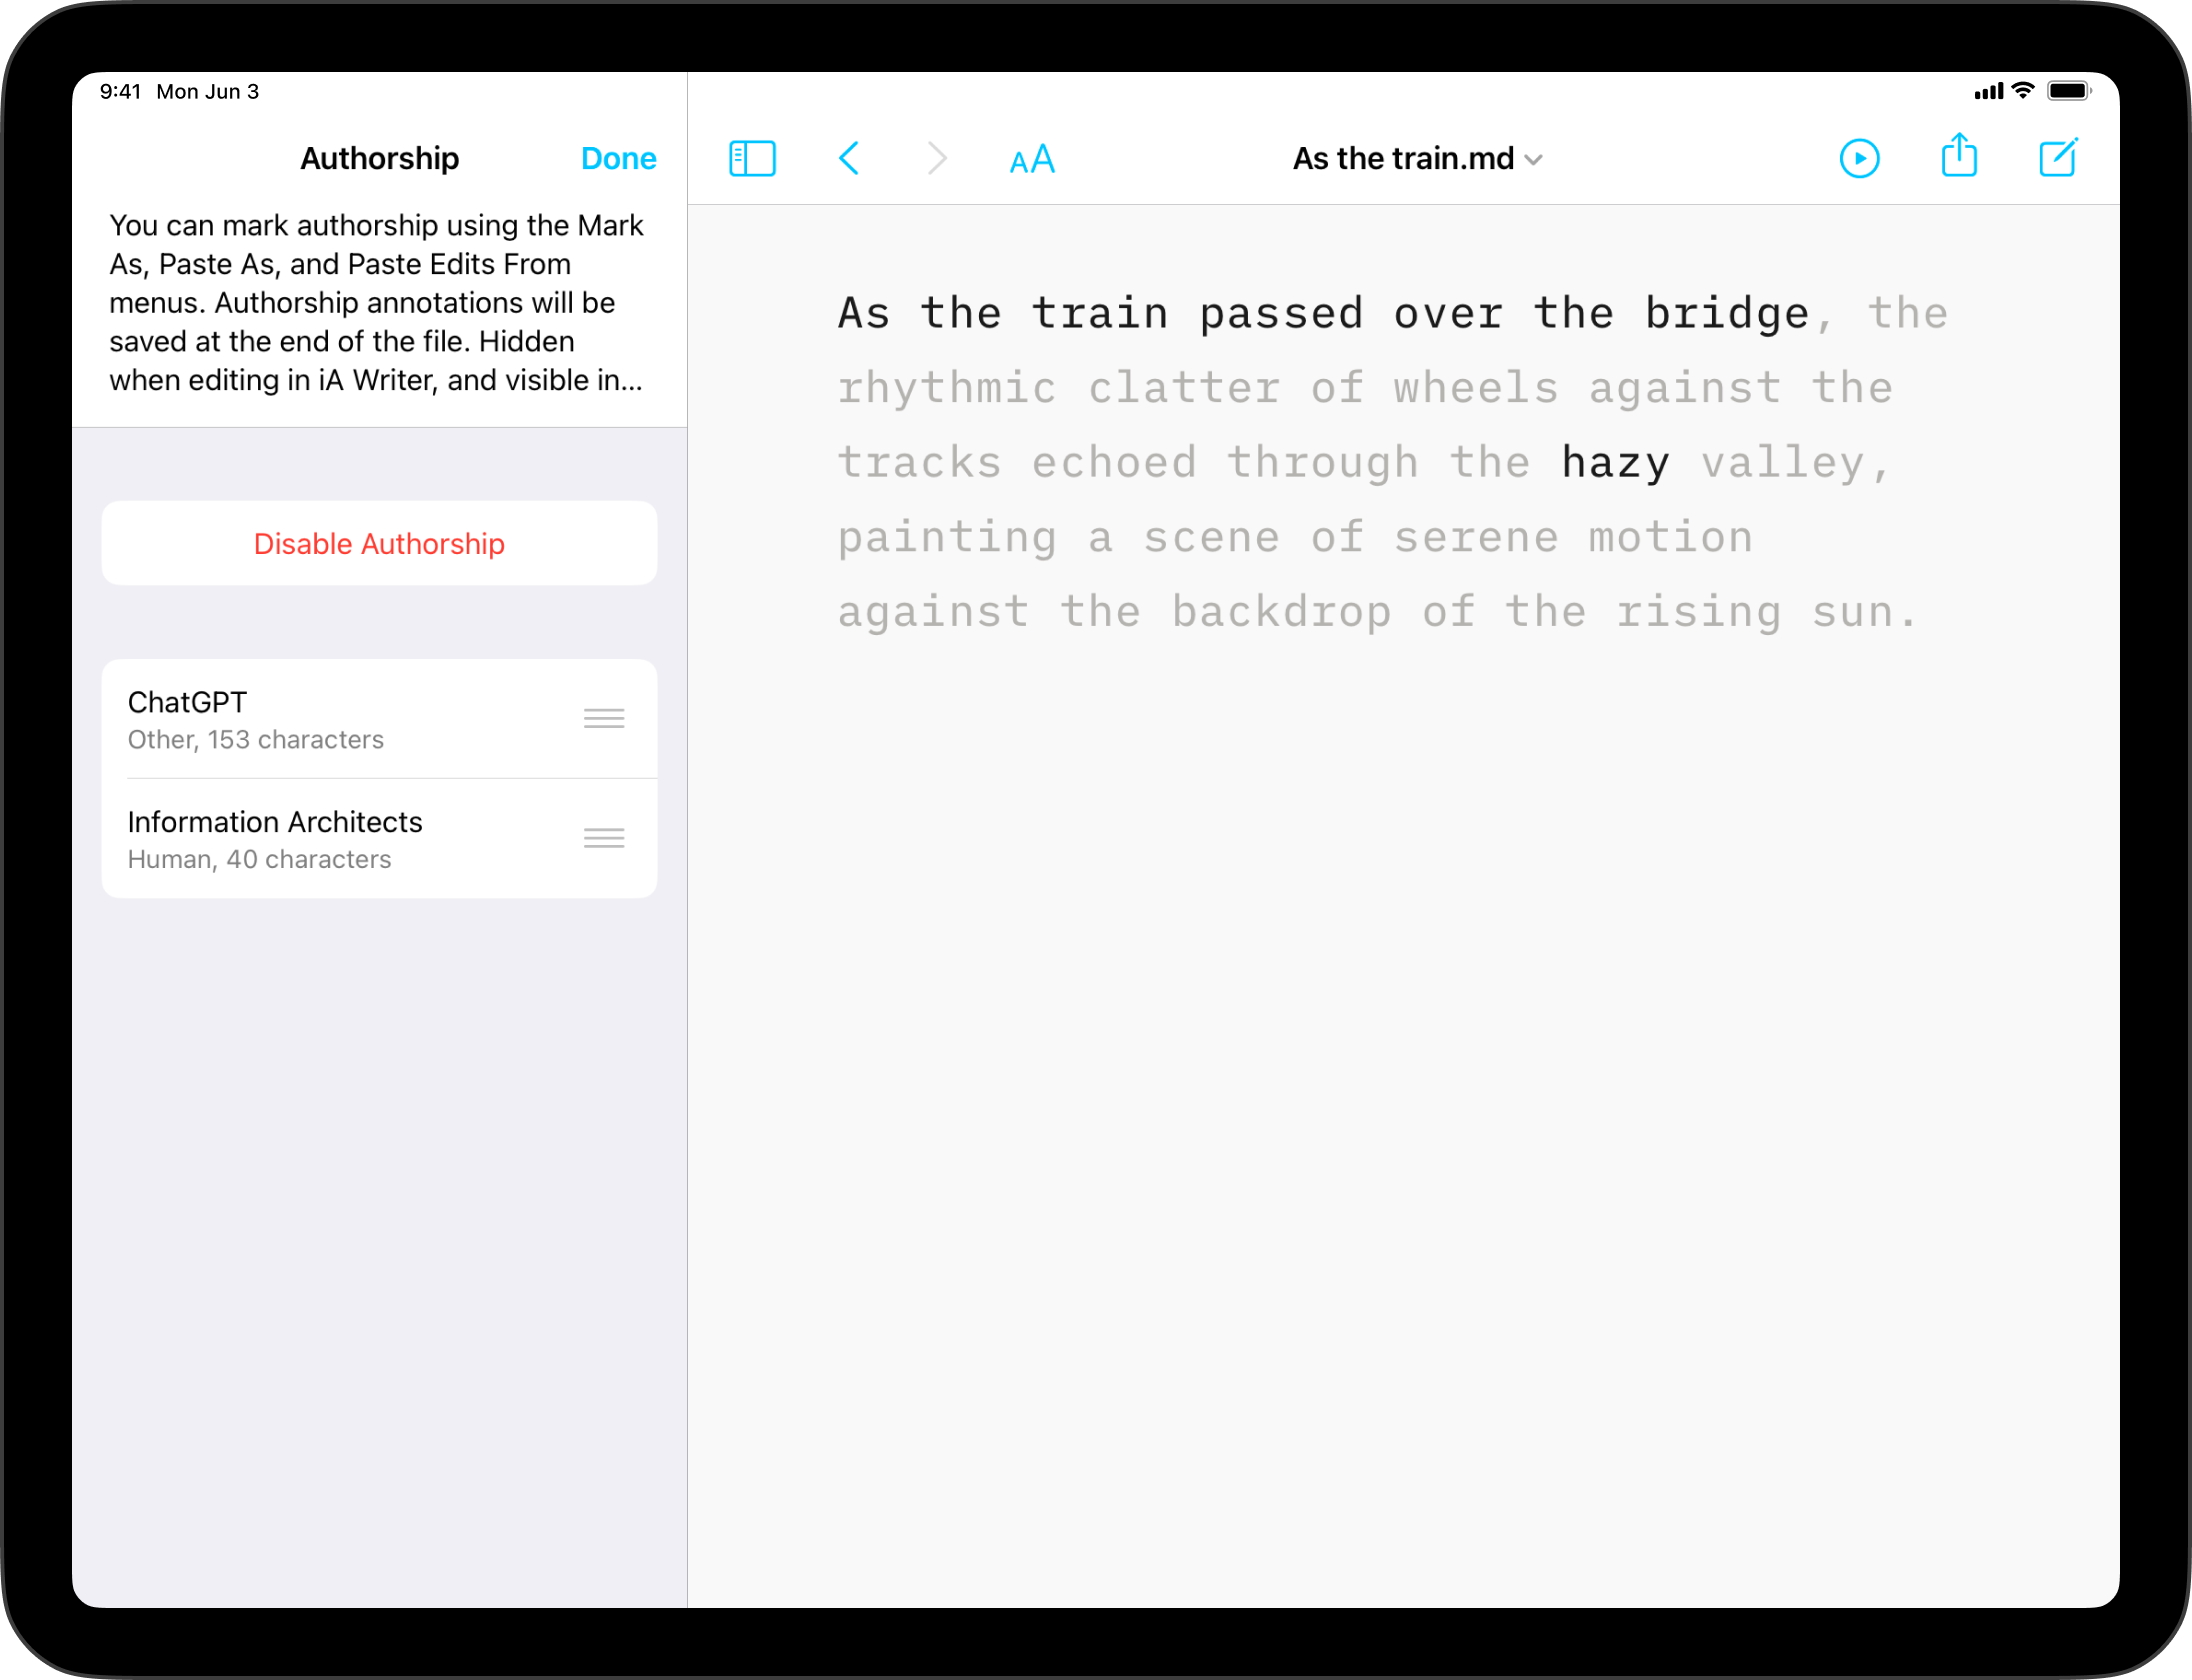
This will present a list of authors for the document as well as a character count for each author. You can also:
| Enable Authorship | Attributes subsequently typed text to you and allows for pasting or marking sections with authorship. | |
| Disable Authorship | Removes all authorship data from the file. | |
Tapping on a specific author will give you some additional options, like the ability to save, edit, replace or delete the author.
iA Writer stores author related metadata at the end of a file. This metadata is tucked out of view in Writer’s editor, but is visible when the file is opened in other text editors/apps.
You can quickly distinguish between files including authorship data and those without. When a file has authorship annotations added, the file icon shows a blue Ⓐ.
iA Writer stores author related metadata at the end of a file. This metadata is tucked out of view in Writer’s editor, but is visible when the file is opened in other text editors/apps.
iA Writer automatically strips author metadata on export to Markdown, HTML, PDF and MS Word.
When sharing annotated files via iPadOS sharing options (AirDrop, email, from Files, etc.), all file information including author metadata is shared.
If you are experiencing a problem that our support section doesn’t solve please reach out to us. We take a break on the weekends (JST), but during weekdays we aim to reply within 1-2 business days.
Shut down distractions. Focus on the sentence or paragraph you’re currently working on.
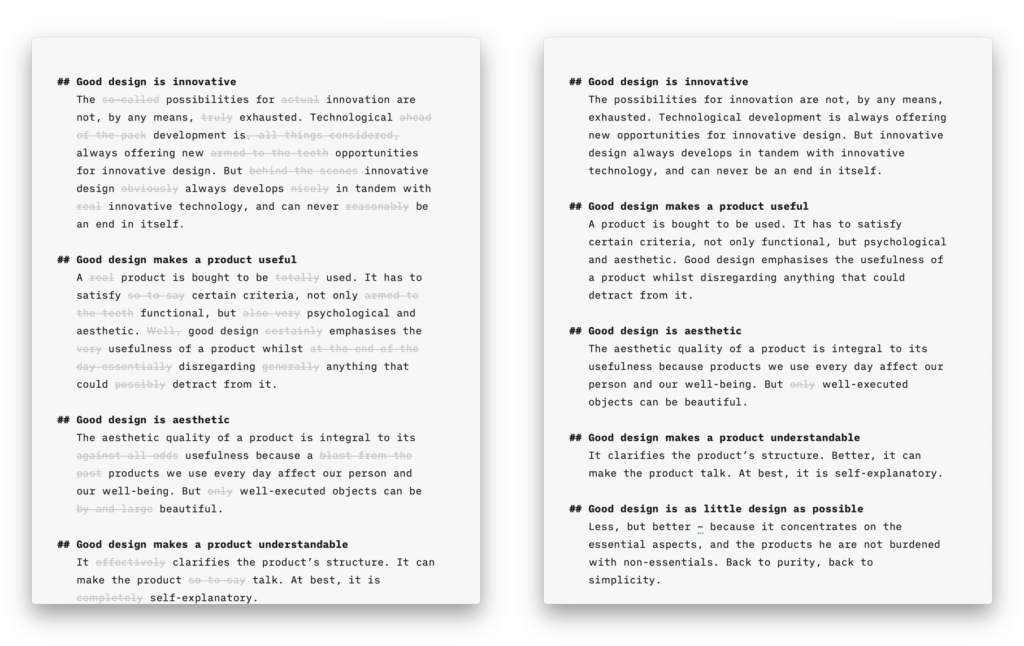
Highlight the text you craft yourself and keep track of your sources, artificial or natural.
A personal editor-in-chief on your device, carefully reviewing your text for redundancies, clichés, and filler words.

A more structured view of your document will help you improve your writing style.
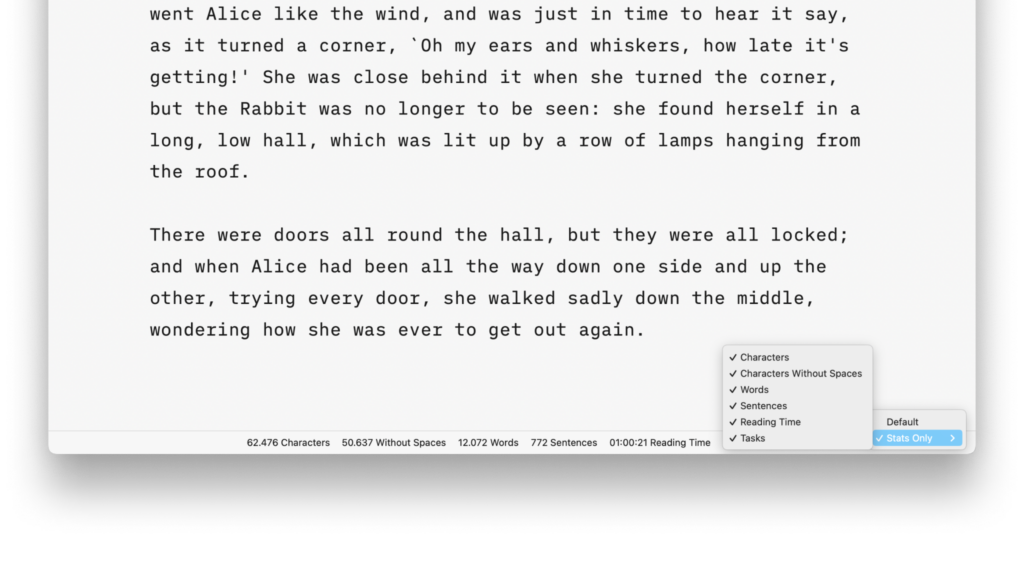
From word count to estimated reading time, document stats help you stay on top of things.
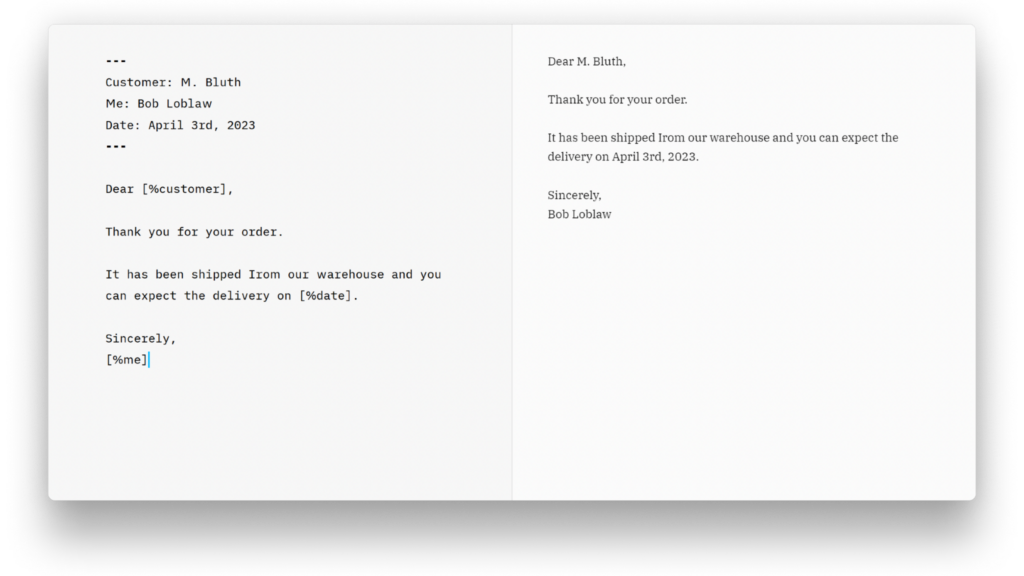
A simple key-value format for storing additional information about a document, only visible in the Editor.
Auto text completion and transformation: focus on your writing, without getting bogged down by minor details.